top button
Flag Notify
    Connect to us
      Site Registration

Site Registration

Posting Multiple Pieces Of Data To Web API

+4 votes
293 views

Web API allows you to create RESTful services easily. A typical Web API implements GET, POST, PUT and DELETE verbs by writing methods intended to handle each of these HTTP verbs. Although the actual method implementation can be anything as per your application requirement, you need to follow certain method signatures. For example, consider the following methods:

public void Post(MyClass data)
{
  //do something with emp and cust here.
}

public void Put(int id, MyClass data)
{
  //do something here.
}

The above code shows the template for Post() and Put() methods. The Post() method signature accepts the data accompanying the request as MyClass object. You can't have multiple parameters to Post() method. On the same lines the Put() method accepts the request data as the second parameter. Here again you can't have more parameters to receive the data. In short, a request to Web API wraps the data accompanying the request in one single object.

At times, however, you need to pass multiple independent pieces of information to the Web API. This poses a limitation to developers. You can overcome this problem in two ways:

  • Accept data as array or ArrayList of objects.
  • Create a class that wraps all the individual pieces and receive data as an instance of that class.

Let's see how these approaches look like at code level. Suppose you have two classes - Employee and Customer - as shown below:

public class Employee
{
  public int EmployeeID { get; set; }
  public string FirstName { get; set; }
  public string LastName { get; set; }
}

public class Customer
{
  public string CustomerID { get; set; }
  public string CompanyName { get; set; }
}

The Employee class has three properties namely EmployeeID, FirstName and LastName. The Customer class has two properties namely CustomerID and CompanyName. Now assume that you will be calling a Web API to store an Employee and a Customer into the database. In this example, let's assume you will be using jQuery to call the Web API (the approach remains the same even with HttpClient).

Next, consider the following Web API method:

public void Post(object[] data)
{
 Employee emp = JsonConvert.DeserializeObject<Employee>(data[0].ToString());
 Customer cust = JsonConvert.DeserializeObject<Customer>(data[1].ToString());

 //do something with emp and cust here.
}

As you can see the Post() method has one parameter of type object array. If you want you can also use ArrayList instead of plain array. Inside, the code uses Json.NET to deserialize individual objects into their respective types. Of course, in this case you must ensure that the object array contains the objects in a specific sequence. In this example, Employee object must be available at index 0 and Customer object at index 1. Once you get the Employee and Customer objects you can store them into a database or process them any way you want.

The client side jQuery code that calls this Web API method is as follows:

$(document).ready(function () {
  var objEmployee = {};
  objEmployee.EmployeeID = 1;
  objEmployee.FirstName = "Nancy";
  objEmployee.LastName = "Davolio";

  var objCustomer = {};
  objCustomer.CustomerID = "ALFKI";
  objCustomer.CompanyName = "Alfreds Futterkiste";

  var strFinal = "[" + JSON.stringify(objEmployee) + "," + 
                       JSON.stringify(objCustomer) + "]";

  var options = {};
  options.url = "/api/Values";
  options.type = "POST";
  options.data = strFinal;
  options.dataType = "json";
  options.contentType = "application/json";
  options.success = function () { alert("Success"); };
  options.error = function () { alert("Error"); };

  $.ajax(options);
});

 The above jQuery code creates a JavaScript object that mimics the Employee class on the server. It sets the EmployeeID, FirstName and LastName properties of the object to 1, Nancy and Davolio respectively. On the same lines another JavaScript object is created that mimics the Customer object on the server. The CustomerID and CompanyName properties of this object are set to ALFKI and Alfreds Futterkiste respectively. Then these two JavaScript objects are combined to form an array in JSON format. The strFinal variable holds this array. A sample array looks like this:

[
  {
    "EmployeeID" : 1,
    "FirstName"  : "Nancy",
    "LastName"   : "Davolio"
  }
  ,
  {
    "CustomerID" : "ALFKI",
    "CompanyName"  : "Alfreds Futterkiste"
  }
]

Then an Ajax call is made to the Web API. The options object provides all the settings required to make the call. The type property of the options object points to the Web API (/api/Values) in this case. The type property indicates the type of request (POST in this case). The data property is set to the strFinal variable. The dataType and contentType properties are set to json and application/json respectively. The success and error properties simply point to functions that display a message using an alert dialog. Finally, jQuery $.ajax() is used to invoke the Web API.

To test this code, run the application after setting a breakpoint in the Post() method. The following figure shows how the data is received in the object array:

image

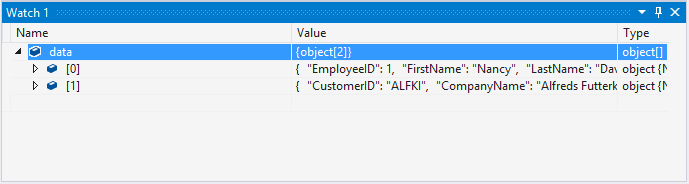
As you can see the data array has two elements. Each element is of type string. The string represents the JSON representation of the respective object.

In the second approach you can wrap the Employee and Customer objects into another class, say EmployeeCustomer, as shown below:

public class EmployeeCustomer
{
  public Employee EmployeeData { get; set; }
  public Customer CustomerData { get; set; }
}

The EmployeeCustomer class has two properties - EmployeeData and CustomerData - that are of type Employee and Customer respectively. The Post() method signature is like this:

public void Post(EmployeeCustomer data)
{
  Employee emp = data.EmployeeData;
  Customer cust = data.CustomerData;
  //do something with emp and cust here.
}

In this case Post() accepts a parameter of type EmployeeCustomer. To call this Web API method from the client side you can use the following jQuery code:

$(document).ready(function () {
  var objEmployee = {};
  objEmployee.EmployeeID = 1;
  objEmployee.FirstName = "Nancy";
  objEmployee.LastName = "Davolio";

  var objCustomer = {};
  objCustomer.CustomerID = "ALFKI";
  objCustomer.CompanyName = "Alfreds Futterkiste";

  var strFinal = JSON.stringify({ 
                 EmployeeData: objEmployee, 
                 CustomerData: objCustomer });

  var options = {};
  options.url = "/api/Values";
  options.type = "POST";
  options.data = strFinal;
  options.dataType = "json";
  options.contentType = "application/json";
  options.success = function () { alert("Success"); };
  options.error = function () { alert("Success"); };

  $.ajax(options);
});

Most of the code shown above is identical to the previous example except the line marked in bold letters. This time you create a JavaScript object with two properties - EmployeeData and CustomerData. You set these properties to the objEmployee and objCustomer respectively. The strFinal variable contains the JSON representation of this JavaScript object.

When you run the above code after setting a breakpoint at the Post() method you will see the EmployeeCustomer object as follows:

image

As you can see the EmployeeData and CustomerData properties of the EmployeeCustomer object are populated as expected.

posted Nov 3, 2016 by Shivaranjini

  Promote This Article
Facebook Share Button Twitter Share Button LinkedIn Share Button


Related Articles

ASP.NET Web API map HTTP verbs to an action method. The Web API actions must follow prescribed signatures in order to work as expected. For example, a Web API method handling POST requests usually takes a single parameter. More often than not this parameter is of a complex type that wraps the actual pieces of data in its properties. This arrangement goes well when you know the exact model being passed by a client (see below).

public string Post(Customer obj)
{
 ...
}

However, this arrangement is of no use when a client is sending arbitrary pieces of data not mapping to any model. Luckily, Web API provides a way to deal with such data. This article discusses just that.

Consider a case where a Web API is expecting data to be inserted in a table from a client. The data in question consists of arbitrary pieces of information and can't be mapped to a predefined model class. In such cases you can make use of FormDataCollection class. The FormDataCollection class resides in System.Net.Http.Formatting namespace and represents a dictionary of arbitrary keys and values.

The FormDataCollection class should not be confused with the FormCollection class of ASP.NET MVC. They reside in different namespaces. The FormDataCollection resides in System.Net.Http.Formatting whereas FormCollection resides in System.Web.Mvc namespace.

So, a client can send any number of arbitrary key-value pairs to the Web API and the Web API will receive them as a FormDataCollection. The following Post() method of Web API shows how this is done:

public string Post(FormDataCollection form)
{
    string customerid = form.Get("customerId");
    string company = form.Get("companyName");
    string contact = form.Get("contactName");
    string country = form.Get("country");

    NorthwindEntities db = new NorthwindEntities();
    Customer obj = new Customer()
    {
        CustomerID = customerid,
        CompanyName = company,
        ContactName = contact,
        Country = country
    };
    db.Customers.Add(obj);
    db.SaveChanges();

    return "Customer added successfully!";

}

The Post() method shown above takes a parameter of type FormDataCollection. To read the values from this collection you use Get() method and specify a key name. In the above code the client is sending Customer details such as CustomerID, CompanyName, ContactName and Country. Based on these details a Customer object is formed and added to the Customers DbSet. The changes are saved to the database using SaveChanges(). The Post() method then returns a success method to the client.

To call this Web API method you will write the following jQuery code:

$(document).ready(function () {
  var data = {};
  data.customerID = "ABCDE";
  data.companyName = "Company 1";
  data.contactName = "Contact 1";
  data.country = "USA";

  $.post("/api/customer", data, function(msg){
     alert(msg);
  });
  
});

As you can see the above code creates a JavaScript object with four properties - customerID, companyName, contactName and country. Although this class mimics the Customer model class that's not necessary. You can add any arbitrary property - value pairs to this object and send it to the Web API.

Once the data object created $.post() method of jQuery is used to call the Web API and the data object is passed to it. The success function displays the message returned from the Web API.

If you run this application you will see the customerID, companyName, contactName and country values in the FormDataCollection.

image

In the preceding example, you created a JavaScript object and passed it to the $.post() method. There can be a situation where you need to pass the data from form fields (rather than from a JavaScript object) to the Web API. For example, you might be having a web page that renders arbitrary form fields using jQuery based on some condition.

<form id="form1">
    <input type="text" name="customerId" value="ABCDE" />
    <input type="text" name="companyName" value="Company 2" />
    <input type="text" name="contactName" value="Contact 2" />
    <input type="text" name="country" value="USA"  />
</form>

In such cases your $.post() call will change as follows:

$.post("/api/customer", $("#form1").serialize(), function (msg) {
    alert(msg);
});

Notice that the second parameter is not a JavaScript object. It's a call to jQuery serialize() method. The serialize() method returns a URL encoded string that contains the form field name - value pairs. Upon reaching the Web API this data can be read into the FormDataCollection as before.

READ MORE

Most of the times developers use jQuery $.ajax() to call ASP.NET Web API from the client side script. At times, however, you may need to use plain JavaScript to invoke the Web API. Consider a situation wherein you wish to call Web API from HTML5 Web Worker. Now, you can't use jQuery to accomplish your task because DOM access is not allowed inside a web worker. Another reason might be that your project don't have any dependency on jQuery or such libraries. Luckily, calling a Web API using XMLHttpRequest object and plain JavaScript is not hard. This article discusses how that can be done with a sample Customer Web API.

In this example you will use a Customer Web API that does CRUD operations on the Customers table of Northwind database. This Web API is shown below:

public class CustomerController : ApiController
{
    NorthwindEntities db = new NorthwindEntities();

    public List<Customer> Get()
    {
        return db.Customers.ToList();
    }

    public Customer Get(string id)
    {
        return db.Customers.Find(id);
    }

    public string Post(Customer obj)
    {
        db.Customers.Add(obj);
        db.SaveChanges();
        return "Customer added successfully!";
    }

    public string Put(string id,Customer obj)
    {
        db.Entry(obj).State = EntityState.Modified;
        db.SaveChanges();
        return "Customer modified successfully!";
    }

    public string Delete(string id)
    {
        db.Entry(db.Customers.Find(id)).State = EntityState.Deleted;
        db.SaveChanges();
        return "Customer deleted successfully!";
    }
}

As you can see CustomerController consists of five methods namely Get(), Get(id), Post(), Put() and Delete(). These methods deal with the GET, GET, POST, PUT and DELETE verbs respectively.

To call this Web API from client side script you will create a JavaScript object - AjaxHelper - that consists of five methods namely SelectAll(), SelectByID(), Insert(), Update() and Delete(). You will then call t these methods to invoke the respective Web API action.

The AjaxHelper object is shown below:

function AjaxHelper(baseUrl)
{
    this._baseUrl = baseUrl;

    var callWebAPI = function (url, verb, data, callback) {

        var xhr = new XMLHttpRequest();

        xhr.onload = function (evt) {
            var data = JSON.parse(evt.target.responseText);
            callback(data);
        }

        xhr.onerror = function () {
            alert("Error while calling Web API");
        }

        xhr.open(verb, url);
        xhr.setRequestHeader("Content-Type", "application/json");
        if (data==null) {
            xhr.send();
        }
        else {
            xhr.send(JSON.stringify(data));
        }
    }

    this.SelectAll = function (callback) {
        callWebAPI(this._baseUrl, "GET", null, callback);
    }

    this.SelectByID = function (id, callback) {
        callWebAPI(this._baseUrl + "/" + id, "GET", null, callback);
    }

    this.Insert = function (obj, callback) {
        callWebAPI(this._baseUrl, "POST", obj, callback);
    }

    this.Update = function (id, obj, callback) {
        callWebAPI(this._baseUrl + "/" + id, "PUT", obj, callback);
    }

    this.Delete = function (id, callback) {
        callWebAPI(this._baseUrl + "/" + id, "DELETE", null, callback);
    }
}

The AjaxHelper object receives base URL of the Web API as its constructor parameter and stores it in a _baseUrl private variable. Then the code shows a private helper function - callWebAPI() - that creates and configures a new instance of XMLHttpRequest object. The callWebAPI() function accepts four parameters - url, verb, data and callback - and configures five aspects of the XMLHttpRequest object:

  • It wires a success function by handling the load event of the XMLHttpRequest.
  • It wires an error function by handling the error event of the XMLHttpRequest.
  • It opens a URL for a specific HTTP verb using open() method.
  • It sets the content-type header to application/json since we will be using JSON format for the communication.
  • It calls the send() method by passing the data parameter.

Notice the onload event handler. It retrieves the data returned by the Web API using responseText property (which will be in JSON format) and parses it into JavaScript object. The callback parameter supplies a callback function that will be invoked with the Web API call succeeded.

Then the code shows a series of functions of the AjaxHelper object. The SelectAll(), SelectByID(), Insert(), Update() and Delete() methods call the callWebAPI() function by passing the required URL, HTTP verb, data and callback.

You can now use the AjaxHelper object as shown below:

var ajaxHelper = new AjaxHelper("/api/customer");

var selectAllCallback = function (customers) {
    alert(customers.length);
}

var selectByIDCallback = function (customer) {
    alert(customer.CompanyName);
}

var actionCallback = function (msg) {
    alert(msg);
}

//GET
ajaxHelper.SelectAll(selectAllCallback);
ajaxHelper.SelectByID("ALFKI", selectByIDCallback);

//POST
var obj = {
    CustomerID: "ABCDE",
    CompanyName: "Company 1",
    ContactName: "Contact 1",
    Country: "USA"
}
ajaxHelper.Insert(obj, actionCallback);

//PUT
obj.CompanyName = "Company 2";
ajaxHelper.Update("ABCDE", obj, actionCallback);

//DELETE
ajaxHelper.Delete("ABCDE", actionCallback);

As you can see calling a Web API is now a matter of invoking the methods of AjaxHelper object. The callback functions simply display an alert() that confirms that the underlying operation was successful.

READ MORE

ASP.NET applications often use cookies to store user specific pieces of information. Not just web forms and MVC applications, Web API too can use cookies. Sometimes developers device an authentication scheme revolving around cookie as an authentication ticket. Although this article won't show you how to develop such a scheme, it illustrates how cookies can be issued and used in Web API. Specifically you will learn:

  • How to set cookies from a Web API controller and read those cookies in a client application.
  • How to set cookies from a client application (HttpClient) and read those cookies in a Web API controller.

Setting cookie from Web API controller and reading it in the client

To work through the code shown in this section create a new Web API project and write a Get() method as shown below:

public HttpResponseMessage Get()
{
    CookieHeaderValue serverCookie = new CookieHeaderValue
                                   ("server_cookie", "hello from server");
    serverCookie.Expires = DateTimeOffset.Now.AddDays(2);
    serverCookie.Domain = Request.RequestUri.Host;
    serverCookie.Path = "/";
            
    HttpResponseMessage response = Request.CreateResponse
                                 ("This is response from the Web API.");

    response.Headers.AddCookies(new CookieHeaderValue[] { serverCookie });
    return response;
}

The above code shows Get() method that handles GET requests. The method returns HttpResponseMessage. Inside, the code creates an instance of CookieHeaderValue class. This class represents a cookie header that goes as a part of HTTP headers. The constructor of the CookieHeaderValue class accepts a cookie name (server_cookie in this case) and its value (hello from server - in this case). The code then sets Expires, Domain and Path properties of the cookie. The Expires property sets the expiration date and time for the cookie (2 days from now in this case). The Domain property is set to the Hose of the request and the Path property is set to the root ("/").

Then the code creates a instance of HttpResponseMessage class using the CreateResponse() method of the Request object. The CreateResponse() method accepts the response data (a string message in this case) and returns it wrapped in a HttpResponseMessage.

The CookieHeaderValue object created earlier is then added to the Headers collection of the HttpResponseMessage. This is done using the AddCookies() method and then passing an array of CookieHeaderValue objects. In this case we are issuing just one cookie and hence the array contains just a single element.

Finally, the HttpResponseMessage is returned to the caller.

Now, let's see how this cookie can be read in the client code. It is assumed that the client application is a separate ASP.NET MVC application and uses HttpClient to invoke the Web API. The client code to read the cookie is shown below:

public ActionResult Index()
{
    WebRequestHandler handler = new WebRequestHandler();
    handler.CookieContainer = new System.Net.CookieContainer();
    handler.UseCookies = true;
    handler.UseDefaultCredentials = true;

    HttpClient client = new HttpClient(handler);
    client.BaseAddress = new Uri("http://localhost:49308/");
    HttpResponseMessage response = client.GetAsync("/api/mywebapi").Result;
    string data = response.Content.ReadAsAsync<string>().Result;

    int count = handler.CookieContainer.Count;
    Cookie serverCookie = handler.CookieContainer.
                          GetCookies(new Uri("http://localhost:49308/"))
                          ["server_cookie"];

    ViewBag.CookieCount = count;
    ViewBag.ServerResponse = data;
    ViewBag.ServerCookieValue = Server.UrlDecode(serverCookie.Value);

    return View();
}

The Index() action method shown above creates an instance of WebRequestHandler class. This class is required because it wraps a CookieContainer object that stores the cookies during the communication. The CookieContainer object is instantiated to a new instance of the CookieContainer. The UseCookies and UseDefaultCredentials properties of the WebRequestHandler are set to true.

Then an instance of HttpClient is created by passing the WebRequestHandler object in its constructor. This way the HttpClient object uses the handler object to store cookies. The BaseAddress property of the HttpClient is set to the base address of the Web API. Make sure to change this address to reflect your development environment.

Then GetAsync() method of HttpClient is used to invoke the Get() Web API method. Note that the above code assumes that the Web API controller is MyWebAPI. Change the Web API name to match your environment. To read the response sent by the Web API ReadAsAsync() method is used. In this case the response will be a string - This is response from the Web API (refer the Web API earlier).

To access the cookie issued by the Web API controller the CookieContainer object of the WebRequestHandler is used. The Count property of the CookieContainer returns the number of cookies present in the container. The GetCookies() method is used to retrieve the server_cookie from the container. The cookie is returned as Cookie object. The Value property of the Cookie object returns the value of the cookie. In this case the value will be - hello from server (see Web API code earlier).

The cookie count, response data and the cookie value are sent to the View through the respective ViewBag properties. If you output these ViewBag properties on the Index view you should get the values as expected. 

Setting Cookie through HttpClient and reading it in the Web API

In the preceding example the cookie was set in the Web API and was read in the client application. In this section we will do the opposite - we will set a cookie from the client application and read it in the Web API.

The following code shows the client side code in the form of an action method (recollect that our client is an MVC application).

public ActionResult Index()
{
    WebRequestHandler handler = new WebRequestHandler();
    handler.CookieContainer = new System.Net.CookieContainer();
    handler.UseCookies = true;
    handler.UseDefaultCredentials = true;

    Cookie clientCookie = new Cookie("client_cookie", "hello from client");
    clientCookie.Expires = DateTime.Now.AddDays(2);
    clientCookie.Domain = Request.Url.Host;
    clientCookie.Path = "/";
    handler.CookieContainer.Add(clientCookie);

    HttpClient client = new HttpClient(handler);
    client.BaseAddress = new Uri("http://localhost:49308/");
    HttpResponseMessage response = client.GetAsync("/api/mywebapi").Result;
    string data = response.Content.ReadAsAsync<string>().Result;

    ViewBag.ServerResponse = data;

    return View();
}

Notice the code marked in bold letters. This code creates a Cookie instace named client_cookie and sets its value to - hello from client. The Expires, Domain and Path properties of the cookie are set as before. This Cookie is then added to the CookieContainer object. Finally, Web API is invoked using a GET request. The response from the Web API is stored in a ViewBag property and outputted on the view.

The Web API Get() method in this case is modified as follows:

public HttpResponseMessage GetCustomers()
{
    CookieHeaderValue clientCookie = Request.Headers.GetCookies
                                   ("client_cookie").SingleOrDefault();
    string clientCookieValue = clientCookie["client_cookie"].Value;
            
    HttpResponseMessage response = Request.CreateResponse
                                 ("Client cookie said - " + clientCookieValue);

    return response;
}

Notice the code shown in bold letters. The cookie issued from the client side is retrieved using the GetCookies() method of the Headers collection. The cookie is returned as CookieHeaderValue. The value of the cookie can then be read using the Value property. Just to conform that the value is retrieved successfully the same value is appended to the response message.

If you wish to access the same cookie across multiple Web API calls (and in most cases you would need this) you must preserve the WebRequestHandler instance somewhere (such as a Session variable). This way you can use the same CookieContainer across multiple Web API calls.

That's it! Run the sample code shown above and test both the scenarios.

READ MORE

Whenever you access ASP.NET Web API from your client side script (JavaScript / jQuery) by default the data is returned in JSON format. However, in certain cases you may want to retrieve the data in XML format instead of JSON. On the server side, Web API determinses what data format to use for sending data to the client by doing what is known as Content Negotiation. Simply put, content negotiation is a process by which Web API inspects the incoming request and HTTP headers accompanying the request to figure out what response format(s) the client can understand. Based on this checking Web API sends the output. Two HTTP headers that play role in content negotiation are:

  • Accept
  • Content-Type

To understand how content negotiation works let's create a simple Customer Web API that returns customer data from the Northwind database.

Begin by creating a new ASP.NET MVC 4 project in Visual Studio 2012. You will need to add ADO.NET Entity Framework data model for the Customers table. The following figure shows the Customer class upon adding the data model.

image

Next, add a new Web API controller to the Controllers folder and name it as CustomerController. The CustomerController needs to have just one method - Get() - as shown below:

public class CustomerController : ApiController
{
  public IEnumerable<Customer> Get()
  {
    NorthwindEntities db=new NorthwindEntities();
    var data = (from item in db.Customers
    select item).Take(10);
    return data;
  }
}

As you can see the Get() method simply returns first 10 Customer records from the Customers table. To call this Web API from a client browser, add a new controller and name it as HomeController. Then add a view for the Index() action method of the HomeController.

public class HomeController : Controller
{
  public ActionResult Index()
  {
    return View();
  }
}

Inside the Index view, add the following jQuery code that calls the Customer Web API:

$(document).ready(function () {
  var options = {};
  options.url = "/api/customer";
  options.type = "GET";
  options.success = OnSuccessJSON;
  options.error = OnError;
  $.ajax(options);
});

function OnSuccessJSON(results) {
  var html = "<table border=1 cellpadding=3>";
  for (var i = 0; i < results.length; i++) {
    html += "<tr>";
    html += "<td>" + results[i].CustomerID + "</td>";
    html += "<td>" + results[i].CompanyName + "</td>";
    html += "</tr>";
  }
  html += "</table>";
  $("#container").html(html);
}

function OnError(err) {
  alert(err.status + " - " + err.statusText);
}

The above code uses $.ajax() of jQuery to call the Customer Web API. The options object stores all the settings that are needed to call our Web API. Notice that currently we have not specified Accept and Content-Type headers. The OnSuccessJSON() function handles the successful request and displays the returned data in an HTML table. As mentioned earlier, by default Web API invoked via client side script gets data from the server in JSON format. That is why the OnSuccessJSON() function treats results object like any other JSON array. After generating HTML markup for table the markup is set to the container <div> element.

The OnError() function is called in case there is any error while calling the Web API.

If you run the above view you should see the HTML table populated with customer data as shown below:

image

 Now let's modify our jQuery code so that the Web API sends us data in XML format instead of JSON. Modify the options object to include Accept header as shown below:

 ...
options.type = "GET";
options.headers = { "accept": "application/xml;charset=utf-8" };
...

As you can see you use the headers setting. Set its key to accept and value to application/xml;charset=utf-8. This value tells Web API that data should be sent in XML format. You will also need to write another success handler function because now the data is in XML format instead of JSON. Let's call that function OnSuccessXML().

function OnSuccessXML(results) {
  var html = "<table border=1 cellpadding=3>";
  $(results).find("Customer").each(function () {
    var item = $(this);
    html += "<tr>";
    html += "<td>" + item.find("CustomerID").text() + "</td>";
    html += "<td>" + item.find("CompanyName").text() + "</td>";
    html += "</tr>";
  });
  html += "</table>";
  $("#container").html(html);
}

The OnSuccessXML() function uses find() of jQuery to locate <Customer> elements from the response XML and for each <Customer> the code specified inside each() is executed. The each() function further finds <CustomerID> and <CompanyName> elements from the response XML and an HTML table is generated. Finally, the generated HTML markup is assigned to the container <div> element.

Make sure to change the success function and then run the new code:

 ...
options.success = OnSuccessXML;
... 

In the above code you used Accept header but what's the role of Content-Type header? The Content-Type header is used in situations where response format as suggested by Accept header can't be sent. To understand this modify the jQuery code as shown below:

...
options.type = "GET";
options.contentType = "application/json;charset=utf-8";
options.headers = { "accept": "application/xml123;charset=utf-8" };
...

Notice carefully that accept header contains invalid format (xml123) and contentType setting says the format to be JSON. In this case since xml123 is an unsupported format, Web API will use format as suggested by Content-Type header (JSON in this case). You can confirm this by wiring OnSuccessJSON() function again.

The following table summarizes various combinations of Accept and Content-Type headers:

AcceptContent-TypeResponse Format
YesNoAs per Accept header value
YesYesAs per Accept header value
Yes but invalidYesAs per Content-Type header value
NoYesAs per Content-Type header value
No or invalidNo or invalidDepending on the default sequence of media formatters specified in the Configuration.Formatters list.

The last option from the above table can be changed via Web API code but that's beyond the scope of this article.

That's it! Keep coding !!

READ MORE
...