top button
Flag Notify
    Connect to us
      Site Registration

Site Registration

Receiving Data As FormDataCollection In ASP.NET Web API

+4 votes
847 views

ASP.NET Web API map HTTP verbs to an action method. The Web API actions must follow prescribed signatures in order to work as expected. For example, a Web API method handling POST requests usually takes a single parameter. More often than not this parameter is of a complex type that wraps the actual pieces of data in its properties. This arrangement goes well when you know the exact model being passed by a client (see below).

public string Post(Customer obj)
{
 ...
}

However, this arrangement is of no use when a client is sending arbitrary pieces of data not mapping to any model. Luckily, Web API provides a way to deal with such data. This article discusses just that.

Consider a case where a Web API is expecting data to be inserted in a table from a client. The data in question consists of arbitrary pieces of information and can't be mapped to a predefined model class. In such cases you can make use of FormDataCollection class. The FormDataCollection class resides in System.Net.Http.Formatting namespace and represents a dictionary of arbitrary keys and values.

The FormDataCollection class should not be confused with the FormCollection class of ASP.NET MVC. They reside in different namespaces. The FormDataCollection resides in System.Net.Http.Formatting whereas FormCollection resides in System.Web.Mvc namespace.

So, a client can send any number of arbitrary key-value pairs to the Web API and the Web API will receive them as a FormDataCollection. The following Post() method of Web API shows how this is done:

public string Post(FormDataCollection form)
{
    string customerid = form.Get("customerId");
    string company = form.Get("companyName");
    string contact = form.Get("contactName");
    string country = form.Get("country");

    NorthwindEntities db = new NorthwindEntities();
    Customer obj = new Customer()
    {
        CustomerID = customerid,
        CompanyName = company,
        ContactName = contact,
        Country = country
    };
    db.Customers.Add(obj);
    db.SaveChanges();

    return "Customer added successfully!";

}

The Post() method shown above takes a parameter of type FormDataCollection. To read the values from this collection you use Get() method and specify a key name. In the above code the client is sending Customer details such as CustomerID, CompanyName, ContactName and Country. Based on these details a Customer object is formed and added to the Customers DbSet. The changes are saved to the database using SaveChanges(). The Post() method then returns a success method to the client.

To call this Web API method you will write the following jQuery code:

$(document).ready(function () {
  var data = {};
  data.customerID = "ABCDE";
  data.companyName = "Company 1";
  data.contactName = "Contact 1";
  data.country = "USA";

  $.post("/api/customer", data, function(msg){
     alert(msg);
  });
  
});

As you can see the above code creates a JavaScript object with four properties - customerID, companyName, contactName and country. Although this class mimics the Customer model class that's not necessary. You can add any arbitrary property - value pairs to this object and send it to the Web API.

Once the data object created $.post() method of jQuery is used to call the Web API and the data object is passed to it. The success function displays the message returned from the Web API.

If you run this application you will see the customerID, companyName, contactName and country values in the FormDataCollection.

image

In the preceding example, you created a JavaScript object and passed it to the $.post() method. There can be a situation where you need to pass the data from form fields (rather than from a JavaScript object) to the Web API. For example, you might be having a web page that renders arbitrary form fields using jQuery based on some condition.

<form id="form1">
    <input type="text" name="customerId" value="ABCDE" />
    <input type="text" name="companyName" value="Company 2" />
    <input type="text" name="contactName" value="Contact 2" />
    <input type="text" name="country" value="USA"  />
</form>

In such cases your $.post() call will change as follows:

$.post("/api/customer", $("#form1").serialize(), function (msg) {
    alert(msg);
});

Notice that the second parameter is not a JavaScript object. It's a call to jQuery serialize() method. The serialize() method returns a URL encoded string that contains the form field name - value pairs. Upon reaching the Web API this data can be read into the FormDataCollection as before.

posted Oct 25, 2016 by Shivaranjini

  Promote This Article
Facebook Share Button Twitter Share Button LinkedIn Share Button


Related Articles

ASP.NET developers commonly use forms authentication to secure their web pages. Just like ASP.NET web forms and ASP.NET MVC applications, Web API can take advantage of forms authentication to implement authentication and role based security. I have already explained how forms authentication works in web forms and MVC applications. In this post I explain how forms authentication can be used in Web API being consumed in an MVC application. This example assumes that the Web API and the View that consumes it using jQuery are parts of the same project (that is they belong to the same origin).

The overall process of implementing forms authentication remains the same in case of Web API also. However, there are a few points that you need to keep in mind:

  • Web API itself doesn't log-in or log-out a user. That is taken care by the underlying web application - be it web forms application or MVC application. Typically a user logs into the application using some web form or a view designed for that purpose and then proceeds to call a Web API.
  • The Web API action methods can check the authentication status of a user, his membership information and also his role information.
  • If an unauthenticated user tries to access a Web API that requires authentication you typically get "undefined" error in the browser (you will see this later).

Configure SQL Server

Membership features of ASP.NET require certain database tables and stored procedures. To configure your SQL server database for enabling application services (membership, roles, profiles) you use aspnet_regsql.exe command line tool. We won't discuss this tool here because its usage is exactly the same as in the case of web forms and MVC applications. You can also let ASP.NET configure and create a new LocalDb database for you if you don't want to use an existing database. If so, skip this step and move to the next.

Configure Web API project to use forms authentication

Now create a new ASP.NET MVC 4 project and select Web API as its project template. Then open its web.config file and add the following markup to it:

<authentication mode="Forms">
  <forms loginUrl="~/home/login" defaultUrl="~/home/index" ></forms>
</authentication>

The <authentication> section sets the mode of authentication and in this case it is set to Forms. The <forms> tag configures the loginUrl and defaultUrl attributes to ~/home/login and ~/home/index respectively. The loginUrl attribute indicates URL of the login page whereas defaultUrl attribute indicates URL of the default page.

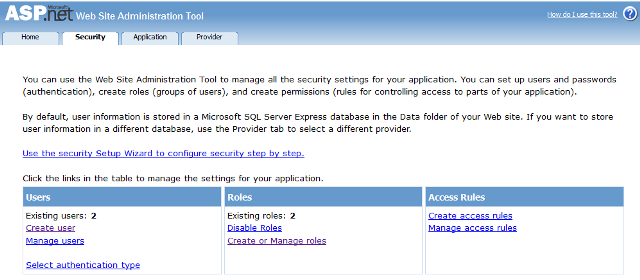
If you haven't configured a database to store membership information and don't want to use an existing database, select PROJECT > ASP.NET Configuration to open Website Administration Tool. Click on the security tab of the tool and create two roles - Administrator and Operator. Then create two users - user1 and user2 - and associate them with Administrator and Operator roles respectively.

image

This will add a new LocalDb database to the App_Data folder and will also add membership, roles and profile providers in the web.config as shown below:

<membership defaultProvider="DefaultMembershipProvider">
      <providers>
        <add name="DefaultMembershipProvider" 
         type="System.Web.Providers.DefaultMembershipProvider,... />
      </providers>
    </membership>

    <roleManager enabled="true" defaultProvider="DefaultRoleProvider">
      <providers>
        <add name="DefaultRoleProvider" 
         type="System.Web.Providers.DefaultRoleProvider... />
      </providers>
    </roleManager>

    <profile defaultProvider="DefaultProfileProvider">
      <providers>
        <add name="DefaultProfileProvider" 
         type="System.Web.Providers.DefaultProfileProvider... />
      </providers>
    </profile>

As you can see the membership, roles and profile providers are being picked from System.Web.Providersnamespace.

Create Login and Logout views

Since we have created users through WAT tool as mentioned in the preceding section there is no need to create registration page. You can directly create Login and Logout actions and views. To do so, open the HomeController from the controllers folder and add the following actions to it:

public ActionResult Login()
{
return View();
}

[HttpPost]
public ActionResult Login(string userid,string password)
{
  if (Membership.ValidateUser(userid, password))
  {
    FormsAuthentication.SetAuthCookie(userid, false);
    Response.Redirect(FormsAuthentication.DefaultUrl);
  }
  return View();
}

public ActionResult Logout()
{
  return View();
}

[HttpPost]
public ActionResult DoLogout()
{
  FormsAuthentication.SignOut();
  Response.Redirect(FormsAuthentication.LoginUrl);
  return View();
}

The Login(), Logout() and DoLogout() methods are easy to understand. The second version of Logn() method accepts userid and password parameters. Inside, it uses ValidateUser() method of Membership class to check whether a user has supplied valid credentials. If so, a forms authentication cookie is set using SetAuthCookie() method of FormsAuthentication class. The user is then redirected to default page (/home/index in this case).

The DoLogout() method removes the forms authentication cookie using Signout() method of FormsAuthentication class and takes the user to login page (/home/login in this case).

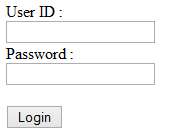
The Login and Logout views are quite simple in nature and are shown below:

image 


image


Create a Web API

Now let's create a simple Web API for testing purpose. One the default ValuesController class and modify it as shown below:

public class ValuesController : ApiController
{
  [Authorize]
  public IEnumerable<string> Get()
  {
    if (User.Identity.IsAuthenticated)
    {
      MembershipUser user = Membership.GetUser();
      if (Roles.IsUserInRole(user.UserName, "Administrator"))
      {
         return new string[] { "Blue", "Red" };
      }
      else
      {
         return new string[] { "Orange", "White" };
      }
    }
    else
    {
        throw new Exception("You are not authorized to use this page!");
    }
}

As you can see the ValuesController inherits from ApiController and contains Get() method. The Get() method returns an IEnumerable of strings and responds to GET requests. Notice that the Get() method is decorated with [Authorize] attribute. Remember that this [Authorize] attribute comes from System.Web.Http namespace whereas [Authorize] used in normal MVC controller comes from System.Web.Mvc namespace. The [Authorize] attribute indicates that the Get() method can be accessed only by authenticated users.

Inside the Get() method User.Identoty.IsAuthenticated is used as an additional check to ensure that the desired code is executed only for an authenticated user. Then the code implements role based security and checks whether current user belongs to Administrator role or not. This is done using IsUserInRole() method of Roles class. Accordingly a string array containing some color values (Blue and Red for administrators and Orange and White for other users) is returned to the caller. If a request is not authenticated an exception is thrown.

Consume the Web API

The jQuery code that calls the Web API resides inside Index view and is shown below:

$(document).ready(function () {
  $("#button1").click(function () {
    $.ajax({
      url: '/api/values',
      type: 'GET',
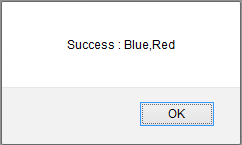
      success: function (r) { alert('Success : ' + r); },
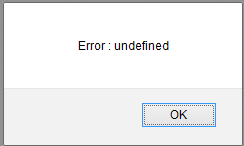
      error: function (err) { alert('Error : ' + err.description); }
    });
  });
});

As you can see the click event handler of a button (button1) invokes values web API using $.ajax() of jQuery. The success function displays the returned array of colors in an alert dialog. Similarly, the error function displays the error information in an alert dialog.

If you try to invoke the web API without first signing in to the system you will get the following error:

image

If you log in to the system and then invoke the web API you will get the color array as shown below:

image

READ MORE

Most of the times developers use jQuery $.ajax() to call ASP.NET Web API from the client side script. At times, however, you may need to use plain JavaScript to invoke the Web API. Consider a situation wherein you wish to call Web API from HTML5 Web Worker. Now, you can't use jQuery to accomplish your task because DOM access is not allowed inside a web worker. Another reason might be that your project don't have any dependency on jQuery or such libraries. Luckily, calling a Web API using XMLHttpRequest object and plain JavaScript is not hard. This article discusses how that can be done with a sample Customer Web API.

In this example you will use a Customer Web API that does CRUD operations on the Customers table of Northwind database. This Web API is shown below:

public class CustomerController : ApiController
{
    NorthwindEntities db = new NorthwindEntities();

    public List<Customer> Get()
    {
        return db.Customers.ToList();
    }

    public Customer Get(string id)
    {
        return db.Customers.Find(id);
    }

    public string Post(Customer obj)
    {
        db.Customers.Add(obj);
        db.SaveChanges();
        return "Customer added successfully!";
    }

    public string Put(string id,Customer obj)
    {
        db.Entry(obj).State = EntityState.Modified;
        db.SaveChanges();
        return "Customer modified successfully!";
    }

    public string Delete(string id)
    {
        db.Entry(db.Customers.Find(id)).State = EntityState.Deleted;
        db.SaveChanges();
        return "Customer deleted successfully!";
    }
}

As you can see CustomerController consists of five methods namely Get(), Get(id), Post(), Put() and Delete(). These methods deal with the GET, GET, POST, PUT and DELETE verbs respectively.

To call this Web API from client side script you will create a JavaScript object - AjaxHelper - that consists of five methods namely SelectAll(), SelectByID(), Insert(), Update() and Delete(). You will then call t these methods to invoke the respective Web API action.

The AjaxHelper object is shown below:

function AjaxHelper(baseUrl)
{
    this._baseUrl = baseUrl;

    var callWebAPI = function (url, verb, data, callback) {

        var xhr = new XMLHttpRequest();

        xhr.onload = function (evt) {
            var data = JSON.parse(evt.target.responseText);
            callback(data);
        }

        xhr.onerror = function () {
            alert("Error while calling Web API");
        }

        xhr.open(verb, url);
        xhr.setRequestHeader("Content-Type", "application/json");
        if (data==null) {
            xhr.send();
        }
        else {
            xhr.send(JSON.stringify(data));
        }
    }

    this.SelectAll = function (callback) {
        callWebAPI(this._baseUrl, "GET", null, callback);
    }

    this.SelectByID = function (id, callback) {
        callWebAPI(this._baseUrl + "/" + id, "GET", null, callback);
    }

    this.Insert = function (obj, callback) {
        callWebAPI(this._baseUrl, "POST", obj, callback);
    }

    this.Update = function (id, obj, callback) {
        callWebAPI(this._baseUrl + "/" + id, "PUT", obj, callback);
    }

    this.Delete = function (id, callback) {
        callWebAPI(this._baseUrl + "/" + id, "DELETE", null, callback);
    }
}

The AjaxHelper object receives base URL of the Web API as its constructor parameter and stores it in a _baseUrl private variable. Then the code shows a private helper function - callWebAPI() - that creates and configures a new instance of XMLHttpRequest object. The callWebAPI() function accepts four parameters - url, verb, data and callback - and configures five aspects of the XMLHttpRequest object:

  • It wires a success function by handling the load event of the XMLHttpRequest.
  • It wires an error function by handling the error event of the XMLHttpRequest.
  • It opens a URL for a specific HTTP verb using open() method.
  • It sets the content-type header to application/json since we will be using JSON format for the communication.
  • It calls the send() method by passing the data parameter.

Notice the onload event handler. It retrieves the data returned by the Web API using responseText property (which will be in JSON format) and parses it into JavaScript object. The callback parameter supplies a callback function that will be invoked with the Web API call succeeded.

Then the code shows a series of functions of the AjaxHelper object. The SelectAll(), SelectByID(), Insert(), Update() and Delete() methods call the callWebAPI() function by passing the required URL, HTTP verb, data and callback.

You can now use the AjaxHelper object as shown below:

var ajaxHelper = new AjaxHelper("/api/customer");

var selectAllCallback = function (customers) {
    alert(customers.length);
}

var selectByIDCallback = function (customer) {
    alert(customer.CompanyName);
}

var actionCallback = function (msg) {
    alert(msg);
}

//GET
ajaxHelper.SelectAll(selectAllCallback);
ajaxHelper.SelectByID("ALFKI", selectByIDCallback);

//POST
var obj = {
    CustomerID: "ABCDE",
    CompanyName: "Company 1",
    ContactName: "Contact 1",
    Country: "USA"
}
ajaxHelper.Insert(obj, actionCallback);

//PUT
obj.CompanyName = "Company 2";
ajaxHelper.Update("ABCDE", obj, actionCallback);

//DELETE
ajaxHelper.Delete("ABCDE", actionCallback);

As you can see calling a Web API is now a matter of invoking the methods of AjaxHelper object. The callback functions simply display an alert() that confirms that the underlying operation was successful.

READ MORE
...