ASP.NET model binding is quite powerful and flexible. It caters to most of the scenarios without much configuration from developers. However, at times you may need to intervene in order to achieve the desired model binding effect. One such situation is when you use multiple instance of a partial view on a view. This article shows one possible approach to deal with such situations.
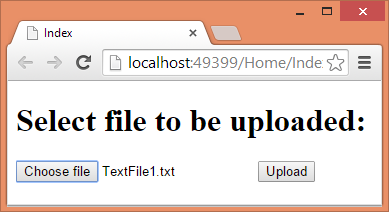
Suppose that you have a web page as shown below:
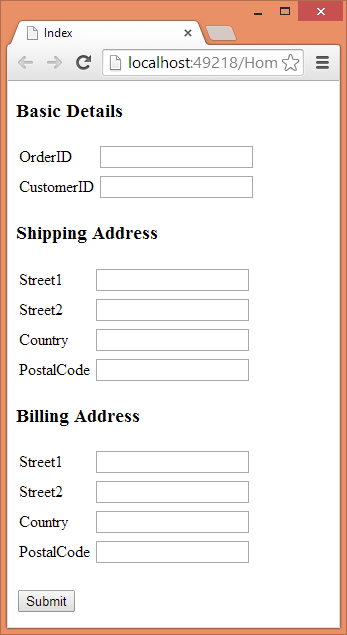
As shown in the above figure the web page captures OrderID, CustomerID, ShippingAddress and BillingAddress from the end user. This information is stored in a model class - Order - that looks like this:
public class Order
{
    public int OrderID { get; set; }
    public int CustomerID { get; set; }

    public Address ShippingAddress { get; set; }
    public Address BillingAddress { get; set; }
}

public class Address
{
    public string Street1{get;set;}
    public string Street2{get;set;}
    public string Country{get;set;}
    public string PostalCode{get;set;}
}
The Order class consists of four public properties namely OrderID, CustomerID, ShippingAddress and BillingAddress. Notice that OrderID and CustomerID are integer properties whereas ShippingAddress and BillingAddress properties are of type Address. The Address class is also shown and consists of four string properties - Street1, Street2, Country and PostalCode.
Now let's assume that the whole page is rendered using two ASP.NET MVC Partial Pages. The OrderID and CustomerID is captured using _BasicDetails.cshtml as shown below:
@model Demo.Models.Order

<table>
    <tr>
        <td>@Html.LabelFor(m=>m.OrderID)</td>
        <td>@Html.TextBoxFor(m=>m.OrderID)</td>
    </tr>
    <tr>
        <td>@Html.LabelFor(m=>m.CustomerID)</td>
        <td>@Html.TextBoxFor(m=>m.CustomerID)</td>
    </tr>
</table>
Note that _BasicDetails partial page has its model set to Order class. The partial page then uses LabelFor() and TextBoxFor() helpers to display a label and textbox for the OrderID and CustomerID model properties respectively.
The address information is captured using _Address.cshtml as shown below:
@model Demo.Models.Address

<table>
    <tr>
        <td>@Html.LabelFor(m=>m.Street1)</td>
        <td>@Html.TextBoxFor(m=>m.Street1)</td>
    </tr>
    <tr>
        <td>@Html.LabelFor(m=>m.Street2)</td>
        <td>@Html.TextBoxFor(m=>m.Street2)</td>
    </tr>
    <tr>
        <td>@Html.LabelFor(m=>m.Country)</td>
        <td>@Html.TextBoxFor(m=>m.Country)</td>
    </tr>
    <tr>
        <td>@Html.LabelFor(m=>m.PostalCode)</td>
        <td>@Html.TextBoxFor(m=>m.PostalCode)</td>
    </tr>
</table>
The _Address partial page has Address class as its model and uses LabelFor() and TextBoxFor() helpers to display model properties.
The Index view that makes use of _BasicDetails and _Address partial pages to form the complete page is shown below:
@model Demo.Models.Order

...
@using(Html.BeginForm("ProcessForm","Home",FormMethod.Post))
{
  <h3>Basic Details</h3>
  @Html.Partial("_BasicDetails")

  <h3>Shipping Address</h3>
  @Html.Partial("_Address",Model.ShippingAddress)

  <h3>Billing Address</h3>
  @Html.Partial("_Address",Model.BillingAddress)

  <input type="submit" value="Submit" />
}
</body>
</html>
The Index view renders the _BasicDetails partial page using Partial() helper. Since the model for Index view is Order class, the same is available to the _BasicDetails partial page. Then two instances of _Address partial page are rendered on the page to capture ShippingAddress and BillingAddress respectively. Recollect that _Address has Address class as its model. So, Model.ShippingAddress and Model.BillingAddress are passed to the Partial() helper.
The above form submits to ProcessForm action method that looks like this:
public ActionResult ProcessForm(Order ord)
{
    //do something with Order object here
    return View("Index");
}
And the Index() action method looks like this:
public ActionResult Index()
{
    Order ord = new Order();
    ord.BillingAddress = new Address();
    ord.ShippingAddress = new Address();
    return View(ord);
}
Both of these methods are quite straightforward and need no explanation.
Now comes the important and tricky part. If you run the application at this stage, you will get the following HTML markup in the browser (unwanted markup has been removed for the sake of clarity):
<form action="/Home/ProcessForm" method="post">
<h3>Basic Details</h3>
<table>
    <tr>
        <td><label for="OrderID">OrderID</label></td>
        <td><input id="OrderID" name="OrderID" type="text" /></td>
    </tr>
    <tr>
        <td><label for="CustomerID">CustomerID</label></td>
        <td><input id="CustomerID" name="CustomerID" type="text" /></td>
    </tr>
</table>
<h3>Shipping Address</h3>
<table>
    <tr>
        <td><label for="Street1">Street1</label></td>
        <td><input id="Street1" name="Street1" type="text" value="" /></td>
    </tr>
    <tr>
        <td><label for="Street2">Street2</label></td>
        <td><input id="Street2" name="Street2" type="text" value="" /></td>
    </tr>
    <tr>
        <td><label for="Country">Country</label></td>
        <td><input id="Country" name="Country" type="text" value="" /></td>
    </tr>
    <tr>
        <td><label for="PostalCode">PostalCode</label></td>
        <td><input id="PostalCode" name="PostalCode" type="text" value="" /></td>
    </tr>
</table>
<h3>Billing Address</h3>
<table>
    <tr>
        <td><label for="Street1">Street1</label></td>
        <td><input id="Street1" name="Street1" type="text" value="" /></td>
    </tr>
    <tr>
        <td><label for="Street2">Street2</label></td>
        <td><input id="Street2" name="Street2" type="text" value="" /></td>
    </tr>
    <tr>
        <td><label for="Country">Country</label></td>
        <td><input id="Country" name="Country" type="text" value="" /></td>
    </tr>
    <tr>
        <td><label for="PostalCode">PostalCode</label></td>
        <td><input id="PostalCode" name="PostalCode" type="text" value="" /></td>
    </tr>
</table>
<input type="submit" value="Submit" />
</form>
Notice the markup in bold letters. Can you see HTML elements with duplicate id and name attributes? That's because you are rendering two instance of the _Address partial page. The model binding framework requires that the HTML fields follow this naming convention for the model binding to work as expected:
<input id="ShippingAddress_Street1"
name="ShippingAddress.Street1" type="text" value="" />
<input id="BillingAddress_Street1"
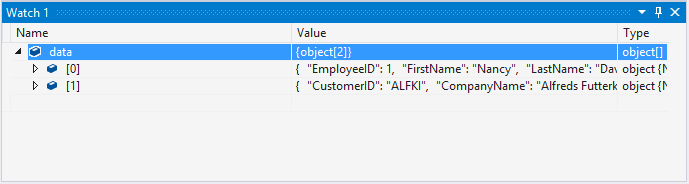
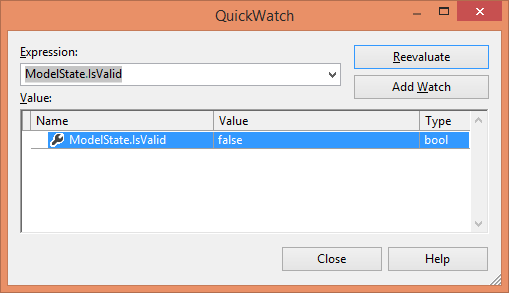
name="BillingAddress.Street1" type="text" value="" />As you can see from the above markup the id and name attributes must fully quality the model property being bound. In the absence of such a naming pattern the Order instance won't be bound as expected as confirmed by the following figure:
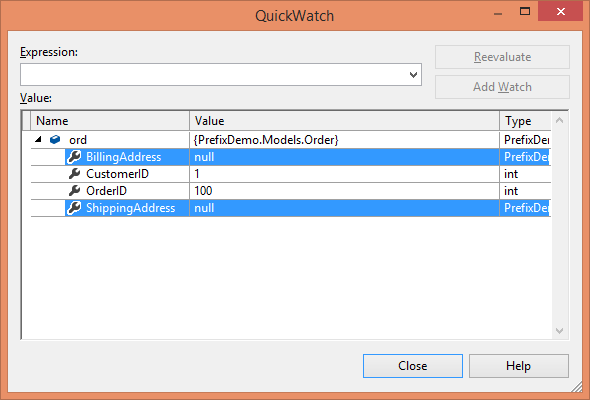
As shown above the ShippingAddress and BillingAddress properties are null whereas OrderID and CustomerID are captured successfully.
The above problem can be solved by using a variation of the Partial() helper while rendering the _Address partial page. The following code shows how this is done:
<h3>Basic Details</h3>
@Html.Partial("_BasicDetails")

<h3>Shipping Address</h3>
@Html.Partial("_Address",
  new ViewDataDictionary()
  {
    TemplateInfo = new TemplateInfo()
      { HtmlFieldPrefix = "ShippingAddress" } })

<h3>Billing Address</h3>
@Html.Partial("_Address",
  new ViewDataDictionary()
    { TemplateInfo = new TemplateInfo()
      { HtmlFieldPrefix = "BillingAddress" } })
The variation of Partial() helper used above uses ViewDataDictionary parameter to specify TemplateInfo. The HtmlFieldPrefix property of the TemplateInfo is set to ShippingAddress for the first instance and to the BillingAddress for the second instance.
If you run the application now, you will find the following markup in the browser:
<form action="/Home/ProcessForm" method="post">
<h3>Basic Details</h3>
<table>
<tr>
<td><label for="OrderID">OrderID</label></td>
<td><input id="OrderID" name="OrderID" type="text" value="0" /></td>
</tr>
<tr>
<td><label for="CustomerID">CustomerID</label></td>
<td><input id="CustomerID" name="CustomerID" type="text" value="0" /></td>
</tr>
</table>
<h3>Shipping Address</h3>
<table>
<tr>
<td><label for="ShippingAddress_Street1">Street1</label></td>
<td><input id="ShippingAddress_Street1"
name="ShippingAddress.Street1" type="text" value="" /></td>
</tr>
<tr>
<td><label for="ShippingAddress_Street2">Street2</label></td>
<td><input id="ShippingAddress_Street2"
name="ShippingAddress.Street2" type="text" value="" /></td>
</tr>
<tr>
<td><label for="ShippingAddress_Country">Country</label></td>
<td><input id="ShippingAddress_Country"
name="ShippingAddress.Country" type="text" value="" /></td>
</tr>
<tr>
<td><label for="ShippingAddress_PostalCode">PostalCode</label></td>
<td><input id="ShippingAddress_PostalCode"
name="ShippingAddress.PostalCode" type="text" value="" /></td>
</tr>
</table>
<h3>Billing Address</h3>
<table>
<tr>
<td><label for="BillingAddress_Street1">Street1</label></td>
<td><input id="BillingAddress_Street1"
name="BillingAddress.Street1" type="text" value="" /></td>
</tr>
<tr>
<td><label for="BillingAddress_Street2">Street2</label></td>
<td><input id="BillingAddress_Street2"
name="BillingAddress.Street2" type="text" value="" /></td>
</tr>
<tr>
<td><label for="BillingAddress_Country">Country</label></td>
<td><input id="BillingAddress_Country"
name="BillingAddress.Country" type="text" value="" /></td>
</tr>
<tr>
<td><label for="BillingAddress_PostalCode">PostalCode</label></td>
<td><input id="BillingAddress_PostalCode"
name="BillingAddress.PostalCode" type="text" value="" /></td>
</tr>
</table>
<input type="submit" value="Submit" />
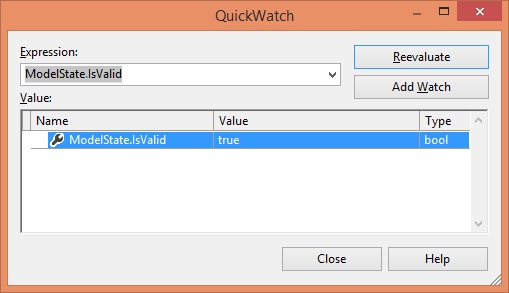
</form>As expected the id and name attributes are now fully qualified and hence the model binding will happen as expected as shown below:
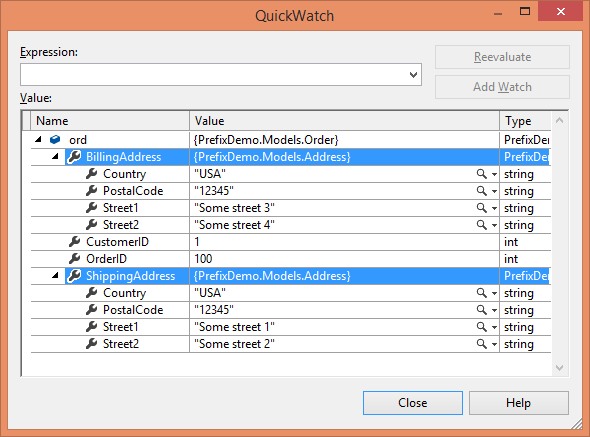
The model binding now correctly captures ShippingAddress as well as BillingAddress information.