top button
Flag Notify
    Connect to us
      Site Registration

Site Registration

Dealing With Multiple Instances Of Partial Views And Model Binding In ASP.NET MVC

+4 votes
569 views

ASP.NET model binding is quite powerful and flexible. It caters to most of the scenarios without much configuration from developers. However, at times you may need to intervene in order to achieve the desired model binding effect. One such situation is when you use multiple instance of a partial view on a view. This article shows one possible approach to deal with such situations.

Suppose that you have a web page as shown below:

image

As shown in the above figure the web page captures OrderID, CustomerID, ShippingAddress and BillingAddress from the end user. This information is stored in a model class - Order - that looks like this:

public class Order
{
    public int OrderID { get; set; }
    public int CustomerID { get; set; }

    public Address ShippingAddress { get; set; }
    public Address BillingAddress { get; set; }
}

public class Address
{
    public string Street1{get;set;}
    public string Street2{get;set;}
    public string Country{get;set;}
    public string PostalCode{get;set;}
}

The Order class consists of four public properties namely OrderID, CustomerID, ShippingAddress and BillingAddress. Notice that OrderID and CustomerID are integer properties whereas ShippingAddress and BillingAddress properties are of type Address. The Address class is also shown and consists of four string properties - Street1, Street2, Country and PostalCode.

Now let's assume that the whole page is rendered using two ASP.NET MVC Partial Pages. The OrderID and CustomerID is captured using _BasicDetails.cshtml as shown below:

@model Demo.Models.Order

<table>
    <tr>
        <td>@Html.LabelFor(m=>m.OrderID)</td>
        <td>@Html.TextBoxFor(m=>m.OrderID)</td>
    </tr>
    <tr>
        <td>@Html.LabelFor(m=>m.CustomerID)</td>
        <td>@Html.TextBoxFor(m=>m.CustomerID)</td>
    </tr>
</table>

Note that _BasicDetails partial page has its model set to Order class. The partial page then uses LabelFor() and TextBoxFor() helpers to display a label and textbox for the OrderID and CustomerID model properties respectively.

The address information is captured using _Address.cshtml as shown below:

@model Demo.Models.Address

<table>
    <tr>
        <td>@Html.LabelFor(m=>m.Street1)</td>
        <td>@Html.TextBoxFor(m=>m.Street1)</td>
    </tr>
    <tr>
        <td>@Html.LabelFor(m=>m.Street2)</td>
        <td>@Html.TextBoxFor(m=>m.Street2)</td>
    </tr>
    <tr>
        <td>@Html.LabelFor(m=>m.Country)</td>
        <td>@Html.TextBoxFor(m=>m.Country)</td>
    </tr>
    <tr>
        <td>@Html.LabelFor(m=>m.PostalCode)</td>
        <td>@Html.TextBoxFor(m=>m.PostalCode)</td>
    </tr>
</table>

The _Address partial page has Address class as its model and uses LabelFor() and TextBoxFor() helpers to display model properties.

The Index view that makes use of _BasicDetails and _Address partial pages to form the complete page is shown below:

@model Demo.Models.Order

...
@using(Html.BeginForm("ProcessForm","Home",FormMethod.Post))
{
  <h3>Basic Details</h3>
  @Html.Partial("_BasicDetails")

  <h3>Shipping Address</h3>
  @Html.Partial("_Address",Model.ShippingAddress)
        
  <h3>Billing Address</h3>
  @Html.Partial("_Address",Model.BillingAddress)
        
  <input type="submit" value="Submit" />
}
</body>
</html>

The Index view renders the _BasicDetails partial page using Partial() helper. Since the model for Index view is Order class, the same is available to the _BasicDetails partial page. Then two instances of _Address partial page are rendered on the page to capture ShippingAddress and BillingAddress respectively. Recollect that _Address has Address class as its model. So, Model.ShippingAddress and Model.BillingAddress are passed to the Partial() helper.

The above form submits to ProcessForm action method that looks like this:

public ActionResult ProcessForm(Order ord)
{
    //do something with Order object here
    return View("Index");
}

And the Index() action method looks like this:

public ActionResult Index()
{
    Order ord = new Order();
    ord.BillingAddress = new Address();
    ord.ShippingAddress = new Address();
    return View(ord);
}

Both of these methods are quite straightforward and need no explanation.

Now comes the important and tricky part. If you run the application at this stage, you will get the following HTML markup in the browser (unwanted markup has been removed for the sake of clarity):

<form action="/Home/ProcessForm" method="post">        
<h3>Basic Details</h3>
<table>
    <tr>
        <td><label for="OrderID">OrderID</label></td>
        <td><input id="OrderID" name="OrderID" type="text" /></td>
    </tr>
    <tr>
        <td><label for="CustomerID">CustomerID</label></td>
        <td><input id="CustomerID" name="CustomerID" type="text" /></td>
    </tr>
</table>
<h3>Shipping Address</h3>
<table>
    <tr>
        <td><label for="Street1">Street1</label></td>
        <td><input id="Street1" name="Street1" type="text" value="" /></td>
    </tr>
    <tr>
        <td><label for="Street2">Street2</label></td>
        <td><input id="Street2" name="Street2" type="text" value="" /></td>
    </tr>
    <tr>
        <td><label for="Country">Country</label></td>
        <td><input id="Country" name="Country" type="text" value="" /></td>
    </tr>
    <tr>
        <td><label for="PostalCode">PostalCode</label></td>
        <td><input id="PostalCode" name="PostalCode" type="text" value="" /></td>
    </tr>
</table>
<h3>Billing Address</h3>
<table>
    <tr>
        <td><label for="Street1">Street1</label></td>
        <td><input id="Street1" name="Street1" type="text" value="" /></td>
    </tr>
    <tr>
        <td><label for="Street2">Street2</label></td>
        <td><input id="Street2" name="Street2" type="text" value="" /></td>
    </tr>
    <tr>
        <td><label for="Country">Country</label></td>
        <td><input id="Country" name="Country" type="text" value="" /></td>
    </tr>
    <tr>
        <td><label for="PostalCode">PostalCode</label></td>
        <td><input id="PostalCode" name="PostalCode" type="text" value="" /></td>
    </tr>
</table>
<input type="submit" value="Submit" />
</form>

Notice the markup in bold letters. Can you see HTML elements with duplicate id and name attributes? That's because you are rendering two instance of the _Address partial page. The model binding framework requires that the HTML fields follow this naming convention for the model binding to work as expected:

<input id="ShippingAddress_Street1" 
       name="ShippingAddress.Street1" type="text" value="" />
<input id="BillingAddress_Street1" 
       name="BillingAddress.Street1" type="text" value="" />

As you can see from the above markup the id and name attributes must fully quality the model property being bound. In the absence of such a naming pattern the Order instance won't be bound as expected as confirmed by the following figure:

image

As shown above the ShippingAddress and BillingAddress properties are null whereas OrderID and CustomerID are captured successfully.

The above problem can be solved by using a variation of the Partial() helper while rendering the _Address partial page. The following code shows how this is done:

<h3>Basic Details</h3>
@Html.Partial("_BasicDetails")

<h3>Shipping Address</h3>
@Html.Partial("_Address", 
  new ViewDataDictionary() 
  { 
    TemplateInfo = new TemplateInfo() 
      { HtmlFieldPrefix = "ShippingAddress" } })

<h3>Billing Address</h3>
@Html.Partial("_Address", 
  new ViewDataDictionary() 
    { TemplateInfo = new TemplateInfo() 
      { HtmlFieldPrefix = "BillingAddress" } })

The variation of Partial() helper used above uses ViewDataDictionary parameter to specify TemplateInfo. The HtmlFieldPrefix property of the TemplateInfo is set to ShippingAddress for the first instance and to the BillingAddress for the second instance.

If you run the application now, you will find the following markup in the browser:

<form action="/Home/ProcessForm" method="post">
<h3>Basic Details</h3>
<table>
    <tr>
        <td><label for="OrderID">OrderID</label></td>
        <td><input id="OrderID" name="OrderID" type="text" value="0" /></td>
    </tr>
    <tr>
        <td><label for="CustomerID">CustomerID</label></td>
        <td><input id="CustomerID" name="CustomerID" type="text" value="0" /></td>
    </tr>
</table>
<h3>Shipping Address</h3>
<table>
    <tr>
        <td><label for="ShippingAddress_Street1">Street1</label></td>
        <td><input id="ShippingAddress_Street1" 
                   name="ShippingAddress.Street1" type="text" value="" /></td>
    </tr>
    <tr>
        <td><label for="ShippingAddress_Street2">Street2</label></td>
        <td><input id="ShippingAddress_Street2" 
                   name="ShippingAddress.Street2" type="text" value="" /></td>
    </tr>
    <tr>
        <td><label for="ShippingAddress_Country">Country</label></td>
        <td><input id="ShippingAddress_Country" 
                   name="ShippingAddress.Country" type="text" value="" /></td>
    </tr>
    <tr>
        <td><label for="ShippingAddress_PostalCode">PostalCode</label></td>
        <td><input id="ShippingAddress_PostalCode" 
                   name="ShippingAddress.PostalCode" type="text" value="" /></td>
    </tr>
</table>
<h3>Billing Address</h3>
<table>
    <tr>
        <td><label for="BillingAddress_Street1">Street1</label></td>
        <td><input id="BillingAddress_Street1" 
                   name="BillingAddress.Street1" type="text" value="" /></td>
    </tr>
    <tr>
        <td><label for="BillingAddress_Street2">Street2</label></td>
        <td><input id="BillingAddress_Street2" 
                   name="BillingAddress.Street2" type="text" value="" /></td>
    </tr>
    <tr>
        <td><label for="BillingAddress_Country">Country</label></td>
        <td><input id="BillingAddress_Country" 
                   name="BillingAddress.Country" type="text" value="" /></td>
    </tr>
    <tr>
        <td><label for="BillingAddress_PostalCode">PostalCode</label></td>
        <td><input id="BillingAddress_PostalCode" 
                   name="BillingAddress.PostalCode" type="text" value="" /></td>
    </tr>
</table>
<input type="submit" value="Submit" />
</form>

As expected the id and name attributes are now fully qualified and hence the model binding will happen as expected as shown below:

image

The model binding now correctly captures ShippingAddress as well as BillingAddress information.

posted Oct 31, 2016 by Shivaranjini

  Promote This Article
Facebook Share Button Twitter Share Button LinkedIn Share Button


Related Articles

Most of the times ASP.NET MVC views are rendered as a result of user navigating to some action. For example, when a user navigates to /home/index in the browser (either through address bar or through a hyperlink), ASP.NET MVC executes the action method and usually returns a view to the browser. This means each view is rendered as a result of a full GET or POST request. At times, however, you may want to load views dynamically through Ajax. This way you can render contents of a view without full page refresh.

Consider the following page:

image

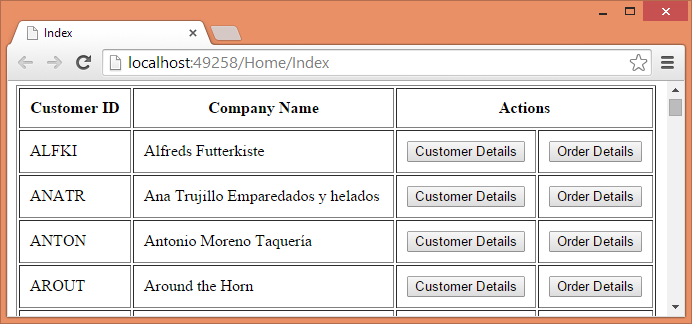
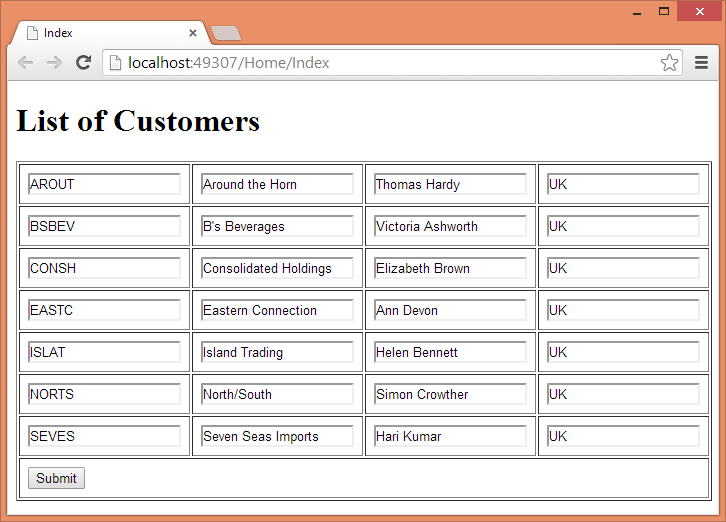
The above page consists of a table that lists customers from the Customers table of Northwind database. Each customer row has two buttons - Customer Details and Order Details. Clicking on the respective button should display customer details and order details from the database. Without Ajax you would have submitted the page back to the server and then returned a view with the corresponding details. Using Ajax you can display the details without causing any postback to the server. This is shown below:

image

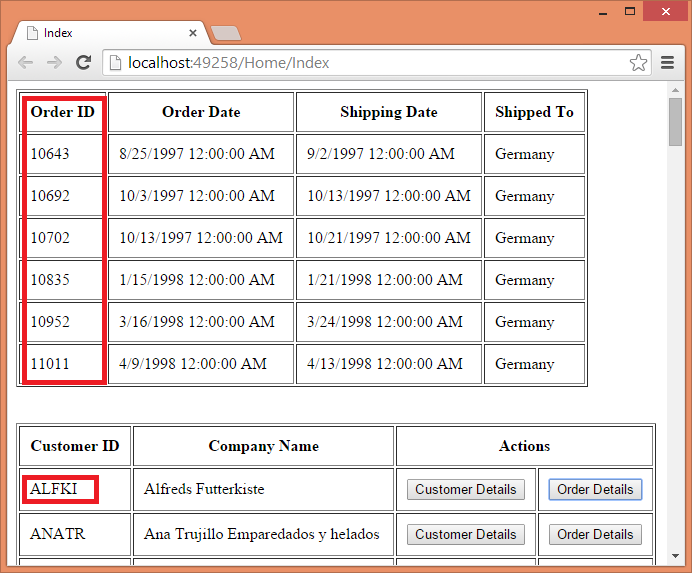
As you can see the above figure shows order details for CustomerID ALFKI above the customers table. These details are fetched via Ajax request.

While displaying data through Ajax request you have two options:

  • Fetch raw data from the server and embed it in HTML markup on the client side
  • Fetch HTML markup with data embedded from the server

Although the choice of the approach depends on a situation, it can be said that the former approach is suitable to make calls to Web API or when HTML display is dynamically decided by the client script. The later approach is suitable when ASP.NET MVC strongly typed views (or partial views) are being used to render the UI. In this example we will be using the later approach.

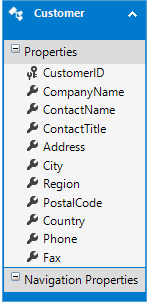
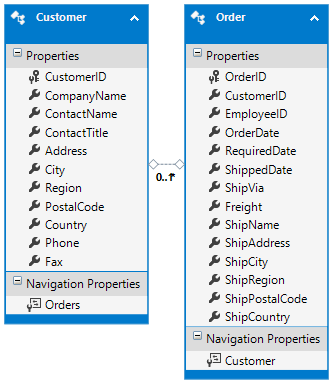
To develop this example, create a new ASP.NET MVC application based on the Empty template. Then add ADO.NET Entity Data Model for Customers and Orders tables of Northwind database. The Customer and Order entities are shown below:

image

Next, add HomeController and write the Index() action method as shown below:

public ActionResult Index()
{
    using (NorthwindEntities db = new NorthwindEntities())
    {
        List<Customer> model = db.Customers.ToList();
        return View(model);
    }
}

The Index() action simply retrieves all the Customer entities from the Customers DbSet and passes them to the Index view.

Now, add another action method - GetView() - to the HomeController as shown below:

public ActionResult GetView(string customerID,string viewName)
{
    object model = null;
    if(viewName=="CustomerDetails")
    {
        using(NorthwindEntities db=new NorthwindEntities())
        {
            model = db.Customers.Find(customerID);
        }
    }
    if (viewName == "OrderDetails")
    {
        using (NorthwindEntities db = new NorthwindEntities())
        {
            model = db.Orders.Where(o => o.CustomerID == customerID)
                      .OrderBy(o => o.OrderID).ToList();
        }
    }
    return PartialView(viewName,model);
}

The GetView() action method accepts two parameters - customerID and viewName. These two parameters are passed through an Ajax request. Depending on the viewName parameter either CustomerDetails partial view is returned to the caller or OrderDetails partial view is returned. These two view need model in the form of a Customer object and a List of Order entities respectively. That's why model variable is declared as object. Once model variable is populated the partial view name and the model is passed to the PartialView() method. Here, we used partial views because the HTML output is to be inserted in an existing page through Ajax.

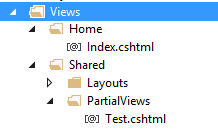
Next, add one view (Index.cshtml) and two partial views (CustomerDetails.cshtml and OrderDetails.cshtml) to the Home sub-folder of Views folder.

Add the following markup to the CustomerDetails.cshtml partial view:

@model MVCViewsThroughAjax.Models.Customer

<table border="1" cellpadding="10">
    <tr>
        <td>Customer ID :</td>
        <td>@Model.CustomerID</td>
    </tr>
    <tr>
        <td>Company Name :</td>
        <td>@Model.CompanyName</td>
    </tr>
    <tr>
        <td>Contact Name :</td>
        <td>@Model.ContactName</td>
    </tr>
    <tr>
        <td>Country :</td>
        <td>@Model.Country</td>
    </tr>
</table>

The above markup is quite straightforward. The CustomerDetails partial view simply displays CustomerID, CompanyName, ContactName and Country of a Customer in a table.

Now add the following markup to the OrderDetails.cshtml partial page:

@model List<MVCViewsThroughAjax.Models.Order>

<table border="1" cellpadding="10">
    <tr>
        <th>Order ID</th>
        <th>Order Date</th>
        <th>Shipping Date</th>
        <th>Shipped To</th>
    </tr>
    @foreach(var item in Model)
    { 
        <tr>
            <td>@item.OrderID</td>
            <td>@item.OrderDate</td>
            <td>@item.ShippedDate</td>
            <td>@item.ShipCountry</td>
        </tr>
    }
</table>

The above markup iterates through the List of Order entities and renders a table with four columns - OrderID, OrderDate, ShippedDate and ShipCountry.

Now, add the following markup to the Index view:

@model List<MVCViewsThroughAjax.Models.Customer>

...
<html>
<head>
...
</head>
<body>
    <div id="viewPlaceHolder"></div>
    <br /><br />
    <table border="1" cellpadding="10">
        <tr>
            <th>Customer ID</th>
            <th>Company Name</th>
            <th colspan="2">Actions</th>
        </tr>
        @foreach(var item in Model)
        {
            <tr>
                <td>@item.CustomerID</td>
                <td>@item.CompanyName</td>
                <td><input type="button" class="customerDetails" 
                           value="Customer Details" /></td>
                <td><input type="button" class="orderDetails" 
                           value="Order Details" /></td>
            </tr>
        }
    </table>
</body>
</html>

The Index view receives a List of Customer entities as its model and renders a table with CustomerID, CompanyName and two buttons - Customer Details and Order Details.

Now comes the important part - making Ajax calls to display customer details and order details. Noticed the <div> at the beginning of the body section? The viewPlaceHolder is where the output of CustomerDetails.cshtml and OrderDetails.cshtml will be loaded. To do so we will use load() method of jQuery. Here is how that can be done:

$(document).ready(function () {

    $(".customerDetails").click(function (evt) {
        var cell=$(evt.target).closest("tr").children().first();
        var custID=cell.text();
        $("#viewPlaceHolder").load("/home/getview", 
            { customerID: custID, viewName: "CustomerDetails" });
    });

    $(".orderDetails").click(function (evt) {
        var cell = $(evt.target).closest("tr").children().first();
        var custID = cell.text();
        $("#viewPlaceHolder").load("/home/getview", 
           { customerID: custID, viewName: "OrderDetails" });
    });
});

Recollect that Customer Details and Order Details buttons have assigned CSS class of customerDetails and orderDetails respectively. The above jQuery code uses class selector to wire click event handlers to the respective buttons. Inside the click event handler of Customer Details button, the code retrieves the CustomerID from the table row. This is done using closest(), children() and first() methods. The CustomerID is stored in custID variable. Then load() method is called on viewPlaceHolder <div>. The first parameter of the load() method is the URL that will be requested through an Ajax request. The second parameter is a JavaScript object that supplies the data needed by the requested URL. In our example, GetView() action method needs two parameters - customerID and viewName. Hence the object has customerID and viewName properties. The customerID property is set to custID variable and viewName is set to CustomerDetails.

The click event handler of Order Details is similar but loads OrderDetails partial view.

That's it! You can now run the application and try clicking on both the buttons. The following figure shows customer details loaded successfully.

image

Notice that through out the application run the URL shown in the browser address bar remains unchanged indicating that Ajax requests are being made to display customer details and order details.

In the above example Ajax requests were made to /home/getview action. A user can also enter this URL in the browser's address bar producing undesirable results. As a precaution you can check the customerID and viewName parameters inside the GetView() action method (not shown in the above code). If these parameters are empty or contain invalid values you can throw an exception.

READ MORE

Showing a single record for editing is quite common and the default model binding of ASP.NET MVC takes care of mapping the form fields to the model properties. However, sometimes you need to edit multiple records. For example, you may want to display an editable grid to the end user filled with existing data. The user can edit the values from multiple rows and hit Save in an attempt to save the data. In this case multiple model objects are being submitted to the action method. The single record editing works on the assumption that form field names from the view match the corresponding model property names. However, when multiple model objects are submitted this assumption is no longer valid. Luckily, by tweaking the form field names you can get this to work as expected. Let's see how.

Begin by creating a new ASP.NET MVC Application. Then right click on the Models folder and add an ADO.NET entity framework data model to it. Configure the model to use Customers table of the Northwind database. The following figure shows this model:

image

Then add HomeController in the Controllers folder. Modify the default Index() action method as shown below:

public ActionResult Index()
{
  NorthwindEntities db=new NorthwindEntities();
  var query = from c in db.Customers
              where c.Country=="UK"
              orderby c.CustomerID
              select c;
  return View(query.ToList());
}

The Index() action method simply selects all the customers from UK and passes them to the Index view as a List of Customer entities.

Then right click on the Index() action method and add Index view. The Index view is where you need to follow certain naming convention to get the desired results:

@model List<ModelBindingToListDemo.Models.Customer>
...
    <h1>List of Customers</h1>
    @using (Html.BeginForm("Index", "Home", FormMethod.Post))
    {
        <table border="1" cellpadding="6">
            @for (int i = 0; i < Model.Count;i++ )
            { 
                <tr>
                    <td>@Html.TextBox("customers[" + @i + "].CustomerID", 
                                      Model[i].CustomerID, 
                                      new { @readonly = "readonly" })</td>
                    <td>@Html.TextBox("customers[" + @i + "].CompanyName", 
                                      Model[i].CompanyName)</td>
                    <td>@Html.TextBox("customers[" + @i + "].ContactName", 
                                      Model[i].ContactName)</td>
                    <td>@Html.TextBox("customers[" + @i + "].Country", 
                                      Model[i].Country)</td>
                </tr>
            }
            <tr>
                <td colspan="4">
                    <input type="submit" value="Submit" />
                </td>
            </tr>
        </table>
    }
...

Notice the markup shown in the bold letters. The code is basically generating names for the textboxes matching the following convention:

customers[n].<Model_Property_Name>

Where n is an index starting from 0 and Model_Property_Name is the name of the properties such as CustomerID, CompanyName, ContactName and Country. For the sake of simplicity the above code uses only four properties form the Customer model class. So, all the textboxes having same index are considered as "one record". This naming convention is required to successfully bind data to the model as you will see later.

The following figures shows how the view looks like in the browser:

image

To see how the textbox names are being generated view the HTML source in the browser.

The above <form> submits the data to Index() method using post method. To handle this data write the second version of Index() action method as follows:

[HttpPost]
public ActionResult Index(List<Customer> customers)
{
  NorthwindEntities db=new NorthwindEntities();
  foreach (Customer cust in customers)
  {
    Customer existing = db.Customers.Find(cust.CustomerID);
    existing.CompanyName = cust.CompanyName;
    existing.ContactName = cust.ContactName;
    existing.Country = cust.Country;
  }
  db.SaveChanges();
  return View();
}

The overloaded Index() method takes a parameter - List of Customer entities. Recollect that this parameter name - customers - is what you used in the view markup earlier. Due the naming conventions followed the model binding framework of ASP.NET MVC transforms the form field values into a generic List of Customer objects. Once received you simply iterate through the List and modify the existing Customer with the new one. You can also put some logic to detect whether a record was really changed or not. Once all the rows are modified SaveChanges() is called to save the changes.

As mentioned earlier the naming convention requires that the index start at 0 and then sequentially increment for each record. If you try changing the start index to say 10, the model binding will fail to bind the data. What if you don't want to start the index from 0? For example, imagine a case where you are removing some row using client side script. In such cases the there might be "gaps" in between various index values. To overcome this situation you can follow an alternate naming convention:

@using (Html.BeginForm("Index", "Home", FormMethod.Post))
{
  <table border="1" cellpadding="6">
  @for (int i = 0; i < Model.Count;i++ )
  { 
    <tr>
      <td>
      @Html.Hidden("customers.Index", (@i + 10))
      @Html.TextBox("customers[" + (@i + 10) + "].CustomerID", 
                    Model[i].CustomerID, new { @readonly = "readonly" })
      </td>
      <td>@Html.TextBox("customers[" + (@i + 10) + "].CompanyName", 
                        Model[i].CompanyName)</td>
      <td>@Html.TextBox("customers[" + (@i + 10) + "].ContactName", 
                        Model[i].ContactName)</td>
      <td>@Html.TextBox("customers[" + (@i + 10) + "].Country", 
                        Model[i].Country)</td>
    </tr>
  }
<tr>
...
}

Notice the above markup carefully. Each table row now has a hidden form field. The name of the hidden form field is customers.Index and its value is set to some arbitrary index (i + 10 in this case). Then all the textboxes are assigned names of the form:

 customers[<arbitrary_index>].<model_property_name>

In this case all the textboxes having same index as specified by the hidden field are considered as "one record". In this case the index need not be a number. It can be a string also. Again, recollect that "customers" in the above markup is the name of the parameter of the Index() method.

That's it! Run the application and test if it works as expected.

READ MORE

Most of the times the ASP.NET MVC routes consists of known number of segments. For example, consider the default route pattern defined by ASP.NET MVC:

routes.MapRoute(
    name: "Default",
    url: "{controller}/{action}/{id}",
    defaults: new { controller = "Home", 
              action = "Index", 
              id = UrlParameter.Optional }
);

Here, the route consists of three segments namely controller, action and an optional id. This works well for many applications. However, at times you may not have idea about the exact number of route segments involved. Consider the following example.

Suppose you are building an application that shows the population in one or more cities of a country. So, you need to pass the country name and one or more cities as a part of the URLs. Some sample URLs are given below:

/home/getdata/USA/Chicago
/home/getdata/USA/Chicago/Houston
/home/getdata/USA/Seattle/Boston/Tampa

As you can see from the above URLs, one could specify any number of cities in the route segments. Obviously you can't have a route pattern with a known number of segments. Luckily, ASP.NET MVC allows you to use what is often called catch-all route parameter. Let's see how it can be used in this situation.

Create a new ASP.NET MVC application and open its RouteConfig.cs file. Then add the following MapRoute() call after the default route pattern.

routes.MapRoute(
    name: "CatchAll",
    url: "{controller}/{action}/
          {country}/{*cities}",
    defaults: new { controller = "Home", 
              action = "GetData" }
);

Notice that the route pattern consists of four parameters namely controller, action, country and *cities. The *cities does the trick for us. This catch-all parameter indicates that any number of route segments can follow the country segment. Also notice that the route is configured to be handled by the GetData() action of the HomeController. The catch-all parameter must appear as the last segment of a route.

The GetData() action looks like this:

public ActionResult GetData(string country,string cities)
{
    string[] cityArray = cities.Split('/');

    ViewBag.Country = country;
    ViewBag.Cities = cityArray;

    return View();
}

The GetData() action takes two parameters - country and cities. Note that names of these parameters must match with the names of the route parameters defined in the RouteConfig.cs.

Capturing and using the country parameter is quite straightforward. The cities parameter could be a single city or multiple cities in the form city1/city2/city3. So, you need to split this string to get an array. Once you do that you are free to process the country and city values as per the application's logic. In this case you simply pass them to the GetData view through the ViewBag.

The Index view looks like this:

<body>
 <h1>
 <a href="/home/getdata/USA/Chicago">USA - Chicago</a>
 </h1>
 <h1>
 <a href="/home/getdata/USA/Chicago/Houston">
    USA - Chicago and Houston
 </a>
 </h1>
 <h1>
 <a href="/home/getdata/USA/Seattle/Boston/Tampa">
    USA - Seattle, Boston and Tampa
 </a>
 </h1>
</body>

The Index view simply renders a few links with USA as the country and some combination of cities.

The GetData view is shown below:

<body>
    <h1>@ViewBag.Country</h1>
    @foreach(string city in ViewBag.Cities)
    {
        <h2>@city</h2>
    }
</body>

The GetData view simply displays the country received in the controller and also a list of cities received from the route segments.

The following figure shows a sample run of the application.

image

Notice how the URL segments and the output of the view shows the country and cities.

That's it! Keep coding !!

READ MORE

By default ASP.NET MVC stores all the views associated to a controller inside a sub-folder of Views folder. On the same lines partial views and layout pages are stored inside Shared sub-folder under Views folder. Although this default arrangement works well in most of the cases, at times you may want to deviate from this convention based arrangement and store views, partial views and layouts in some different folder structure. Consider, for example, a huge application that wants to arrange partial views in several sub-folders inside Shared folder. Or some application may want to store views outside views folder. In such cases when you use view names in methods such as View(), Html.Partial() and PartialView() the system won't be able to find the required .cshtml files. Of course, you can use fully qualified paths in some cases but that makes your code rigid because any future change in the paths will require changes at multiple places.

Luckily, you can easily deal with the situation by creating a custom view engine. This article tells you how.

Let's assume that you wish to store partial views and layouts in the following custom folder structure:

image

Notice that partial views and layouts aren't stored directly inside Shared folder. They are stored inside PartialViews and Layouts sub-folders of Shared folder. Views are stored as per default convention. Let's assume that Index view uses Test.cshtml like this:

@Html.Partial("Test")

If you run the application under these settings, you will get this error in the browser:

image

As you can see, the system is unable to find Test.cshtml residing inside PartialViews sub-folder.

To deal with this situation you can create a custom view engine and then supply the custom search locations to the new view engine. Don't worry. Creating a custom view engine to accomplish this task is quite straightforward. Let's do that now.

Add a new class to your project and give it whatever name you wish to give to the new view engine. In my code I am calling my view engine as BinaryIntellectViewEngine. The complete class is shown below:

public class BinaryIntellectViewEngine : RazorViewEngine
{
    public BinaryIntellectViewEngine()
    {
        string[] locations = new string[] {  
            "~/Views/{1}/{0}.cshtml",  
            "~/Views/Shared/PartialViews/{0}.cshtml",  
            "~/Views/Shared/Layouts/{0}.cshtml"
        };

        this.ViewLocationFormats = locations;
        this.PartialViewLocationFormats = locations;
        this.MasterLocationFormats = locations;
    }
}

The BinaryIntellectViewEngine class inherits from RazorViewEngine base class. In our example we are using Razor view engine and hence the above code inherits from RazorViewEngine class. This inbuilt class comes from System.Web.Mvc namespace.

The magic that makes the custom locations work happens inside the constructor of the custom view engine class. Here, we create an array of strings. This array contains a list of all locations where the view engine should look for the views, partial views and layout pages. Notice the convention used in the paths. The placeholder {0} contains the view or payout page name whereas {1} contains the folder name (controller name).

The three base class properties namely ViewLocationFormats, PartialViewLocationFormats and MasterLocationFormats point to the list of search locations for views, partial views and layout pages respectively. In our example, all the three properties are set to the location string array.

This completes our custom view engine. The final step is to register this new view engine with the MVC framework. This is done inside Application_Start event in Global.asax.

void Application_Start(object sender, EventArgs e)
{
    AreaRegistration.RegisterAllAreas();
    GlobalConfiguration.Configure(WebApiConfig.Register);
    RouteConfig.RegisterRoutes(RouteTable.Routes);

    ViewEngines.Engines.Clear();
    ViewEngines.Engines.Add(new BinaryIntellectViewEngine());
}

The Application_Start event handler clears the existing registered view engines by calling Clear() method of ViewEngines.Engines collection. Then the new view engine is added using Add() method.

That's it! If you run the application now you should see the Test partial view rendered successfully.

image

READ MORE

ASP.NET MVC organizes view files in the Views folder. This arrangement works fine for most of the applications. However, in some cases you may need to load views from database rather than physical disk file. Consider an example wherein you are building a portal or a content management system. You may want to allow the administrator to create or modify views and then you may want to load these views dynamically. Such dynamically created / modified views may not be a nice fit into the folder based arrangement of MVC. In such cases the recommended way is to store views in a database and load them on the fly. This article discusses how t his can be accomplished.

The Views database table

In order to load views from a database you first need to create a table (I have named it - Views) as shown below:

image

You can add the Views table in any existing database or create a database in App_Data specifically to house Views table. The Views table has four columns - Id, ViewName, ViewPath and ViewContent. The ViewName column stores a developer friendly name of a view. This name is purely for your own use and identification. The ViewPath column stores the path of a view from the root folder. For example, /Views/Home/Index.cshtml. Note that ViewPath is not a ~ qualified path. This simplifies your code that checks existence of a view (you will see that later). The ViewContent column holds the actual content of a view. This can be HTML markup and / or Razor code.

Entity Framework data model to read view data

Next, you need to have some way to read the data stored in the Views table shown above. You can write a POCO using plain ADO.NET or use EF model to do that. I my example I am using EF generated model. You also need to add a model class for the Employees table of the Northwind database. Again, this can be a POCO or EF designer generated class. I am using EF designer generated class. The two EF entities mentioned above are shown in the following figure:

image

Controller and view content

Now, add Home controller to the Controllers folder and modify its Index() action method as follows:

public ActionResult Index()
{
    NorthwindEntities db=new NorthwindEntities();
    List<Employee> model = db.Employees.ToList();
    ViewBag.Message = "This view is loaded from database!";
    return View(model);
}

The Index() action simply pulls all the Employee records into a List and passes that List to the view. It also sets Message property on the ViewBag. The Message property has been added just for the sake of testing.

Then add Index view to the project and modify it as shown below:

@model List<ViewsInDbDemo.Models.Employee>

@{
    Layout = null;
}

<!DOCTYPE html>

<html>
<head>
    <meta name="viewport" content="width=device-width" />
    <title>Index</title>
</head>
<body>
    <h1>List of Employees</h1>
    <h2>@ViewBag.Message</h2>
    <table border="1" cellpadding="10">
        @foreach(var item in Model)
        {
            <tr>
                <td>@item.EmployeeID</td>
                <td>@item.FirstName</td>
                <td>@item.LastName</td>
            </tr>
        }
    </table>
</body>
</html>

The Index view is quite straightforward and simply outputs the model data (Employees) and ViewBag message (Message) to the response stream. You can run the application and see whether the view displays the Employee data and Message as expected.

Now comes the important part! Copy this whole view content and paste it into the ViewContent column of the Views table that you created earlier. And then DELETE this Index.cshtml file. That's because we want to load views from database and not from physical disk files. Also set the ViewPath column to /Views/Home/Index.cshtml.

Creating Custom VirtualPathProvider and VirtualFile

The key part of our solution is the creation of a custom VirtualPathProvider class and a VirtualFile class. A VirtualPathProvider does the job of picking the views from disk, database or any other location. In our case it will pick views from database. The views picked from database are wrapped in a custom VirtualFile so that MVC framework can further deal with it.

To create a VirtualPathProvider class, add a new class to the project as shown below:

public class BinaryIntellectVirtualPathProvider : VirtualPathProvider
{
    public override bool FileExists(string virtualPath)
    {
        var view = GetViewFromDatabase(virtualPath);

        if (view == null)
        {
            return base.FileExists(virtualPath);
        }
        else
        {
            return true;
        }
    }

    public override VirtualFile GetFile(string virtualPath)
    {
        var view = GetViewFromDatabase(virtualPath);

        if (view == null)
        {
            return base.GetFile(virtualPath);
        }
        else
        {
            byte[] content = ASCIIEncoding.ASCII.
                             GetBytes(view.ViewContent);
            return new BinaryIntellectVirtualFile
                          (virtualPath,content);
        }
    }

    public override CacheDependency GetCacheDependency
     (string virtualPath,Enumerable virtualPathDependencies, 
      DateTime utcStart)
    {

        var view = GetViewFromDatabase(virtualPath);

        if (view !=null)
        {
            return null;
        }

        return Previous.GetCacheDependency(virtualPath, 
           virtualPathDependencies, utcStart);
    }

    private View GetViewFromDatabase(string virtualPath)
    {
        virtualPath = virtualPath.Replace("~", "");

        ViewsDbEntities db = new ViewsDbEntities();
        var view = from v in db.Views
                    where v.ViewPath == virtualPath
                    select v;
        return view.SingleOrDefault();
    }
}

The BinaryIntellectVirtualPathProvider class inherits from VirtualPathProvider base class. The VirtualPathProvider class resides in System.Web.Hosting namespace. It then overrides a few methods of the base class namely FileExists() and GetFile(). There is also a helper method GetViewFromDatabase().

The GetViewFromDatabase() method retrieves a requested view from the database (Views table) and returns it to the caller. The same method can be used to determine whether a view exists in the database or not. For example, if GetViewFromDatabase() returns null it indicates that a requested view doesn't exist in the Views table.

The FileExists() overridden method checks whether a view exists in the database. If it doesn't then it calls the FileExists() of the base class, otherwise it returns true.

The GetFile() overridden method does the job of retrieving a view from the database and returning it to the caller. The method first checks whether the requested view exists in the Views table. If it doesn't then it calls the GetFile() method of the base class. If the view exists in the database it creates a new instance of  BinaryIntellectVirtualFile class (discussed shortly). The virtual path and the view content (ViewContent column) are passed to the constructor of the BinaryIntellectVirtualFile class. Notice that the view content is passed after converting it into a byte array. This is because BinaryIntellectVirtualFile class writes this content into a MemoryStream and MemortStream requires its content as byte array.

Now add a custom VirtualFile class class as shown below:

public class BinaryIntellectVirtualFile : VirtualFile
{
    private byte[] viewContent;

    public BinaryIntellectVirtualFile(string virtualPath, 
       byte[] viewContent) : base(virtualPath)
    {
        this.viewContent = viewContent;
    }

    public override Stream Open()
    {
        return new MemoryStream(viewContent);
    }
}

The BinaryIntellectVirtualFile class inherits from VirtualFile base class (System.Web.Hosting) and overrides Open() method. Notice that the constructor of BinaryIntellectVirtualFile receives view content as a byte array. The Open() method constructs a new MemoryStream based on this byte array and returns the MemoryStream to the caller.

Register the VirtualPathProvider

The final step is to register the custom VirtualPathProvider with the MVC framework. You do this in Global.asax as shown below:

protected void Application_Start()
{
  ...
  HostingEnvironment.RegisterVirtualPathProvider
    (new BinaryIntellectVirtualPathProvider());
}

To register a custom VirtualPathProvider you use HostingEnvironment class from System.Web.Hosting namespace. The RegisterVirtualPathProvider() method accepts a new instance of a VirtualPathProvider class (BinaryIntellectVirtualPathProvider in my example).

 You can run the application and see the view loaded from database in action. Here is a sample run:

image

That's it for now! Keep coding.

READ MORE
...