A common way to perform list, insert, update and delete operations in ASP.NET MVC is to create four separate views. The List view forms the launching view where records are displayed and you can choose to Edit, Delete or Insert a record. However, in some cases you may want to perform all these operations in a single view itself. This task can be accomplished using full page postback or using Ajax. This article discusses the former technique.
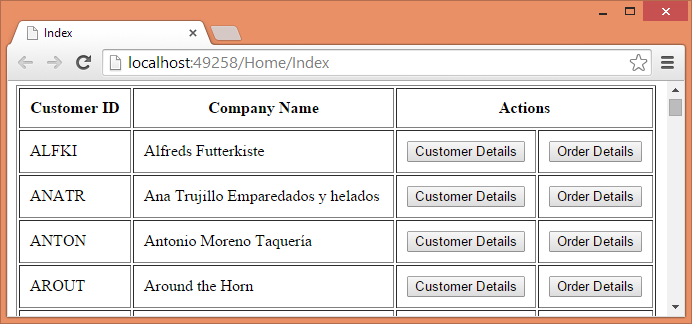
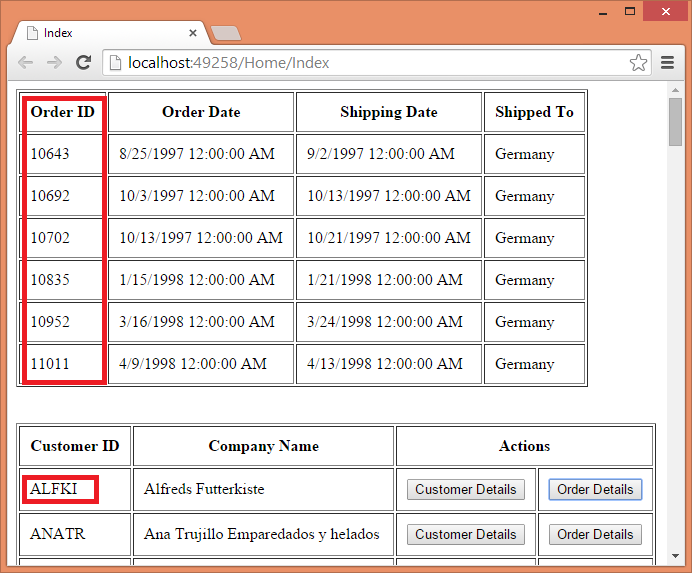
Consider the following figure that shows one such arrangement:

The above figure shows a list of records from Customers table of Northwind database. You can Insert a new customer by clicking on Insert button. You can select a row for editing by clicking on the Select button. The selected customer is shown below the main table for editing. Similarly you can also delete a customer by clicking on the Delete button.
Model and View Model
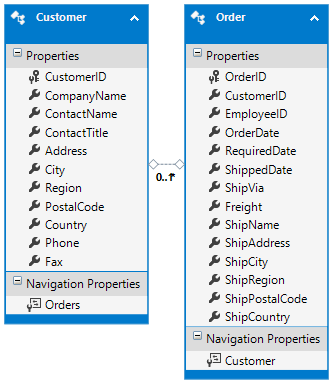
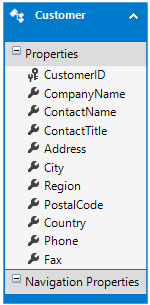
Let's see how the above application can be built. Begin by creating a new empty ASP.NET MVCproject in Visual Studio. Then add an ADO.NET Entity Data Model for the Customers table. The Customer entity class is shown below:
Then add a new POCO to the Models folder and name it CustomersViewModel. As you will see later, this view model class will be passed from the HomeController to the Index view. The CustomersViewModel class is shown below:
public class CustomersViewModel
{
    public List<Customer> Customers { get; set; }
    public Customer SelectedCustomer { get; set; }
    public string DisplayMode { get; set; }
}
The CustomersViewModel class consists of three properties. The Customers property holds a List of Customer that are to be displayed on the view. The SelectedCustomer property points to a Customer that is selected by the user. If no Customer is selected this property is null. The DisplayMode property indicates the mode of the Customer details area. Possible values are ReadOnly (after selection), ReadWrite (during edit) and WriteOnly (during insert). For the sake of simplicity DisplayMode is created as a string property, you can easily make it to accept an enumeration.
Home controller and its action methods
Then add HomeController in the Controllers folder. The HomeController will contain the following action methods:
- Index()
- Select()
- New()
- Insert()
- Edit()
- Update()
- Delete()
- Cancel()
The method names are self-explanatory. All the actions except Index() are called as a result of POST operation. Let's discuss them briefly one by one.
public ActionResult Index()
{
    using (NorthwindEntities db = new NorthwindEntities())
    {
        CustomersViewModel model = new CustomersViewModel();
        model.Customers = db.Customers.OrderBy(
                m => m.CustomerID).Take(5).ToList();
        model.SelectedCustomer = null;
        return View(model);
    }
}
The Index() action fetches a list of customers and fills it in the Customers view model property. The SelectedCustomer is set to null because there is no selected customer in the beginning. Note that for the sake of simplicity the above code fetches only 5 customers. You can, of course, fetch all if you so wish.
[HttpPost]
public ActionResult New()
{
using (NorthwindEntities db = new NorthwindEntities())
{
CustomersViewModel model = new CustomersViewModel();
model.Customers = db.Customers.OrderBy(
m => m.CustomerID).Take(5).ToList();
model.SelectedCustomer = null;
model.DisplayMode = "WriteOnly";
return View("Index", model);
}
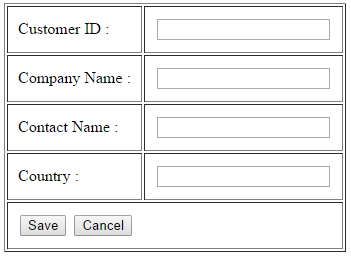
}The New() action is called when a user hits the Insert button at the top of the page. It fills the Customers list as before. SelectedCustomer is set to null because a new record is to be added. The DisplayMode is set to WriteOnly because we will be accepting new customer details. The following figure shows how the insert area looks like:
[HttpPost]
public ActionResult Insert(Customer obj)
{
    using (NorthwindEntities db = new NorthwindEntities())
    {
        db.Customers.Add(obj);
        db.SaveChanges();

        CustomersViewModel model = new CustomersViewModel();
        model.Customers = db.Customers.OrderBy(
                         m => m.CustomerID).Take(5).ToList();
        model.SelectedCustomer = db.Customers.Find(obj.CustomerID);
        model.DisplayMode = "ReadOnly";
        return View("Index", model);
    }
}
The Insert() action is called when a user fills new customer details and clicks on the Save button (see above figure). It receives a Customer object as its parameter. Inside, the Insert() action adds that new Customer to the database. It also sets the currently selected customer to the newly added customer by setting the SelectedCustomer property. The DisplayMode is set to ReadOnly so that the record is displayed in read-only manner.
[HttpPost]
public ActionResult Select(string id)
{
using (NorthwindEntities db = new NorthwindEntities())
{
CustomersViewModel model = new CustomersViewModel();
model.Customers = db.Customers.OrderBy(
m => m.CustomerID).Take(5).ToList();
model.SelectedCustomer = db.Customers.Find(id);
model.DisplayMode = "ReadOnly";
return View("Index",model);
}
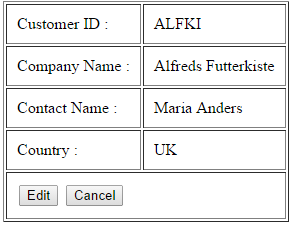
}The Select() action method is called when the Select button from a customer table row is clicked. It receives CustomerID as its parameter. Inside, it fills Customers list as before. This time SelectedCustomer property is set to the Customer whose CustomerID is passed. The DisplayMode property is set to ReadOnly to indicate that the details of the selected customer should be displayed in a read-only table below the main customer listing (see below).
[HttpPost]
public ActionResult Edit(string id)
{
using (NorthwindEntities db = new NorthwindEntities())
{
CustomersViewModel model = new CustomersViewModel();
model.Customers = db.Customers.OrderBy(
m => m.CustomerID).Take(5).ToList();
model.SelectedCustomer = db.Customers.Find(id);
model.DisplayMode = "ReadWrite";
return View("Index", model);
}
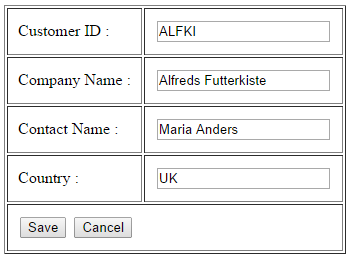
}The Edit() action is called when a user clicks on the Edit button once a Customer is selected. Inside, it sets the SelectedCustomer property to the Customer whose CustomerID is passed to the method. DisplayMode property is set to ReadOnly to display that record in editable table as shown below:
[HttpPost]
public ActionResult Update(Customer obj)
{
    using (NorthwindEntities db = new NorthwindEntities())
    {
        Customer existing = db.Customers.Find(obj.CustomerID);
        existing.CompanyName = obj.CompanyName;
        existing.ContactName = obj.ContactName;
        existing.Country = obj.Country;
        db.SaveChanges();

        CustomersViewModel model = new CustomersViewModel();
        model.Customers = db.Customers.OrderBy(
                      m => m.CustomerID).Take(5).ToList();

        model.SelectedCustomer = existing;
        model.DisplayMode = "ReadOnly";
        return View("Index", model);
    }
}
The Update() action is called when a user modifies an existing Customer data and clicks on the Save button (see above figure). Inside, the code updates an existing Customer and saves the changes back to the database. Then Customers, SelectedCustomer and DisplayMode properties of the view model are set.
[HttpPost]
public ActionResult Delete(string id)
{
    using (NorthwindEntities db = new NorthwindEntities())
    {
        Customer existing = db.Customers.Find(id);
        db.Customers.Remove(existing);
        db.SaveChanges();

        CustomersViewModel model = new CustomersViewModel();
        model.Customers = db.Customers.OrderBy(
                          m => m.CustomerID).Take(5).ToList();

        model.SelectedCustomer = null;
        model.DisplayMode = "";
        return View("Index", model);
    }
}
The Delete() action is called when Delete button in any of the customer row is clicked. It receives CustomerID as its parameter. Inside, it removes the specified Customer and saves the changes back to the database. The SelectedCustomer is set to null because post deletion that customer no longer exists in the database. For the same reason, DisplayMode is set to an empty string.
[HttpPost]
public ActionResult Cancel(string id)
{
    using (NorthwindEntities db = new NorthwindEntities())
    {
        CustomersViewModel model = new CustomersViewModel();
        model.Customers = db.Customers.OrderBy(
                          m => m.CustomerID).Take(5).ToList();
        model.SelectedCustomer = db.Customers.Find(id);
        model.DisplayMode = "ReadOnly";
        return View("Index", model);
    }
}
The Cancel() action is called when Cancel button from the Edit area is clicked. It receives CustomerID as its parameter. It changes the DisplayMode from ReadWrite to ReadOnly so that the SelectedCustomer is displayed in read-only fashion.
Notice that all the above action methods return Index view and CustomerViewModel object.
Index view
Now, let's see what goes inside the Index view.
@model MasterDetailsDemo.Models.CustomersViewModel

@{
    Layout = null;
}

<!DOCTYPE html>

<html>
<head>
    <meta name="viewport" content="width=device-width" />
    <title>Index</title>
    <style>
        .SelectedCustomer
        {
            background-color:gray;
            font-weight:bold;
        }
    </style>
</head>
<body>
    <h1>List of Customers</h1>

    <form method="post">
        <input type="submit"
         value="Insert" formaction="/home/new" />
        <br /><br />
        <table border="1" cellpadding="10">
            <tr>
                <th>CustomerID</th>
                <th>CompanyName</th>
                <th colspan="2">Actions</th>
            </tr>
            @foreach (var item in Model.Customers)
            {
                if (Model.SelectedCustomer != null)
                {
                    if (item.CustomerID ==
                        Model.SelectedCustomer.CustomerID)
                    {
                        @:<tr class="SelectedCustomer">
                    }
                    else
                    {
                        @:<tr>
                    }
                }
                else
                {
                    @:<tr>
                }
                <td>@item.CustomerID</td>
                <td>@item.CompanyName</td>
                <td><input type="submit"
                     formaction="/home/select/@item.CustomerID"
                     value="Select" /></td>
                <td><input type="submit"
                     formaction="/home/delete/@item.CustomerID"
                     value="Delete" /></td>
                @:</tr>
            }
        </table>
    </form>
    <br /><br />
    @{
        if(Model.SelectedCustomer!=null)
        {
            if (Model.DisplayMode == "ReadOnly")
            {
                Html.RenderPartial
                ("ShowCustomer",Model.SelectedCustomer);
            }
            if (Model.DisplayMode == "ReadWrite")
            {
                Html.RenderPartial
                ("EditCustomer",Model.SelectedCustomer);
            }
        }
        if (Model.DisplayMode == "WriteOnly")
        {
            Html.RenderPartial("InsertCustomer",
            new MasterDetailsDemo.Models.Customer());
        }
    }
</body>
</html>
The Index view is divided into two logical parts. The top part displays a list of customers in a table. Notice that a CSS class SelectedCustomer is applied to the row that contains the selected CustomerID. The bottom part displays a Partial Page based on the value of DisplayMode. This way either show, insert or edit areas are displayed. Notice that there are three partial pages involved:
- ShowCustomer.cshtml
- EditCustomer.cshtml
- InsertCustomer.cshtml
These three partial pages render the read-only, read-write and write-only displays respectively. All of them take Customer object as their model. Let's see each of these partial pages one by one.
ShowCustomer partial page
The following code shows ShowCustomer.cshtml partial page.
@model MasterDetailsDemo.Models.Customer

@using(Html.BeginForm("Edit","Home",FormMethod.Post))
{
<table border="1" cellpadding="10">
    <tr>
        <td>Customer ID :</td>
        <td>@Model.CustomerID</td>
    </tr>
    <tr>
        <td>Company Name :</td>
        <td>@Model.CompanyName</td>
    </tr>
    <tr>
        <td>Contact Name :</td>
        <td>@Model.ContactName</td>
    </tr>
    <tr>
        <td>Country :</td>
        <td>@Model.Country</td>
    </tr>
    <tr>
        <td colspan="2">
            <input type="submit" value="Edit"
                   formaction="/home/edit/@Model.CustomerID" />
            <input type="submit" value="Cancel"
                   formaction="/home/index" />
        </td>
    </tr>
</table>
}
Notice that the Edit and Cancel buttons submit to /home/edit and /home/index respectively. The other markup from the partial page is quite straightforward and displays CustomerID, CompanyName, ContactName and Country columns for a selected customer.
EditCustomer partial page
The following code shows what goes inside EditCustomer.cshtml:
@model MasterDetailsDemo.Models.Customer

@using (Html.BeginForm("Update", "Home", FormMethod.Post))
{
    <table border="1" cellpadding="10">
        <tr>
            <td>Customer ID :</td>
            <td>@Html.TextBoxFor(m => m.CustomerID,
                         new { @readonly = "readonly" })</td>
        </tr>
        <tr>
            <td>Company Name :</td>
            <td>@Html.TextBoxFor(m => m.CompanyName)</td>
        </tr>
        <tr>
            <td>Contact Name :</td>
            <td>@Html.TextBoxFor(m => m.ContactName)</td>
        </tr>
        <tr>
            <td>Country :</td>
            <td>@Html.TextBoxFor(m => m.Country)</td>
        </tr>
        <tr>
            <td colspan="2">
                <input type="submit" value="Save"
                       formaction="/home/update" />
                <input type="submit" value="Cancel"
                       formaction="/home/cancel/@Model.CustomerID" />
            </td>
        </tr>
    </table>
}
Note that Save button and Cancel button submit to /home/update and /home/cancel respectively.
InsertCustomer partial page
Finally, here is the markup of InsertCustomer.cshtml:
@model MasterDetailsDemo.Models.Customer

@using (Html.BeginForm("Insert", "Home", FormMethod.Post))
{
    <table border="1" cellpadding="10">
        <tr>
            <td>Customer ID :</td>
            <td>@Html.TextBoxFor(m => m.CustomerID)</td>
        </tr>
        <tr>
            <td>Company Name :</td>
            <td>@Html.TextBoxFor(m => m.CompanyName)</td>
        </tr>
        <tr>
            <td>Contact Name :</td>
            <td>@Html.TextBoxFor(m => m.ContactName)</td>
        </tr>
        <tr>
            <td>Country :</td>
            <td>@Html.TextBoxFor(m => m.Country)</td>
        </tr>
        <tr>
            <td colspan="2">
                <input type="submit" value="Save"
                       formaction="/home/insert" />
                <input type="submit" value="Cancel"
                       formaction="/home/index" />
            </td>
        </tr>
    </table>
}
The Save and Cancel button submit to /home/insert and /home/index respectively.
That's it! All the parts of the application are in place. Run the application and test whether all the operations work as expected.