top button
Flag Notify
    Connect to us
      Site Registration

Site Registration

Perform List, Insert, Update And Delete In A Single View In ASP.NET MVC

+4 votes
1,146 views

A common way to perform list, insert, update and delete operations in ASP.NET MVC is to create four separate views. The List view forms the launching view where records are displayed and you can choose to Edit, Delete or Insert a record. However, in some cases you may want to perform all these operations in a single view itself. This task can be accomplished using full page postback or using Ajax. This article discusses the former technique.

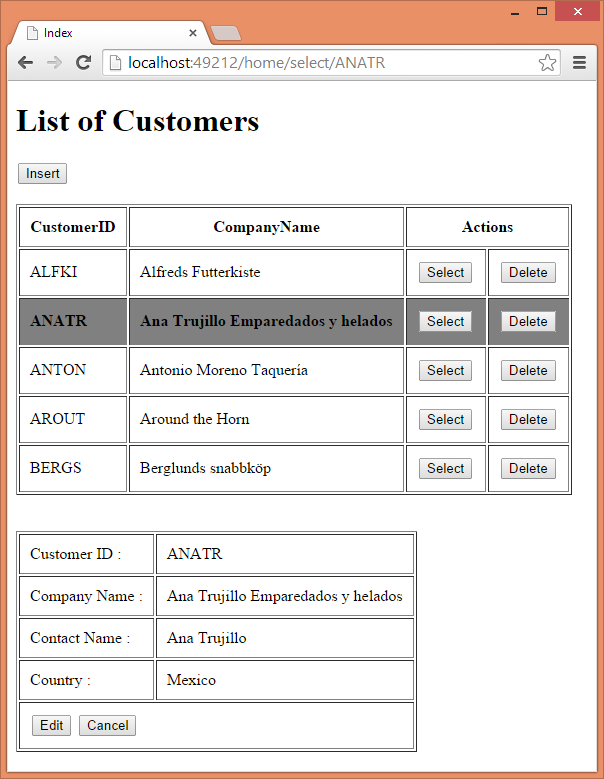
Consider the following figure that shows one such arrangement:
image

The above figure shows a list of records from Customers table of Northwind database. You can Insert a new customer by clicking on Insert button. You can select a row for editing by clicking on the Select button. The selected customer is shown below the main table for editing. Similarly you can also delete a customer by clicking on the Delete button.

Model and View Model

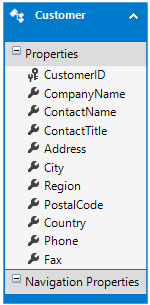
Let's see how the above application can be built. Begin by creating a new empty ASP.NET MVCproject in Visual Studio. Then add an ADO.NET Entity Data Model for the Customers table. The Customer entity class is shown below:
image

Then add a new POCO to the Models folder and name it CustomersViewModel. As you will see later, this view model class will be passed from the HomeController to the Index view. The CustomersViewModel class is shown below:

public class CustomersViewModel
{
    public List<Customer> Customers { get; set; }
    public Customer SelectedCustomer { get; set; }
    public string DisplayMode { get; set; }
}

The CustomersViewModel class consists of three properties. The Customers property holds a List of Customer that are to be displayed on the view. The SelectedCustomer property points to a Customer that is selected by the user. If no Customer is selected this property is null. The DisplayMode property indicates the mode of the Customer details area. Possible values are ReadOnly (after selection), ReadWrite (during edit) and WriteOnly (during insert). For the sake of simplicity DisplayMode is created as a string property, you can easily make it to accept an enumeration.

Home controller and its action methods

Then add HomeController in the Controllers folder. The HomeController will contain the following action methods:

  • Index()
  • Select()
  • New()
  • Insert()
  • Edit()
  • Update()
  • Delete()
  • Cancel()

The method names are self-explanatory. All the actions except Index() are called as a result of POST operation. Let's discuss them briefly one by one.

public ActionResult Index()
{
    using (NorthwindEntities db = new NorthwindEntities())
    {
        CustomersViewModel model = new CustomersViewModel();
        model.Customers = db.Customers.OrderBy(
                m => m.CustomerID).Take(5).ToList(); 
        model.SelectedCustomer = null;
        return View(model);
    }
}

The Index() action fetches a list of customers and fills it in the Customers view model property. The SelectedCustomer is set to null because there is no selected customer in the beginning. Note that for the sake of simplicity the above code fetches only 5 customers. You can, of course, fetch all if you so wish.

[HttpPost]
public ActionResult New()
{
    using (NorthwindEntities db = new NorthwindEntities())
    {
        CustomersViewModel model = new CustomersViewModel();
        model.Customers = db.Customers.OrderBy(
                       m => m.CustomerID).Take(5).ToList();
        model.SelectedCustomer = null;
        model.DisplayMode = "WriteOnly";
        return View("Index", model);
    }
}

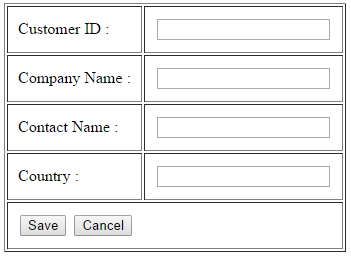
The New() action is called when a user hits the Insert button at the top of the page. It fills the Customers list as before. SelectedCustomer is set to null because a new record is to be added. The DisplayMode is set to WriteOnly because we will be accepting new customer details. The following figure shows how the insert area looks like:
image

[HttpPost]
public ActionResult Insert(Customer obj)
{
    using (NorthwindEntities db = new NorthwindEntities())
    {
        db.Customers.Add(obj);
        db.SaveChanges();

        CustomersViewModel model = new CustomersViewModel();
        model.Customers = db.Customers.OrderBy(
                         m => m.CustomerID).Take(5).ToList();
        model.SelectedCustomer = db.Customers.Find(obj.CustomerID);
        model.DisplayMode = "ReadOnly";
        return View("Index", model);
    }
}

The Insert() action is called when a user fills new customer details and clicks on the Save button (see above figure). It receives a Customer object as its parameter. Inside, the Insert() action adds that new Customer to the database. It also sets the currently selected customer to the newly added customer by setting the SelectedCustomer property. The DisplayMode is set to ReadOnly so that the record is displayed in read-only manner.

[HttpPost]
public ActionResult Select(string id)
{
    using (NorthwindEntities db = new NorthwindEntities())
    {
        CustomersViewModel model = new CustomersViewModel();
        model.Customers = db.Customers.OrderBy(
                    m => m.CustomerID).Take(5).ToList();
        model.SelectedCustomer = db.Customers.Find(id);
        model.DisplayMode = "ReadOnly";
        return View("Index",model);
    }
}

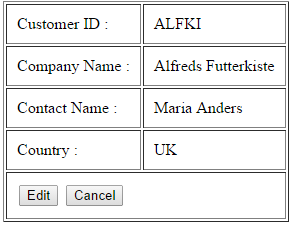
The Select() action method is called when the Select button from a customer table row is clicked. It receives CustomerID as its parameter. Inside, it fills Customers list as before. This time SelectedCustomer property is set to the Customer whose CustomerID is passed. The DisplayMode property is set to ReadOnly to indicate that the details of the selected customer should be displayed in a read-only table below the main customer listing (see below).
image

[HttpPost]
public ActionResult Edit(string id)
{
    using (NorthwindEntities db = new NorthwindEntities())
    {
        CustomersViewModel model = new CustomersViewModel();
        model.Customers = db.Customers.OrderBy(
                        m => m.CustomerID).Take(5).ToList();
        model.SelectedCustomer = db.Customers.Find(id);
        model.DisplayMode = "ReadWrite";
        return View("Index", model);
    }
}

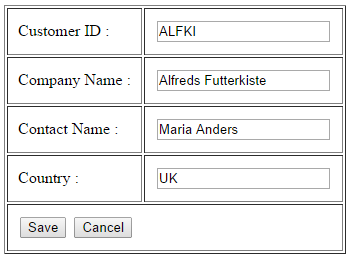
The Edit() action is called when a user clicks on the Edit button once a Customer is selected. Inside, it sets the SelectedCustomer property to the Customer whose CustomerID is passed to the method. DisplayMode property is set to ReadOnly to display that record in editable table as shown below:
image

[HttpPost]
public ActionResult Update(Customer obj)
{
    using (NorthwindEntities db = new NorthwindEntities())
    {
        Customer existing = db.Customers.Find(obj.CustomerID);
        existing.CompanyName = obj.CompanyName;
        existing.ContactName = obj.ContactName;
        existing.Country = obj.Country;
        db.SaveChanges();
                
        CustomersViewModel model = new CustomersViewModel();
        model.Customers = db.Customers.OrderBy(
                      m => m.CustomerID).Take(5).ToList();

        model.SelectedCustomer = existing;
        model.DisplayMode = "ReadOnly";
        return View("Index", model);
    }
}

The Update() action is called when a user modifies an existing Customer data and clicks on the Save button (see above figure). Inside, the code updates an existing Customer and saves the changes back to the database. Then Customers, SelectedCustomer and DisplayMode properties of the view model are set.

[HttpPost]
public ActionResult Delete(string id)
{
    using (NorthwindEntities db = new NorthwindEntities())
    {
        Customer existing = db.Customers.Find(id);
        db.Customers.Remove(existing);
        db.SaveChanges();

        CustomersViewModel model = new CustomersViewModel();
        model.Customers = db.Customers.OrderBy(
                          m => m.CustomerID).Take(5).ToList();

        model.SelectedCustomer = null;
        model.DisplayMode = "";
        return View("Index", model);
    }
}

The Delete() action is called when Delete button in any of the customer row is clicked. It receives CustomerID as its parameter. Inside, it removes the specified Customer and saves the changes back to the database. The SelectedCustomer is set to null because post deletion that customer no longer exists in the database. For the same reason, DisplayMode is set to an empty string.

[HttpPost]
public ActionResult Cancel(string id)
{
    using (NorthwindEntities db = new NorthwindEntities())
    {
        CustomersViewModel model = new CustomersViewModel();
        model.Customers = db.Customers.OrderBy(
                          m => m.CustomerID).Take(5).ToList();
        model.SelectedCustomer = db.Customers.Find(id);
        model.DisplayMode = "ReadOnly";
        return View("Index", model);
    }
}

The Cancel() action is called when Cancel button from the Edit area is clicked. It receives CustomerID as its parameter. It changes the DisplayMode from ReadWrite to ReadOnly so that the SelectedCustomer is displayed in read-only fashion.

Notice that all the above action methods return Index view and CustomerViewModel object.

Index view

Now, let's see what goes inside the Index view.

@model MasterDetailsDemo.Models.CustomersViewModel

@{
    Layout = null;
}

<!DOCTYPE html>

<html>
<head>
    <meta name="viewport" content="width=device-width" />
    <title>Index</title>
    <style>
        .SelectedCustomer
        {
            background-color:gray;
            font-weight:bold;
        }
    </style>
</head>
<body>
    <h1>List of Customers</h1>

    <form method="post">
        <input type="submit" 
         value="Insert" formaction="/home/new" />
        <br /><br />
        <table border="1" cellpadding="10">
            <tr>
                <th>CustomerID</th>
                <th>CompanyName</th>
                <th colspan="2">Actions</th>
            </tr>
            @foreach (var item in Model.Customers)
            {
                if (Model.SelectedCustomer != null)
                {
                    if (item.CustomerID == 
                        Model.SelectedCustomer.CustomerID)
                    {
                        @:<tr class="SelectedCustomer">
                    }
                    else
                    {
                        @:<tr>
                    }
                }
                else
                {
                    @:<tr>
                }
                <td>@item.CustomerID</td>
                <td>@item.CompanyName</td>
                <td><input type="submit" 
                     formaction="/home/select/@item.CustomerID" 
                     value="Select" /></td>
                <td><input type="submit" 
                     formaction="/home/delete/@item.CustomerID" 
                     value="Delete" /></td>
                @:</tr>
            }
        </table>
    </form>
    <br /><br />
    @{
        if(Model.SelectedCustomer!=null)
        {
            if (Model.DisplayMode == "ReadOnly")
            {
                Html.RenderPartial
                ("ShowCustomer",Model.SelectedCustomer);
            }
            if (Model.DisplayMode == "ReadWrite")
            {
                Html.RenderPartial
                ("EditCustomer",Model.SelectedCustomer);
            }
        }
        if (Model.DisplayMode == "WriteOnly")
        {
            Html.RenderPartial("InsertCustomer",
            new MasterDetailsDemo.Models.Customer());
        }
    }
</body>
</html>

The Index view is divided into two logical parts. The top part displays a list of customers in a table. Notice that a CSS class SelectedCustomer is applied to the row that contains the selected CustomerID. The bottom part displays a Partial Page based on the value of DisplayMode. This way either show, insert or edit areas are displayed. Notice that there are three partial pages involved:

  • ShowCustomer.cshtml
  • EditCustomer.cshtml
  • InsertCustomer.cshtml

These three partial pages render the read-only, read-write and write-only displays respectively. All of them take Customer object as their model. Let's see each of these partial pages one by one.

ShowCustomer partial page

The following code shows ShowCustomer.cshtml partial page.

@model MasterDetailsDemo.Models.Customer

@using(Html.BeginForm("Edit","Home",FormMethod.Post))
{ 
<table border="1" cellpadding="10">
    <tr>
        <td>Customer ID :</td>
        <td>@Model.CustomerID</td>
    </tr>
    <tr>
        <td>Company Name :</td>
        <td>@Model.CompanyName</td>
    </tr>
    <tr>
        <td>Contact Name :</td>
        <td>@Model.ContactName</td>
    </tr>
    <tr>
        <td>Country :</td>
        <td>@Model.Country</td>
    </tr>
    <tr>
        <td colspan="2">
            <input type="submit" value="Edit" 
                   formaction="/home/edit/@Model.CustomerID" />
            <input type="submit" value="Cancel" 
                   formaction="/home/index" />
        </td>
    </tr>
</table>
}

Notice that the Edit and Cancel buttons submit to /home/edit and /home/index respectively. The other markup from the partial page is quite straightforward and displays CustomerID, CompanyName, ContactName and Country columns for a selected customer.

EditCustomer partial page

The following code shows what goes inside EditCustomer.cshtml:

@model MasterDetailsDemo.Models.Customer

@using (Html.BeginForm("Update", "Home", FormMethod.Post))
{
    <table border="1" cellpadding="10">
        <tr>
            <td>Customer ID :</td>
            <td>@Html.TextBoxFor(m => m.CustomerID, 
                         new { @readonly = "readonly" })</td>
        </tr>
        <tr>
            <td>Company Name :</td>
            <td>@Html.TextBoxFor(m => m.CompanyName)</td>
        </tr>
        <tr>
            <td>Contact Name :</td>
            <td>@Html.TextBoxFor(m => m.ContactName)</td>
        </tr>
        <tr>
            <td>Country :</td>
            <td>@Html.TextBoxFor(m => m.Country)</td>
        </tr>
        <tr>
            <td colspan="2">
                <input type="submit" value="Save" 
                       formaction="/home/update" />
                <input type="submit" value="Cancel" 
                       formaction="/home/cancel/@Model.CustomerID" />
            </td>
        </tr>
    </table>
}

Note that Save button and Cancel button submit to /home/update and /home/cancel respectively.

InsertCustomer partial page

Finally, here is the markup of InsertCustomer.cshtml:

@model MasterDetailsDemo.Models.Customer

@using (Html.BeginForm("Insert", "Home", FormMethod.Post))
{
    <table border="1" cellpadding="10">
        <tr>
            <td>Customer ID :</td>
            <td>@Html.TextBoxFor(m => m.CustomerID)</td>
        </tr>
        <tr>
            <td>Company Name :</td>
            <td>@Html.TextBoxFor(m => m.CompanyName)</td>
        </tr>
        <tr>
            <td>Contact Name :</td>
            <td>@Html.TextBoxFor(m => m.ContactName)</td>
        </tr>
        <tr>
            <td>Country :</td>
            <td>@Html.TextBoxFor(m => m.Country)</td>
        </tr>
        <tr>
            <td colspan="2">
                <input type="submit" value="Save" 
                       formaction="/home/insert" />
                <input type="submit" value="Cancel" 
                       formaction="/home/index" />
            </td>
        </tr>
    </table>
}

The Save and Cancel button submit to /home/insert and /home/index respectively.

That's it! All the parts of the application are in place. Run the application and test whether all the operations work as expected.

posted Oct 6, 2016 by Shivaranjini

  Promote This Article
Facebook Share Button Twitter Share Button LinkedIn Share Button


Related Articles

In my previous article I illustrated how jQuery can be used to select and delete records in an ASP.NET MVC application. A few readers asked how the same can be accomplished using AngularJS instead of jQuery. This article shows just that.

Recollect how our Index view looks like and how it allows you to select all rows through the header checkbox or individual rows through the respective checkboxes.

image

As you can see there are two ways to select records for deletion:

  • You select checkboxes for rows to be deleted individually.
  • You can check the checkbox placed in the header row to select all the rows. This checkbox toggles the checked state of the other checkboxes.

Once selected you can click on the Delete Selected Customers button to actually delete the records.

In order to implement such a functionality using ASP.NET MVC and AngularJS you will need to modify the Index view as shown below:

@model List<SelectAllDeleteDemo.Models.Customer>
...
...
<html ng-app>
<body ng-controller="MyController">
    <h1>List of Customers</h1>
    <input type="button" id="delete" 
           value="Delete Selected Customers" 
           ng-click="DeleteSelected()" />
    <br /><br />
    <table border="1" cellpadding="11">
        <tr>
            <th><input type="checkbox" id="checkAll" 
                 ng-click="ToggleSelectAll()" /></th>
            <th>CustomerID</th>
            <th>CompanyName</th>
            <th>Country</th>
        </tr>
        @{ int i = 0;}
        @foreach (var item in Model)
        {
            <tr>
                <td><input type="checkbox" 
                     class="checkBox" 
                     value="@item.CustomerID" 
                     ng-checked="selectAll" 
                     ng-model="customerIDs[@i].selected" /></td>
                <td>@item.CustomerID</td>
                <td>@item.CompanyName</td>
                <td>@item.Country</td>
            </tr>
            i++;
        }
    </table>
</body>
</html>

Notice a few things about this markup:

  • The <html> tag has ng-app attribute indicating that this page is an AngularJS application.
  • The <body> tag specifies ng-controller attribute to be MyController. You will write this controller shortly.
  • The Delete Selected Customers button wires a click event handler using ng-click attribute and it is set to DeleteSelected().
  • The header checkbox wires click event handler using ng-click to ToggleSelectAll(). This event handler is responsible for toggling the state of all the checkboxes.
  • The checkboxes in individual rows are bound with selected property of objects stored in customerIDs array. This part will be clear once you see the code shortly.

Now add a script reference to AngularJS and also add a <script> block. Then write the following jQuery code:

<script src="~/Scripts/angular-1.2.js"></script>
<script>
    function MyController($scope, $http) {
        $scope.selectAll = false;
        $scope.customerIDs = new Array();

        @foreach (var item in Model)
        {
            @:$scope.customerIDs.push({ 'customerID': 
             '@item.CustomerID', 'selected': false });
        }

        $scope.DeleteSelected = function () {
            var selectedIDs = new Array();
            angular.forEach
            ($scope.customerIDs, function (item) {
                if(item.selected)
                {
                    selectedIDs.push(item.customerID);
                }
            });
            var promise = $http.post
                    ("/home/delete", selectedIDs);
            promise.success(function (msg) {
                alert(msg);
            }).error(function () {
                alert("Error");
            });
        }

        $scope.ToggleSelectAll = function () {
            $scope.selectAll = !$scope.selectAll;
            angular.forEach(
                $scope.customerIDs, function (item) {
                item.selected = $scope.selectAll;
            });
        }
    }
</script>

The code consists of MyController function - the AngularJS controller - with two model properties and two event handlers.

The selectAll model property is initially set to false indicating that all the checkboxes are unchecked. Recollect that selectAll property is bound with the ng-checked attribute of individual checkboxes. The customerIDs array stores JavaScript objects, each holding a CustomerID and its checked state. Notice how this array is filled by dynamically emitting push() script calls through Razor code block. Recollect that checkboxes from the individual rows are model bound with customerIDs[i].selected property. This way checking or unchecking a checkbox individually (rather than header checkbox) toggles the corresponding entry from the customerIDs array.

The DeleteSelected() function handles the click event of the Delete Selected Customers button. Inside, the code iterates through the customerIDs array using forEach() and determines whether selected property is true or false. If the selected property is true, that customerID is pushed into a local array - selectedIDs. This way you get an array of CustomerIDs that are checked in the table. Then the code makes an Ajax call to the /home/delete action method. This is done using the post() method of $http. The post() method takes two parameters - url of the resource to be invoked and data to be sent along with the request. In this case you pass the selectedIDs array to the Delete() action method. The success() and error() method simply wire the respective callbacks to the promise object returned by the post() method.

The ToggleSelectAll() function acts as the click event handler for the header checkbox. Inside, it toggles the selectAll model property. The code then iterates through all the elements of the customerIDs array and set selected property to the value of selectAll. This way all the checkboxes from the table rows toggle their state.

That's it! Run the application and test the functionality.

READ MORE

Sometimes you need to select records for certain action using checkboxes. For example, you may select records for deleting and then delete them from the database. Consider the following screen shot that shows such an example in action.

image

As you can see there are two ways to select records for deletion:

  • You select checkboxes for rows to be deleted individually.
  • You can check the checkbox placed in the header row to select all the rows. This checkbox toggles the checked state of the other checkboxes.

Once selected you can click on the Delete Selected Customers button to actually delete the records.

Implementing such a functionality is straightforward using ASP.NET MVC, jQuery and Ajax. Let's see how.

As an example we will use Customers table of the Northwind database for this example. You will need to create a model class for the Customers table using EF code first. The Customer class is shown below:

public partial class Customer
{
    [StringLength(5)]
    public string CustomerID { get; set; }

    [Required]
    [StringLength(40)]
    public string CompanyName { get; set; }

    [StringLength(30)]
    public string ContactName { get; set; }

    [StringLength(30)]
    public string ContactTitle { get; set; }

    [StringLength(60)]
    public string Address { get; set; }

    [StringLength(15)]
    public string City { get; set; }

    [StringLength(15)]
    public string Region { get; set; }

    [StringLength(10)]
    public string PostalCode { get; set; }

    [StringLength(15)]
    public string Country { get; set; }

    [StringLength(24)]
    public string Phone { get; set; }

    [StringLength(24)]
    public string Fax { get; set; }
}

The NorthwindDbContext - the DbContext of our model - is shown below:

public partial class NorthwindDbContext : DbContext
{
    public NorthwindDbContext()
        : base("name=NorthwindDbContext")
    {
    }

    public virtual DbSet<Customer> Customers { get; set; }

    protected override void OnModelCreating
                (DbModelBuilder modelBuilder)
    {
        modelBuilder.Entity<Customer>()
            .Property(e => e.CustomerID)
            .IsFixedLength();
    }
}

Notice that the NorthwindDbContext assumes that the database connection string is stored in web.config with a name of NorthwindDbContext.

Now add HomeController and write Index() and Delete() actions as shown below:

public ActionResult Index()
{
    using (NorthwindDbContext db = 
                  new NorthwindDbContext())
    {
        var query = from c in db.Customers
                    select c;
        return View(query.ToList());
    }
}

public ActionResult Delete(string[] customerIDs)
{
    using (NorthwindDbContext db = 
                        ew NorthwindDbContext())
    {
        foreach (string customerID in customerIDs)
        {
            Customer obj = db.Customers.Find(customerID);
            db.Customers.Remove(obj);
        }
        db.SaveChanges();
        return Json("All the customers 
                     deleted successfully!");
    }
}

The code from the Index() action simply picks all the customers from the Customers table and passes them to the Index view for display.

The Delete() action takes a single parameter - array of CustomerIDs to be deleted. The Delete() action will be called through client side jQuery code and while calling the array will be passed to it. The Delete() action simply iterates through the customerIDs array and one-by-one deletes the customers from the database. Finally, a success message is sent back to the caller in JSON format.

Now add Index view and also add a <script> reference to the jQuery library. Then add the following markup in the Index view.

@model List<SelectAllDeleteDemo.Models.Customer>
...
...
<body>
    <h1>List of Customers</h1>
    <input type="button" id="delete" 
         value="Delete Selected Customers" />
    <br /><br />
    <table border="1" cellpadding="10">
        <tr>
            <th><input type="checkbox" id="checkAll"/></th>
            <th>CustomerID</th>
            <th>CompanyName</th>
            <th>Country</th>
        </tr>
        @foreach(var item in Model)
        {
            <tr>
                <td><input type="checkbox" class="checkBox" 
                     value="@item.CustomerID" /></td>
                <td>@item.CustomerID</td>
                <td>@item.CompanyName</td>
                <td>@item.Country</td>
            </tr>
        }
    </table>
</body>
...

Notice a few things about this markup:

  • The customer data - CustomerID, CompanyName and Country - is displayed in a table.
  • The header row contains a checkbox whose ID is checkAll
  • Each table row contains a checkbox whose class attribute is set to checkBox. And its value is set to the CustomerID of that row.
  • The button above the table is used to initiate the delete operation and its ID is delete.

Now add a <script> block and write the following jQuery code:

$(document).ready(function () {

    $("#checkAll").click(function () {
        $(".checkBox").prop('checked', 
            $(this).prop('checked'));
    });

    $("#delete").click(function () {
        var selectedIDs = new Array();
        $('input:checkbox.checkBox').each(function () {
            if ($(this).prop('checked')) {
                selectedIDs.push($(this).val());
            }
        });

        var options = {};
        options.url = "/home/delete";
        options.type = "POST";
        options.data = JSON.stringify(selectedIDs);
        options.contentType = "application/json";
        options.dataType = "json";
        options.success = function (msg) {
            alert(msg);
        };
        options.error = function () {
            alert("Error while deleting the records!");
        };
        $.ajax(options);

    });
});

The code wires click event handlers for the checkAll checkbox and the delete button. The click event handler of the checkAll checkbox toggles the checked state of all the checkboxes. This is done by selecting the checkboxes using the jQuery class selector. The checkboxes whose class attribute is checkBox are matched and their checked property is toggled. Notice the use of prop() method to do this.

The click event handler of the delete button declares an array variable to store the selected CustomerIDs. It then selects all the checkboxes with CSS class of checkBox. The each() method iterates through these checkboxes. If a checkbox is checked its value is pushed into the array. This way we get all the CustomerIDs into the selectedIDs array. The success callback simply displays the success message returned from the Delete() action.

Then options object is created to hold all the Ajax configuration properties. Notice that url property points to the Delete() action and data property holds the JSON version of the selectedIDs array. Finally, $.ajax() is used to make the Ajax call.

That's it! Run the application and test the functionality.

READ MORE

By default ASP.NET MVC stores all the views associated to a controller inside a sub-folder of Views folder. On the same lines partial views and layout pages are stored inside Shared sub-folder under Views folder. Although this default arrangement works well in most of the cases, at times you may want to deviate from this convention based arrangement and store views, partial views and layouts in some different folder structure. Consider, for example, a huge application that wants to arrange partial views in several sub-folders inside Shared folder. Or some application may want to store views outside views folder. In such cases when you use view names in methods such as View(), Html.Partial() and PartialView() the system won't be able to find the required .cshtml files. Of course, you can use fully qualified paths in some cases but that makes your code rigid because any future change in the paths will require changes at multiple places.

Luckily, you can easily deal with the situation by creating a custom view engine. This article tells you how.

Let's assume that you wish to store partial views and layouts in the following custom folder structure:

image

Notice that partial views and layouts aren't stored directly inside Shared folder. They are stored inside PartialViews and Layouts sub-folders of Shared folder. Views are stored as per default convention. Let's assume that Index view uses Test.cshtml like this:

@Html.Partial("Test")

If you run the application under these settings, you will get this error in the browser:

image

As you can see, the system is unable to find Test.cshtml residing inside PartialViews sub-folder.

To deal with this situation you can create a custom view engine and then supply the custom search locations to the new view engine. Don't worry. Creating a custom view engine to accomplish this task is quite straightforward. Let's do that now.

Add a new class to your project and give it whatever name you wish to give to the new view engine. In my code I am calling my view engine as BinaryIntellectViewEngine. The complete class is shown below:

public class BinaryIntellectViewEngine : RazorViewEngine
{
    public BinaryIntellectViewEngine()
    {
        string[] locations = new string[] {  
            "~/Views/{1}/{0}.cshtml",  
            "~/Views/Shared/PartialViews/{0}.cshtml",  
            "~/Views/Shared/Layouts/{0}.cshtml"
        };

        this.ViewLocationFormats = locations;
        this.PartialViewLocationFormats = locations;
        this.MasterLocationFormats = locations;
    }
}

The BinaryIntellectViewEngine class inherits from RazorViewEngine base class. In our example we are using Razor view engine and hence the above code inherits from RazorViewEngine class. This inbuilt class comes from System.Web.Mvc namespace.

The magic that makes the custom locations work happens inside the constructor of the custom view engine class. Here, we create an array of strings. This array contains a list of all locations where the view engine should look for the views, partial views and layout pages. Notice the convention used in the paths. The placeholder {0} contains the view or payout page name whereas {1} contains the folder name (controller name).

The three base class properties namely ViewLocationFormats, PartialViewLocationFormats and MasterLocationFormats point to the list of search locations for views, partial views and layout pages respectively. In our example, all the three properties are set to the location string array.

This completes our custom view engine. The final step is to register this new view engine with the MVC framework. This is done inside Application_Start event in Global.asax.

void Application_Start(object sender, EventArgs e)
{
    AreaRegistration.RegisterAllAreas();
    GlobalConfiguration.Configure(WebApiConfig.Register);
    RouteConfig.RegisterRoutes(RouteTable.Routes);

    ViewEngines.Engines.Clear();
    ViewEngines.Engines.Add(new BinaryIntellectViewEngine());
}

The Application_Start event handler clears the existing registered view engines by calling Clear() method of ViewEngines.Engines collection. Then the new view engine is added using Add() method.

That's it! If you run the application now you should see the Test partial view rendered successfully.

image

READ MORE

Developers new to ASP.NET MVC often ask these questions:

  • How do I pass multiple models to a view?
  • How do I pass anonymous objects to a view?

This article provides a solution to both of these questions. Before we discuss the solution, let's quickly understand these questions and possible solutions in brief.

How do I pass multiple models to a view?

Consider a case where you have two model classes - Customer and Order. ASP.NET MVC allows you to pass only ONE model to a view. You typically do that by passing the model as a View() method parameter. This means a view can be bound with one and only one model. So, in the preceding example a view can either display Customer data or Order data. What if a view requires to display both? You can tackle such a situation as follows:

  • Create a new view model class, say CustomerOrder, that has two properties. One for holding Customer data and other for holding Order data. 
    public class CustomerOrder
    {
      public List<Customer> Customers{get; set;}
      public List<Order> Orders{get; set;}
    }
  • Pass one of the model as the View() method parameter and other(s) through ViewData or ViewBag.
  • Use ExpandoObject to create a dynamic model.

The first two approaches are quite straightforward and hence I won't discuss them here. Out of these three the first solution (custom view model class) is a recommended approach to deal with the situation. However, it calls for creating of a new view model class (POCO). The second one does the job but the view can't be strongly typed because models passed through ViewData or ViewBag are not part of the Model property of the view. The third approach is the topic of this article and is discussed in detail in the later part of this article.

 How do I pass anonymous objects to a view?

Sometimes you need to write LINQ to Entities queries that return data filled in an anonymous type. Consider the following example:

var query = from c in db.Customers
            join o in db.Orders
            on c.CustomerID equals o.CustomerID
            orderby c.CustomerID ascending
            select new { 
                c.CustomerID,
                c.CompanyName,
                o.OrderID,
                o.OrderDate 
            };

Here, you are not selecting Customer objects (select c). You are creating an anonymous type that has four properties - CustomerID, CompanyName, OrderID and OrderDate. Although this LINQ query works without any problem, the problem is you can't pass anonymous types to an ASP.NET MVC view. If you try to do so, you will see a runtime error. Of course, just like previous case you can create a new view model (POCO with these four properties) and project your data in it. You can then pass the collection to the View() method. As before this is a recommended solution but again you need create an additional class. If you wish to avoid doing that for some reason, here also you can resort to ExpandoObject. You can store the realized data in an ExpandoObject and then pass it to the view.

ExpandoObject to the rescue

The ExpandoObject class resides in System.Dynamic namespace and represents an object whose members can be dynamically added and removed at run time. In our specific cases an ExpandoObject can act as a container for multiple pieces of data that you wish to pass as a model to a view. So, in a way ExpandoObject is a "dynamic" alternative to a manually created view model.

Storing data in an ExpandoObject is straightforward.

dynamic model = new ExpandoObject();
model.Customers = <some_data_here>;
model.Orders = <some_data_here>;

The above code creates an instance of ExpandoObject class. Notice that the instance is stored in a variable of type dynamic. The code then assigns Customers and Orders properties of the ExpandoObject to some data. You should be familiar with this usage because ViewBag uses the same "dynamic" mechanism to store values.

Ok. Now that you know what an ExpandoObject is and how to use it, let's put it to use in our specific situations.

Let's assume that you have two model classes - Customers and Orders - as a part of Entity Framework data model. You wish to pass both of them to a view. So, you can write something like this in an action method:

public ActionResult Index()
{
    NorthwindEntities db=new NorthwindEntities();

    dynamic model = new ExpandoObject();
    model.Customers = db.Customers.ToList();
    model.Orders = db.Orders.ToList();
    return View(model);
}

Notice the code marked in bold letters. The code creates an ExpandoObject and assigns two properties on it - Customers and Orders. These properties store a generic List of the respective model objects. The ExpandoObject is then passed to the View() method.

You can use  the ExpandoObject in the view as shown below:

@model dynamic

...
<h1>List of Customers</h1>
<div>
  @foreach(var item in Model.Customers)
  {
    <h2>@item.CustomerID</h2>
  }
</div>

Notice that the view is marked to use a dynamic model using the @model dynamic line. This line is optional. If you don't write any @model then Razor defaults to dynamic. The foreach loop then iterates through Model.Customers property and displays all the CustomerIDs. Note that since Model points to an ExpandoObject, you won't get any IntelliSense help for the property names. You will need to key them in yourself. On the same lines you can display Model.Orders data.

Store anonymous objects in an ExpandoObject

In the preceding example you stored List of Customer and Order objects respectively in the model ExpandoObject. Now let's see how to store an anonymous object in an ExpandoObject.

var addtionalInfo = new { 
                    CustomersNote="This is a customer note",
                    OrdersNote="This is an order note" };
IDictionary<string, object> 
expandoAddInfo = new ExpandoObject();
foreach (PropertyDescriptor property 
         in 
         TypeDescriptor.GetProperties(addtionalInfo.GetType()))
{
    expandoAddInfo.Add(property.Name, 
           property.GetValue(addtionalInfo));
}
model.AdditionalInfo = expandoAddInfo;

The code creates an anonymous object with two properties - CustomersNote and OrdersNote - and stores it in additionalInfo variable. Then an ExpandoObject is created. This time, however, it is captured as an IDictionary<string, object>. Then a foreach loop iterates through all the properties of additionalInfo object. This is done using PropertyDescriptor and TypeDescriptor classes from System.ComponentModel namespace. These classes allow you to reflect upon the properties of any object (additionalInfo in this case). All the properties from the anonymous object are transferred to the ExpandoObject by adding them to the expandoAddInfo variable. Finally, AdditionalInfo property of model (which itself is an ExpandoObject) is set to expandoAddInfo ExpandoObject.

You can pass the model object to the view exactly as before. Once received in the view you can access the AdditionalInfo property as shown below:

<h1>Additional Information</h1>
<h2>@Model.AdditionalInfo.CustomersNote</h2>
<h2>@Model.AdditionalInfo.OrdersNote</h2>

What if you wish to convert a collection of anonymous objects to an ExpandoObject? The following code shows how this can be done:

var query = from c in db.Customers
            join o in db.Orders
            on c.CustomerID equals o.CustomerID
            orderby c.CustomerID ascending
            select new { 
                c.CustomerID,
                c.CompanyName,
                o.OrderID,
                o.OrderDate 
            };

List<ExpandoObject> joinData=new List<ExpandoObject>();

foreach(var item in query)
{
    IDictionary<string, object> itemExpando = new ExpandoObject();
    foreach (PropertyDescriptor property 
             in 
             TypeDescriptor.GetProperties(item.GetType()))
    {
        itemExpando.Add(property.Name, property.GetValue(item));
    }
    joinData.Add(itemExpando as ExpandoObject);
}

model.JoinData = joinData;

The above code is similar to the previous case but deals with a List of ExpandoObject (joinData variable). Each ExpandoObject (itemExpando variable) holds data belonging to a single anonymous object. The joinData List is then assigned to the JoinData property of the model ExpandoObject.

You can access JoinData inside a view as shown below:

<h1>Customer Orders Join Data</h1>
<div>
    @foreach (var item in Model.JoinData)
    {
        <h2>@item.CustomerID (@item.OrderID on @item.OrderDate)</h2>
    }
</div>

A note of caution about using ExpandoObject as shown above - Although ExpandoObject solves our problem, one should carefully evaluate whether there is any flaw in the model creation process. You should give a thought to creating POCOs for holding the multiple pieces instead of using an ExpandoObject. Since ExpandoObject instances are dynamic Visual Studio IntelliSense won't help much. POCO containers, on the other hand, give all the benefits of strongly typed view.

That's it for today! Keep coding!!

READ MORE
...