top button
Flag Notify
    Connect to us
      Site Registration

Site Registration

What's New In Prism 5.0?

+5 votes
324 views

Are you a WPF, Silverlight or Windows Phone developer and use Microsoft's Patterns and Practices library to build your applications? If you are, then you might want to know that Microsoft's Patterns and Practices team have just released Prism 5.0. All the applications built using the previous versions of Prism are now broken. So, in this article, I'll be discussing the new assemblies, new objects and deprecated objects that can/can't be used with Prism 4.1 and Prism 5.0.

Downloading Prism 5.0

Prism 5.0 can be downloaded and installed either from the Patterns and Practices site having the URLhttp://compositewpf.codeplex.com/ or by using the Nugget package inside Visual Studio. The specified link also discusses all the changes that are part of Prism 5.0

Supported Platforms

Let's have a quick look at the supported platforms of Prism 5.0. When working with previous versions of Prism (in other words 4.1), one was able to create applications like WPF (.Net 4.0), Silverlight 5 and Windows Phone (7.5). The point to note here is, Prism 5.0 only supports WPF (.Net 4.5).

different between prime version

In other words, if your application is written in Silverlight or Windows Phone and you are planning to upgrade to Prism 5.0, then it's not going to work. In this case, either you need to use some tool and make your application a WPF application (if possible) or simply continue with the existing version of Prism.

Assembly Changes

This section discusses about all the assembly-related changes that Prism 5.0 introduces. Please note, in the following table all the assemblies are prefixed with Microsoft.Practices:

Assembly Changes in prime version

Note that in the preceding table, the assembly named Microsoft.Practices.Prism in Prism 4.1 is no longer called Microsoft.Practices.Prism in Prism 5.0. Now this assembly is renamed toPrism.Composition.

There is no change in Prism.Interactivity, ServiceLocation, Prism.UnityExtensions andPrism.MefExtensions front.

This Prism.Composition takes dependency on another new assembly called Prism.SharedInterfaces, which is a Portable Class Library (PCL).

On the MVVM front, there are two more additions. One is Prism.MVVM that is again a PCL and shares a common MVVM functionality across Windows Store Apps and Windows Presentation Foundation applications. Now to get around a few limitations and some necessary enhancements on WPF, a separate assembly is created having a name the Prism.MVVM.Desktop, that is specifically meant to be used on the desktop.

One more addition is Prism.PubSubEvents. This is an event aggregator. So, the event aggregator is called out of Prism and has been kept into its own PCL library in Prism 5.0.


Deprecated Objects

Deprecated objects are the objects that are still in assemblies, but we just don't want to use them anymore and if you are currently using them, then you need to move them to a different object instance. The following is the list of such objects:

object use

Objects moved to a new location

There are a few objects that provide the new home in Prism 5.0. If you are using any of the following specified objects, then you need to re-reference your assemblies with the new ones. Apart from assemblies, the namespace is also changed. Please note, the following changes are the breaking changes.

Objects moved to new location

Removed Objects

There are a few objects in Prism 4.1 that are completely removed from Prism 5.0. This section discusses the objects that are completely gone. This is again considered to be breaking changes.

remove object
 

posted Nov 4, 2015 by Jdk

  Promote This Article
Facebook Share Button Twitter Share Button LinkedIn Share Button


Related Articles

Now we add a ListBox control and set its ItemsSource property as the first DataTable of the DataSetand set ItemTemplate to the resource defined above. 

<ListBox Margin="17,8,15,26" Name="listBox1" ItemsSource="{Binding Tables[0]}"  ItemTemplate="{StaticResource listBoxTemplate}" />  

Now in our code behind, we define the following variables. 

public SqlConnection connection;  

public SqlCommand command;  

string sql = "SELECT ContactName, Address, City, Country FROM Customers"

string connectionString = @"Data Source=.\SQLEXPRESS;AttachDbFilename=|DataDirectory|\NORTHWND.MDF;Integrated Security=True;Connect Timeout=30;User Instance=True"

Now on the Windows_Loaded method, we call the BindData method and in the BindData method, we create a connection, data adapter and fill in the DataSet using the SqlDataAdapter.Fill() method.

private void Window_Loaded(object sender, RoutedEventArgs e)  
{  
    BindData();             
}  
  
private void BindData()  
{  
    DataSet dtSet = new DataSet();  
    using (connection = new SqlConnection(connectionString))  
    {  
        command = new SqlCommand(sql, connection);                 
        SqlDataAdapter adapter = new SqlDataAdapter();             
        connection.Open();  
        adapter.SelectCommand = command;  
        adapter.Fill(dtSet, "Customers");  
        listBox1.DataContext = dtSet;  
    }  
}  

Data Binding with XML 

Now let's look at how to bind XML data to a ListBox control. The XmlDataProvider is used to bind XMLdata in WPF

Here is an XmlDataProvider defined in XAML that contains books data. The XML data is defined within the x:Data tag. 


<XmlDataProvider x:Key="BooksData" XPath="Inventory/Books">  
    <x:XData>  
        <Inventory xmlns="">  
            <Books>  
                <Book Category="Programming" >  
                    <Title>A Programmer's Guide to ADO.NET</Title>  
                    <Summary>Learn how to write database applications using ADO.NET and C#.  
                    </Summary>  
                    <Author>Mahesh Chand</Author>  
                    <Publisher>APress</Publisher>  
                </Book>  
                <Book Category="Programming" >  
                    <Title>Graphics Programming with GDI+</Title>  
                    <Summary>Learn how to write graphics applications using GDI+ and C#.  
                    </Summary>  
                    <Author>Mahesh Chand</Author>  
                    <Publisher>Addison Wesley</Publisher>  
                </Book>  
                <Book Category="Programming" >  
                    <Title>Visual C#</Title>  
                    <Summary>Learn how to write C# applications.  
                    </Summary>  
                    <Author>Mike Gold</Author>  
                    <Publisher>APress</Publisher>  
                </Book>  
                <Book Category="Programming" >  
                    <Title>Introducing Microsoft .NET</Title>  
                    <Summary>Programming .NET  
                    </Summary>  
                    <Author>Mathew Cochran</Author>  
                    <Publisher>APress</Publisher>  
                </Book>  
                <Book Category="Database" >  
                    <Title>DBA Express</Title>  
                    <Summary>DBA's Handbook  
                    </Summary>  
                    <Author>Mahesh Chand</Author>  
                    <Publisher>Microsoft</Publisher>  
                </Book>  
            </Books>  
        </Inventory>  
    </x:XData>  
</XmlDataProvider>  

To bind an XmlDataProvider, we set the Source property inside the ItemsSource of a ListBox to thex:Key of XmlDataProvider and XPath is used to filter the data. In the ListBox.ItemTempate, we use the Binding property. 

<ListBox Width="400" Height="300" Background="LightGray">  
    <ListBox.ItemsSource>  
        <Binding Source="{StaticResource BooksData}"  
       XPath="*[@Category='Programming'] "/>  
    </ListBox.ItemsSource>  
  
    <ListBox.ItemTemplate>  
        <DataTemplate>  
            <StackPanel Orientation="Horizontal">  
                <TextBlock Text="Title: " FontWeight="Bold"/>  
                <TextBlock Foreground="Green"  >  
                    <TextBlock.Text>   
                        <Binding XPath="Title"/>  
                    </TextBlock.Text>                        
                </TextBlock>                       
           </StackPanel>  
        </DataTemplate>  
    </ListBox.ItemTemplate>  
</ListBox>  

The output of the preceding code looks as in Figure 11.

code behind file


READ MORE

Part 4: Continues

We will read ContactName, Address, City and Country columns in a WPF TreeView control. The finalTreeView looks as in the following: 

final TreeView

Now let's look at our XAML file. We create a resources DataTemplate type called TreeViewTemplate. A data template is used to represent data in a formatted way. The data template has two dock panels where the first panel shows the name and the second panel shows the address, city and country columns by using TextBlock controls. 

  1. <Window.Resources>  
        <DataTemplate x:Key="TreeViewTemplate">  
            <StackPanel Margin="3">  
                <DockPanel >  
                    <TextBlock FontWeight="Bold" Text="Name:"  
                      DockPanel.Dock="Left"  
                      Margin="5,0,10,0"/>  
                    <TextBlock Text="  " />  
                    <TextBlock Text="{Binding ContactName}" Foreground="Green" FontWeight="Bold" />  
                </DockPanel>  
                <DockPanel >  
                    <TextBlock FontWeight="Bold" Text="Address:" Foreground ="DarkOrange"   
                      DockPanel.Dock="Left"  
                      Margin="5,0,5,0"/>  
                    <TextBlock Text="{Binding Address}" />  
                     <TextBlock Text=", " />  
                    <TextBlock Text="{Binding City}" />  
                     <TextBlock Text=", " />  
                    <TextBlock Text="{Binding Country}" />  
                </DockPanel>  
            </StackPanel>  
        </DataTemplate>  
    </Window.Resources>   

Now in our code behind, we define the following variables. 

  1. public SqlConnection connection;   
    public SqlCommand command;   
    string sql = "SELECT ContactName, Address, City, Country FROM Customers";  
    string connectionString = @"Data Source=.\SQLEXPRESS;AttachDbFilename=|DataDirectory|\NORTHWND.MDF;Integrated Security=True;Connect Timeout=30;User Instance=True";  

On the Windows_Loaded method, we use the BindData method. In the BindData method, we create a connection and a data adapter and fill in the DataSet using the SqlDataAdapter.Fill method.

  1. private void Window_Loaded(object sender, RoutedEventArgs e)  
    {  
        BindData();             
    }  
      
    private void BindData()  
    {  
        DataSet dtSet = new DataSet();  
        using (connection = new SqlConnection(connectionString))  
        {  
            command = new SqlCommand(sql, connection);                 
            SqlDataAdapter adapter = new SqlDataAdapter();             
            connection.Open();  
            adapter.SelectCommand = command;  
            adapter.Fill(dtSet, "Customers");  
            TreeView1.DataContext = dtSet;          
        }  
    }  

Now let's look at how to bind XML data to a TreeView control. The XmlDataProvider is used to bind XMLdata in WPF

  1. <XmlDataProvider x:Key="BooksData" XPath="Inventory/Books">  
        <x:XData>  
            <Inventory xmlns="">  
                <Books>  
                    <Book Category="Programming" >  
                        <Title>A Programmer's Guide to ADO.NET</Title>  
                        <Summary>Learn how to write database applications using ADO.NET and C#.  
                        </Summary>  
                        <Author>Mahesh Chand</Author>  
                        <Publisher>APress</Publisher>  
                    </Book>  
                    <Book Category="Programming" >  
                        <Title>Graphics Programming with GDI+</Title>  
                        <Summary>Learn how to write graphics applications using GDI+ and C#.  
                        </Summary>  
                        <Author>Mahesh Chand</Author>  
                        <Publisher>Addison Wesley</Publisher>  
                    </Book>  
                    <Book Category="Programming" >  
                        <Title>Visual C#</Title>  
                        <Summary>Learn how to write C# applications.  
                        </Summary>  
                        <Author>Mike Gold</Author>  
                        <Publisher>APress</Publisher>  
                    </Book>  
                    <Book Category="Programming" >  
                        <Title>Introducing Microsoft .NET</Title>  
                        <Summary>Programming .NET  
                        </Summary>  
                        <Author>Mathew Cochran</Author>  
                        <Publisher>APress</Publisher>  
                    </Book>  
                    <Book Category="Database" >  
                        <Title>DBA Express</Title>  
                        <Summary>DBA's Handbook  
                        </Summary>  
                        <Author>Mahesh Chand</Author>  
                        <Publisher>Microsoft</Publisher>  
                    </Book>  
                </Books>               
            </Inventory>  
        </x:XData>  
    </XmlDataProvider>  
READ MORE

Introduction


Figure 1: 
SpiltView Navigation Framework

The very idea of SpiltView originates from the Navigation Framework inside a XAML application. The navigation framework was introduced with Silverlight. The major components of the Navigation Framework were:

  1. Frame
  2. Page

The Frame here is much like the browser that was used to contain a page that can be navigated back and forth. Here, the frontward stack and the backward stack.

They supported a series of methods, namely:

  1. GoBack()
  2. GoForward()
  3. CanGoBack()
  4. CanGoForward()

But often it's only about the navigation that the developers are concerned about. This is why you have SplitView. SplitView helps us to navigate by “type” and not the URI that we used to do in Silverlight. Also, we don't need to care about the physical location of the file as well. 

The Page 

The page has the following two methods:

  1. OnNavigatedTo(Param)
  2. OnNavigatedFrom()

These two overridden methods help to navigate and hence help us to interact with the page.

Although there are a few more things worth noticing in Page.NavigationCacheMode that are primarily concerned with whether the page is supposed to be created again or the same instance of the page will be rendered.

Jumping with SpitView

SplitView is there for navigation. That means this gives a smoother way to navigate with menus and making the UI smoother and more fluid. 

Where to use a SpiltView


Figure 2: 
SpiltView Usage

Universally this is also know as the “Hamburger Menu” because it has two pieces of bread forming a nice Big Boy burger. But yes, that’s the split view. It’s a menu that takes care of a tons of problems a developer has while transiting from one page to another or simply just navigating from one part of the app to another. 

Behaviors of a SplitView


Figure 3: 
Behaviors of a SplitView

A SplitView when it is tapped pops out a menu and shows various options. Although it's not a requirement to have the Split View respond to a tap request.

Where to get the SplitView from


Figure 4: 
Font Selection

The new Segoe Font will have the SplitView. All these are vectors and are oriented to the Windows 10 Style.

Application of the SplitView

A SplitView namely has the following 2 things:

  • SplitView.Pane
  • SplitView.Content

Details

Let's talk in details about SplitView.Pane.


Figure 5: SplitView Pane

A Pane is where the developer puts in all the buttons that are either on the left or the right of the application. The Pane will also takes the kinds of buttons that will be available for tapping in the application.

The SplitView.Content


Figure 6: 
SplitView Content

The most important property is the Content property. The Content Property sits over the frame and gives a navigation affordance. The Content also gives us a lot of grip with the overlay on the UI. 

The SplitView.PaneDisplayMode

Depending on whether the SplitView is open or closed we have the PaneDisplayMode as its property.


Figure 7: PaneDisplayMode Properties

The Inline, when set to true, will provide a jolting experience to the user since the content will shift the SplitView opened up. In case of the overlay although the content will not shift, it will simply have the splitview menu coming out as a flyer over the content. The CompactInline will have the capabilities of shifting the content to a large extent if the SplitView is set to true or just have a sleek thin outline when set to false. The Compact overlay will have the same properties like the overlay only difference is in both of the cases of a Compact Overlay there will be a slight shift of content.

READ MORE

Introduction

This blog will help you to create a web browser in WPF (Windows Presentation Foundation).

Prerequisites

  • Visual Studio 2013 with update 4 (or) Visual Studio 2015

Follow the following steps now:

Step 1: Open Visual Studio 2015 and Create a New Project. . 


Step 2: Select WPF (Windows Presentation Foundation), name your project and select the location where it has to be saved.


Step 3: Goto MainWindow.xaml and paste the following code for the web browser:

  1. <Window x:Class="WPFWebControl.MainWindow" xmlns="http://schemas.microsoft.com/winfx/2006/xaml/presentation" xmlns:x="http://schemas.microsoft.com/winfx/2006/xaml" Title="My Web Browser" WindowState="Normal" Loaded="Window_Loaded" WindowStyle="ThreeDBorderWindow" mc:Ignorable="d" xmlns:d="http://schemas.microsoft.com/expression/blend/2008" xmlns:mc="http://schemas.openxmlformats.org/markup-compatibility/2006" Height="529" Width="731">  
  2.     <Grid>  
  3.         <Button Content="<<" Height="23" HorizontalAlignment="Left" Margin="10,5,0,0" Name="MyBack" VerticalAlignment="Top" Width="25" ToolTip="Backword" Click="MyBack_Click" />  
  4.         <WebBrowser Height="445" HorizontalAlignment="Left" Margin="10,33,0,0" Name="MyWebBrowser" VerticalAlignment="Top" Width="687" LoadCompleted="MyWebBrowser_LoadCompleted" />  
  5.         <TextBox Height="23" Margin="103,5,12,0" Name="MyTextBox" VerticalAlignment="Top" />  
  6.         <Button Content="|>" Height="23" HorizontalAlignment="Left" Margin="41,5,0,0" Name="MyGo" VerticalAlignment="Top" Width="25" ToolTip="Go" Click="MyGo_Click" />  
  7.         <Button Content=">>" Height="23" HorizontalAlignment="Right" Margin="0,5,612,0" Name="MyForward" VerticalAlignment="Top" Width="25" ToolTip="Forward" Click="MyForward_Click" />   
  8.    </Grid>  
  9. </Window>  


Step 4: Now copy the following code in MainWindow.xaml.cs:

  1. using System;  
  2. using System.Collections.Generic;  
  3. using System.Linq;  
  4. using System.Text;  
  5. using System.Windows;  
  6. using System.Windows.Controls;  
  7. using System.Windows.Data;  
  8. using System.Windows.Documents;  
  9. using System.Windows.Input;  
  10. using System.Windows.Media;  
  11. using System.Windows.Media.Imaging;  
  12. using System.Windows.Navigation;  
  13. using System.Windows.Shapes;  
  14. namespace WPFWebControl  
  15. {  
  16.     public partial class MainWindow: Window  
  17.     {  
  18.         public MainWindow()  
  19.         {  
  20.             InitializeComponent();  
  21.         }  
  22.         private void Window_Loaded(object sender, RoutedEventArgs e)  
  23.         {  
  24.             try  
  25.             {  
  26.                 MyWebBrowser.Source = new Uri("http://www.microsoft.com");  
  27.             }  
  28.             catch (Exception ex)  
  29.             {  
  30.                 MessageBox.Show(ex.Message);  
  31.             }  
  32.         }  
  33.         private void MyBack_Click(object sender, RoutedEventArgs e)  
  34.         {  
  35.             try  
  36.             {  
  37.                 MyWebBrowser.GoBack();  
  38.             }  
  39.             catch (Exception ex)  
  40.             {  
  41.                 MessageBox.Show(ex.Message);  
  42.             }  
  43.         }  
  44.         private void MyForward_Click(object sender, RoutedEventArgs e)  
  45.         {  
  46.             try  
  47.             {  
  48.                 MyWebBrowser.GoForward();  
  49.             }  
  50.             catch (Exception ex)  
  51.             {  
  52.                 MessageBox.Show(ex.Message);  
  53.             }  
  54.         }  
  55.         private void MyGo_Click(object sender, RoutedEventArgs e)  
  56.         {  
  57.             try  
  58.             {  
  59.                 MyWebBrowser.Source = new Uri("http://" + MyTextBox.Text);  
  60.             }  
  61.             catch (Exception ex)  
  62.             {  
  63.                 MessageBox.Show(ex.Message);  
  64.             }  
  65.         }  
  66.         private void MyWebBrowser_LoadCompleted(object sender, NavigationEventArgs e)  
  67.         {  
  68.             MessageBox.Show("Completed.");  
  69.         }  
  70.     }  
  71. }  


Step 5: Now run the project by clicking on start at the top of Visual Studio 2015.


READ MORE

Introduction

In this article we will see how we can implement AutoComplete feature in a cell editing in DataGrid.

Creating Silverlight Project

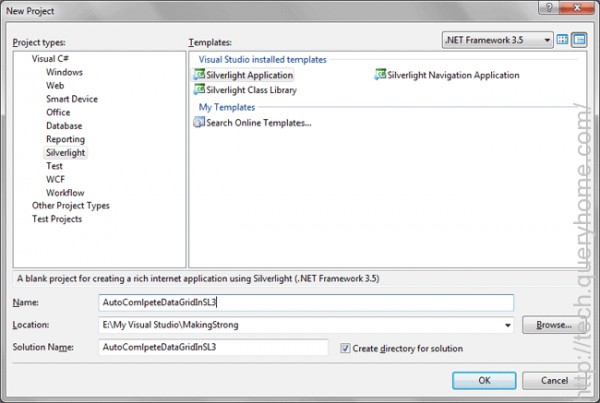
Fire up Visual Studio 2008 and create a Silverlight Application. Name it as AutoComlpeteDataGridInSL3.

1.gif
 
Go ahead and add a DataGrid to your application.

2.gif
 
Now add a Class to define properties for sample data.

public class Users: INotifyPropertyChanged
    {
        #region INotifyPropertyChanged Members

        public event PropertyChangedEventHandler PropertyChanged;

        #endregion


        #region UserName

        private string _UserName;

        public string UserName

        {

            get { return _UserName; }

            set

            {

                if (value.Length < 4)

                {

                    throw new ValidationException("User Name should contain atleast 4 chars");

                }

                _UserName = value;

                RaisePropertyChanged("UserName");

            }

        }

        #endregion


        #region Age

        private int _Age;

        public int Age

        {

            get { return _Age; }

            set

            {

              _Age = value;

            }

        }

        #endregion


        #region Gender

        private string _Gender;

        public string Gender

        {

            get { return _Gender; }

            set

            {

                _Gender = value;

            }

        }

        #endregion


        #region Country

        private string _Country;

        public string Country

        {

            get { return _Country; }

            set

            {

                _Country = value;

            }

        }

        #endregion       


        private void RaisePropertyChanged(string propertyName)

        {

            if (this.PropertyChanged != null)

            {

                this.PropertyChanged(this, new PropertyChangedEventArgs(propertyName));

            }

        }

    }

Now add some sample data to a List and assign the list to the ItemSource of the DataGrid.

public MainPage()
        {

            InitializeComponent();

            List<Users> myList = new List<Users>

            {

                new Users{ UserName="Hiro Nakamura", Age=24, Gender="M", Country="Japan"},

                new Users{ UserName="Mohinder Suresh", Age=26, Gender="M", Country="India"},

                new Users{ UserName="Claire Bennette", Age=20, Gender="F", Country="USA"},

                new Users{ UserName="Matt Parkman", Age=30, Gender="M", Country="USA"},

                new Users{ UserName="Nathan Patrelli", Age=30, Gender="M", Country="USA"},

                new Users{ UserName="Peter Patrelli", Age=26, Gender="M", Country="USA"},

                new Users{ UserName="Mica Sanders", Age=19, Gender="M", Country="USA"},

                new Users{ UserName="Linderman", Age=56, Gender="M", Country="USA"},

                new Users{ UserName="Ando", Age=24, Gender="M", Country="Japan"},

                new Users{ UserName="Maya", Age=24, Gender="F", Country="Mexico"},

                new Users{ UserName="Angela Patrelli", Age=26, Gender="F", Country="USA"},

                new Users{ UserName="Niki Sanders", Age=26, Gender="F", Country="USA"},

            };


            MyDataGrid.ItemsSource = myList;

        }

Now that you have added some sample data, you can test your application.

3.gif
 
Now we don't need to have AutoGenerateColumns of the DataGrid as we are going to define our own.

Follow the xaml code behind for a template:

<data:DataGrid x:Name="MyDataGrid" Margin="0" Grid.Row="1" Grid.Column="1"IsReadOnly="False" AutoGenerateColumns="False">

            <data:DataGrid.Columns>

                <data:DataGridTextColumn Binding="{Binding Age}" Header="Age" />


                <data:DataGridTemplateColumn Header="User Name">

                    <data:DataGridTemplateColumn.CellTemplate>

                        <DataTemplate>

                            <TextBlock Text="{Binding UserName}" Margin="4" />

                        </DataTemplate>

                    </data:DataGridTemplateColumn.CellTemplate>

                    <data:DataGridTemplateColumn.CellEditingTemplate>

                        <DataTemplate>

                            <input:AutoCompleteBox

                                    HorizontalAlignment="Left"

                                    Width="180"

                                    IsTabStop="True"

                                    Text="{Binding UserName, Mode=TwoWay}"

                                    ItemsSource="{StaticResource SampleHeroes}"

                                    />

                        </DataTemplate>

                    </data:DataGridTemplateColumn.CellEditingTemplate>

                </data:DataGridTemplateColumn>

                <data:DataGridTextColumn Binding="{Binding Gender}" Header="Gender" />

                <data:DataGridTextColumn Binding="{Binding Country}" Header="Country" />

            </data:DataGrid.Columns>


        </data:DataGrid>

As you can see from the above xaml code the columns are bound to respective properties. For UserName we have a CellEditingTemplate, where we have used an AutoCompleteBox.

Now create a class named ObjectCollection and define the two constructors as follows:

public class ObjectCollection: Collection<object>

    {

        public ObjectCollection()

        {

        }


        public ObjectCollection(IEnumerable collection)

        {

            foreach (object obj in collection)

            {

                Add(obj);

            }

        }


    }

Add a sample ObjectCollection in xaml code behind.

<UserControl.Resources>

        <local:ObjectCollection x:Key="SampleHeroes">

            <sys:String>Jack Sephered</sys:String>

            <sys:String>James Soyer</sys:String>

            <sys:String>John Lock</sys:String>

            <sys:String>Jacky Chan</sys:String>

        </local:ObjectCollection>

    </UserControl.Resources>

That's it we are done with this. Run your application.

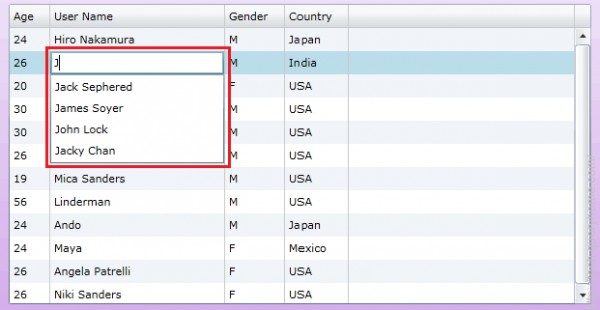
Edit the User Name Column of any row and start typing with the letter "J" (as we have only fields starting with J).

You will be prompted with the List of values from the AutoCompleteBox:

4.gif

READ MORE

Its important that when you think in terms of Silverlight controls, you always think in terms of XAML and that means thinking in terms of a Visual Tree.  Elements in the tree have parents and elements in the tree have children.  A popup control is no  different. Although it appears to look like this disassociated control floating around, it really is just another element in the Visual Tree (Unbeknownst to the naked eye).

In order to position a popup relative to an existing control, you should make it a child of the control.   If the control does not allow children, then put the control in a Grid and you can have all the children you want.  Here is an example.
 

  private void OnHoverTab(object sender, MouseEventArgs e)

  {

  var p = new Popup();

  p.DataContext = ((sender as FrameworkElement).Parent as  
            FrameworkElement).DataContext;

  p.Child = new UnderlyingUserControl();  // puts a user control in the popup

  p.VerticalOffset = 25; // this will offset us slightly from the
                          // parent

  p.HorizontalOffset = 0;

  p.IsOpen = true;

   // this is where we add the popup to a Grid we can position
   // against

  ((sender as FrameworkElement).Parent as Grid).Children.Add(p);

  }


Now once we dismiss our popup, it's important to remove it from the Grid, otherwise we'll end up with lots and lots of dead popups in our Grid tree.

I've added an OK and Cancel onto my Underlying user control to dismiss the popup, here is the code behind for the Child of the popup:
 

  private void OnOK(object sender, RoutedEventArgs e)

    {

      ((MyViewModel) DataContext).Name = NameInput.Text;

// Hide the popup and remove from the parent

      (this.Parent as Popup).IsOpen = false;

      ((this.Parent as Popup).Parent as  Grid).Children.Remove(this.Parent asPopup);

    }


    private void OnCancel(object sender, RoutedEventArgs e)

    {

    // Hide the popup and remove from the parent

      (this.Parent as Popup).IsOpen = false;

      ((this.Parent as Popup).Parent as Grid).Children.Remove(this.Parent as Popup);

    }


READ MORE

Introduction

XAML provides UI element objects that can host child collection items. XAML also provides support to work with .NET collection types as data sources.

XAML Collections

A collection element usually is a parent control with child collection elements. The child collection elements are an ItemCollection that implements IList<object>. A ListBox element is a collection of ListBoxItem elements.

The code listing in Listing 1 creates a ListBox with a few ListBoxItems.


  1. <ListBox Margin="10,10,0,13" Name="listBox1" HorizontalAlignment="Left"  
  2. VerticalAlignment="Top" Width="194" Height="200">  
  3.   
  4. <ListBoxItem Content="Coffie"></ListBoxItem>  
  5. <ListBoxItem Content="Tea"></ListBoxItem>  
  6. <ListBoxItem Content="Orange Juice"></ListBoxItem>  
  7. <ListBoxItem Content="Milk"></ListBoxItem>  
  8. <ListBoxItem Content="Iced Tea"></ListBoxItem>  
  9. <ListBoxItem Content="Mango Shake"></ListBoxItem>  
  10.   
  11. </ListBox>  


Listing 1

The code listed above in Listing 1 generates Figure 1.

Figure 1

Add Collection Items

In the previous section, we saw how to add items to a ListBox at design-time from XAML. We can add items to a ListBox from the code.

Let's change our UI and add a TextBox and a button control to the page. See Listing 2.


  1. <TextBox Height="23" HorizontalAlignment="Left" Margin="8,14,0,0"  
  2. Name="textBox1" VerticalAlignment="Top" Width="127" />  
  3. <Button Height="23" Margin="140,14,0,0" Name="button1" VerticalAlignment="Top" HorizontalAlignment="Left" Width="76" Click="button1_Click">  
  4. Add Item  
  5. </Button>  


Listing 2

The final UI looks like Figure 2.

Figure 2.

We can access collection items using the Items property. On the button click event handler, we add the content of the TextBox to the ListBox by calling the ListBox.Items.Add method. The code in Listing 3 adds the TextBox content to the ListBox items.


  1. private void button1_Click(object sender, RoutedEventArgs e)  
  2. {  
  3. listBox1.Items.Add(textBox1.Text);  
  4. }  


Listing 3

Now if you enter text into the TextBox and click the Add Item button, it will add the contents of the TextBox to the ListBox. See Figure 3.

Figure 3

Delete Collection Items

We can use the ListBox.Items.Remove or ListBox.Items.RemoveAt method to delete an item from the collection of items in the ListBox. The RemoveAt method takes the index of the item in the collection.

Now, we modify our application and add a new button called Delete Item. The XAML code for this button looks as in the following.


  1. <Button Height="23" Margin="226,14,124,0" Name="DeleteButton"  
  2. VerticalAlignment="Top" Click="DeleteButton_Click">  
  3. Delete Item</Button>  


Listing 4

The button click event handler looks like the following. On this button click, we find the index of the selected item and call the ListBox.Items.RemoveAt method as in the following.


  1. private void DeleteButton_Click(object sender, RoutedEventArgs e)  
  2. {  
  3. listBox1.Items.RemoveAt  
  4. (listBox1.Items.IndexOf(listBox1.SelectedItem));  
  5. }  


Listing 5

Collection Types

XAML allows developers to access .NET class library collection types from the scripting language. The code snippet in the Listing creates an array of String types, a collection of strings. To use the Array and String types, we must import the System namespace.

The code listing in Listing 6 creates an Array of String objects in XAML. As you may noticed in Listing 2, you must import the System namespace in XAML using the xmlns.


  1. <Window x:Class="XamlCollectionsSample.MainWindow"  
  2. xmlns="http://schemas.microsoft.com/winfx/2006/xaml/presentation"  
  3. xmlns:x="http://schemas.microsoft.com/winfx/2006/xaml"  
  4. xmlns:sys="clr-namespace:System;assembly=mscorlib"  
  5. Title="MainWindow" Height="402.759" Width="633.345">  
  6.   
  7. <Window.Resources>  
  8. <x:Array x:Key="AuthorList" Type="{x:Type sys:String}">  
  9. <sys:String>Mahesh Chand</sys:String>  
  10. <sys:String>Praveen Kumar</sys:String>  
  11. <sys:String>Raj Beniwal</sys:String>  
  12. <sys:String>Neel Beniwal</sys:String>  
  13. <sys:String>Sam Hobbs</sys:String>  
  14. </x:Array>  
  15. </Window.Resources>  
  16.   
  17. </Window>  


Listing 6

The ItemsSource property if ListBox in XAML is used to bind the ArrayList. See Listing 7.


  1. <ListBox Name="lst" Margin="5" ItemsSource="{StaticResource AuthorList}" />  


Listing 7

Summary

XAML supports collections including collection items and working with .NET collection types. In this article, we saw how to create a control with collection items and how to access its items dynamically.

READ MORE
...