HTML5 custom data attributes (data-*) are used to store arbitrary pieces of metadata about an element. One way to store such metadata in data-* attributes is to create a separate data-* attribute for each piece of information you wish to store. This approach works well if there are only a few data-* attributes. However, at times you need to store a bunch of metadata in data-* attributes. In such cases instead of creating multiple data-* attributes you can create just one data-* attribute and store all the pieces of metadata as an object in JSON format. To that end this article illustrates how custom data attributes can be used to store JSON data in an ASP.NET MVC application.
Consider the following view:
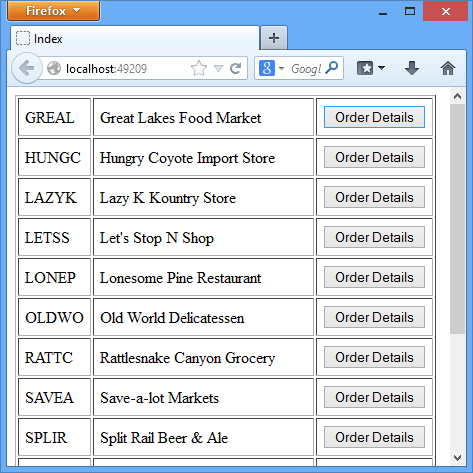
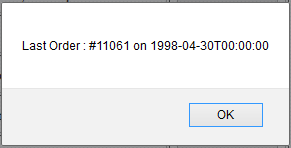
The above view shows a table that lists records from Customers table of Northwind database. Each row has Order Details button. Click on the Order Details button displays details such as OrderID and ShippingDate for the last order placed by the customer under consideration. These details are displayed in an alert dialog like this:
If you see the Customers table, it has only two columns - one showing CustomerID and the other showing CompanyName. From where does the order details such as OrderID and OrderDate came from? These details are stored in a custom data attribute named data-lastorder of each <tr> element. For example, consider the following markup that is revealed in the HTML source of the page in the browser:

As you can see the <tr> element has data-lastorder attribute that stores an object in JSON format. The object stores CustomerID, OrderID and OrderDate. The data-lastorder attribute can be accessed using jQuery code. The following jQuery code shows how this can be accomplished.
 $(document).ready(function () {
  $("input:button").click(function (evt) {
    var orderData = $(evt.target).closest("tr").data("lastorder");
    alert("Last Order : #" + orderData.OrderID + " on " + orderData.OrderDate);
  });
});
As you can see the ready() handler uses :button selector to match all the <input> elements of type button. This will return all the Order Details buttons shown in the earlier figure. The code then wires click event handler to the click event of the Order Details buttons. The click event handler finds <tr> element closest to the button being clicked. This is done using the closest() method. The data() method returns the value of a specified custom data attribute. In this case lastorder is specified (you can omit data- from the attribute name). The return value of data() in this case will be a JSON object and is stored in orderData variable. An alert dialog then displays the OrderID and OrderDate properties of the orderData object.
So far so good. But how to emit the data-lastorder attribute to the client browser? Obviously you can't hard-code it. It has to be generated on the fly using server side code. In this case you will have to write such code in the controller and the view.
Let's assume that you have Entity Framework data model for the Customers and Orders tables as shown below:

Also assume that you have HomeController with Index() method that fetches the data and makes it suitable to go inside data-lastorder attribute. The following code shows how Index() method can do this job:
public ActionResult Index()
{
  NorthwindEntities db = new NorthwindEntities();
  var customers = from c in db.Customers
                  where c.Country == "USA"
                  select c;
  List<Customer> customerList = customers.ToList();
  Dictionary<string, string> orderDict = new Dictionary<string, string>();
  foreach (Customer obj in customerList)
  {
    var order = (from o in db.Orders
                 where o.CustomerID == obj.CustomerID
                 orderby o.OrderDate descending
                 select o).FirstOrDefault();
    string jsonOrder = JsonConvert.SerializeObject(
                       new { CustomerID=order.CustomerID,
                             OrderID=order.OrderID,
                             OrderDate=order.OrderDate });
    orderDict.Add(order.CustomerID, jsonOrder);
  }
  ViewData["orderDict"] = orderDict;
  return View(customerList);
}
The above code creates a database context object (db). A LINQ to Entities query selects all the Customer objects with Country property equal to USA. Then a generic List of Customer objects is obtained by calling ToList() method of the customers variable. A dictionary is created to store order information for all the customers. The key of the dictionary is CustomerID and its value is JSON representation of the order details. Next, a foreach loop iterates through all the customer list. With every iteration the most recent Order is retrieved from the Orders DbSet for a CustomerID. This is done by sorting the results in descending order and then calling FirstOrDefault() method. Then comes the important part. The JsonConvert class of Json.NET library is used to serialize an anonymous object containing order details such as CustomerID, OrderID and OrderDate. The SerializeObject() method accepts an object and returns its JSON representation as a string. The JSON representation of the order data is stored in the dictionary created earlier. The customerList is passed to the Index view as its model whereas orderDict is passed to the view in a ViewData variable.
This completes the controller. The remaining part of the code goes inside the Index view and is shown below:
<%@ Page Language="C#" Inherits="System.Web.Mvc.ViewPage
<List<JSONObjectInCustomDataAttribute.Models.Customer>>" %>
...
<table border="1" cellpadding="6">
<% foreach(var customer in Model){ %>
<tr data-lastorder='<%= ((Dictionary<string,string>)ViewData["orderDict"])
                         [customer.CustomerID] %>'>
<td><%= customer.CustomerID %></td>
<td><%= customer.CompanyName %></td>
<td><input type="button" value="Order Details" /></td>
</tr>
<%}%>
</table>
As shown in the above code, @Page directive sets the model for the view to List<JSONObjectInCustomDataAttribute.Models.Customer>. Make sure to change the namespace of the data model class as per your setup. Then a <table> is generated by iterating through the Model. Each <tr> element emitted has data-lastorder attribute and its value is assigned from the orderDict ViewData variable. Recollect that orderDict is a dictionary where key is CustomerID and value is the order data in JSON format. Then CustomerID, CompanyName values are added to two table cells. The third table cell contains the Order Details button.
That's it! You can now run the application and see whether order data is available in data-lastorder attribute as expected.

