top button
Flag Notify
    Connect to us
      Site Registration

Site Registration

Using Custom Data Attributes To Store JSON Data In ASP.NET MVC

+4 votes
543 views

HTML5 custom data attributes (data-*) are used to store arbitrary pieces of metadata about an element. One way to store such metadata in data-* attributes is to create a separate data-* attribute for each piece of information you wish to store. This approach works well if there are only a few data-* attributes. However, at times you need to store a bunch of metadata in data-* attributes. In such cases instead of creating multiple data-* attributes you can create just one data-* attribute and store all the pieces of  metadata as an object in JSON format. To that end this article illustrates how custom data attributes can be used to store JSON data in an ASP.NET MVC application.

Consider the following view:

image

The above view shows a table that lists records from Customers table of Northwind database. Each row has Order Details button. Click on the Order Details button displays details such as OrderID and ShippingDate for the last order placed by the customer under consideration. These details are displayed in an alert dialog like this:

image

If you see the Customers table, it has only two columns - one showing CustomerID and the other showing CompanyName. From where does the order details such as OrderID and OrderDate came from? These details are stored in a custom data attribute named data-lastorder of each <tr> element. For example, consider the following markup that is revealed in the HTML source of the page in the browser:

image

As you can see the <tr> element has data-lastorder attribute that stores an object in JSON format. The object stores CustomerID, OrderID and OrderDate. The data-lastorder attribute can be accessed using jQuery code. The following jQuery code shows how this can be accomplished.

 $(document).ready(function () {
  $("input:button").click(function (evt) {
    var orderData = $(evt.target).closest("tr").data("lastorder");
    alert("Last Order : #" + orderData.OrderID + " on " + orderData.OrderDate);
  });
});

As you can see the ready() handler uses :button selector to match all the <input> elements of type button. This will return all the Order Details buttons shown in the earlier figure. The code then wires click event handler to the click event of the Order Details buttons. The click event handler finds <tr> element closest to the button being clicked. This is done using the closest() method. The data() method returns the value of a specified custom data attribute. In this case lastorder is specified (you can omit data- from the attribute name). The return value of data() in this case will be a JSON object and is stored in orderData variable. An alert dialog then displays the OrderID and OrderDate properties of the orderData object.

So far so good. But how to emit the data-lastorder attribute to the client browser? Obviously you can't hard-code it. It has to be generated on the fly using server side code. In this case you will have to write such code in the controller and the view.

Let's assume that you have Entity Framework data model for the Customers and Orders tables as shown below:

image


Also assume that you have HomeController with Index() method that fetches the data and makes it suitable to go inside data-lastorder attribute. The following code shows how Index() method can do this job:

public ActionResult Index()
{
  NorthwindEntities db = new NorthwindEntities();
  var customers = from c in db.Customers
                  where c.Country == "USA"
                  select c;
  List<Customer> customerList = customers.ToList();
  Dictionary<string, string> orderDict = new Dictionary<string, string>();
  foreach (Customer obj in customerList)
  {
    var order = (from o in db.Orders
                 where o.CustomerID == obj.CustomerID
                 orderby o.OrderDate descending
                 select o).FirstOrDefault();
    string jsonOrder = JsonConvert.SerializeObject(
                       new { CustomerID=order.CustomerID,
                             OrderID=order.OrderID,
                             OrderDate=order.OrderDate });
    orderDict.Add(order.CustomerID, jsonOrder);
  }
  ViewData["orderDict"] = orderDict;
  return View(customerList);
}

The above code creates a database context object (db). A LINQ to Entities query selects all the Customer objects with Country property equal to USA. Then a generic List of Customer objects is obtained by calling ToList() method of the customers variable. A dictionary is created to store order information for all the customers. The key of the dictionary is CustomerID and its value is JSON representation of the order details. Next, a foreach loop iterates through all the customer list. With every iteration the most recent Order is retrieved from the Orders DbSet for a CustomerID. This is done by sorting the results in descending order and then calling FirstOrDefault() method. Then comes the important part. The JsonConvert class of Json.NET library is used to serialize an anonymous object containing order details such as CustomerID, OrderID and OrderDate. The SerializeObject() method accepts an object and returns its JSON representation as a string. The JSON representation of the order data is stored in the dictionary created earlier. The customerList is passed to the Index view as its model whereas orderDict is passed to the view in a ViewData variable.

This completes the controller. The remaining part of the code goes inside the Index view and is shown below:

<%@ Page Language="C#" Inherits="System.Web.Mvc.ViewPage
<List<JSONObjectInCustomDataAttribute.Models.Customer>>" %>
...
<table border="1" cellpadding="6">
<% foreach(var customer in Model){ %>
<tr data-lastorder='<%= ((Dictionary<string,string>)ViewData["orderDict"])
                         [customer.CustomerID] %>'>
<td><%= customer.CustomerID %></td>
<td><%= customer.CompanyName %></td>
<td><input type="button" value="Order Details" /></td>
</tr>
<%}%>
</table>

As shown in the above code, @Page directive sets the model for the view to List<JSONObjectInCustomDataAttribute.Models.Customer>. Make sure to change the namespace of the data model class as per your setup. Then a <table> is generated by iterating through the Model. Each <tr> element emitted has data-lastorder attribute and its value is assigned from the orderDict ViewData variable. Recollect that orderDict is a dictionary where key is CustomerID and value is the order data in JSON format. Then CustomerID, CompanyName values are added to two table cells. The third table cell contains the Order Details button.

That's it! You can now run the application and see whether order data is available in data-lastorder attribute as expected.

posted Nov 3, 2016 by Shivaranjini

  Promote This Article
Facebook Share Button Twitter Share Button LinkedIn Share Button


Related Articles

Data annotation based validations validate one property at a time. For example, if you decorate CustomerID property of a class with [Required] data annotation attribute, it validates only the CustomerID property. Although this behavior is what is necessary in most of the cases, at times your outcome of a validation may depend on multiple properties. One can deal with such situations using IValidatableObject interface but the downside is that such a validation may not fit seamlessly with data annotation attributes.

In this article you will learn how to create a custom data validation attribute that performs validation based on multiple properties of the class. Specifically you will learn the following two approaches:

  • Create a custom data validation attribute to decorate a single property.
  • Create a custom data validation attribute to decorate the model class.

Which of these two approaches to use depends on your needs. The former approach is good if your class has, say, 10 properties and your validation requires two or three of them. The later approach is good if your validation depends on the object as a whole.

Custom data validation attribute for a property

Before you start developing such a data validation attributes, have a look at the following screen shot:

image

The above figure shows a Customer entry page that accepts CustomerID, CompanyName, ContactName and Country from the user. It performs validation on the CompanyName such that CompanyName ends with a specific phrase depending on a specific Country. For example, if the Country is USA, CompanyName should end with LLC or for an Indian company it should end with Ltd. and so on. If this multi-field validation fails an error message as shown in the figure is thrown back to the user.

To develop this data validation attribute create a new ASP.NET MVC application. Add ADO.NET Entity Data Model for Customers table of the Northwind database and also add HomeController.

Next, add a class named CompanyNameAttribute as shown below:

 public class CompanyNameAttribute:ValidationAttribute
{
  protected override ValidationResult IsValid(object value, 
                ValidationContext validationContext)
  {
    ...
  }
}

As you can see, CompanyNameAttribute class inherits from System.ComponentModel.DataAnnotations.ValidationAttribute base class. It then overrides IsValid() method. The IsValid() method takes two parameters - value and validationContext. The value parameter supplies the value of the property to which this attribute is attached (CompanyName in our case). The validationContext parameter can be used to grab the object instance under consideration. We can then inspect its other properties (as you will see later). The IsValid() method returns ValidationResult object indicating the validation error (if any).

Now add the following code inside the IsValid() method:

bool flag = false;
object instance = validationContext.ObjectInstance;
Type type = instance.GetType();
PropertyInfo property = type.GetProperty("Country");
object propertyValue = property.GetValue(instance);

The above code declares a Boolean variable - flag - that is set to true if the validation succeeds, else it is set to false. Then ObjectInstance property of validationContext is used to grab the underlying instance of Customer class. Remember that our custom attribute will be applied to the CompanyName property of the Customer class. The GetType() method is used to get t he type information of the object instance. Make sure to import System.Reflection for this code to compile correctly. Then GetProperty() method of Type object is called specifying Country as the property name. This way a PropertyInfo object for Country property will be returned. Finally, GetValue() method is used to retrieve the actual value of the Country property.

So far we haven't performed any validation. Next, add the following code:

if (propertyValue == null)
{
    flag = false;
}
else
{
    switch (propertyValue.ToString())
    {
        case "USA":
            if (value.ToString().EndsWith("LLC"))
            {
                flag = true;
            }
            break;
        case "India":
            if (value.ToString().EndsWith("Ltd"))
            {
                flag = true;
            }
            break;
        default:
            flag = true;
            break;
    }
}

The above code is quite straightforward and simply performs our custom validation mentioned earlier. Depending on the switch conditions the flag variable is set. If Country property is not set altogether then flag is set to false.

Finally, add the concluding piece of code as shown below:

if(!flag)
{
    ValidationResult result = new ValidationResult
                    ("Invalid Company Name for the specified country!");
    return result;
}
else
{
    return null;
}

The above code block checks the flag variable. If it is false, a ValidationResult is created with a custom error message and is returned from the IsValid() method. If flag is true, null is returned.

This completes the custom CompanyNameAttribute. Now, it's time to use this attribute. Add a metadata class to the project as shown below:

public class CustomerMetadata
{
    [CompanyName]
    [StringLength(20)]
    public string CompanyName { get; set; }
}

The above code creates a CustomerMetadata class and defines CompanyName property in it. The CompanyName property is decorated with two data validation attributes - our [CompanyName] attribute and inbuilt [StringLength] attribute.

Then add Customer partial class that links the CustomerMetdata class with the Customer model class.

[MetadataType(typeof(CustomerMetadata))]
public partial class Customer
{

}

As you can see, [MetadataType] attribute associates the CustomerMetadata class with the Customer model class.

Now, add Index view to the project and place the following markup in it:

@model MultiFieldCustomDataAnnotationDemo.Models.Customer

@{
    Layout = null;
}

<!DOCTYPE html>

<html>
<head>
    <meta name="viewport" content="width=device-width" />
    <title>Index</title>
</head>
<body>
    @using(Html.BeginForm("Index","Home",FormMethod.Post))
    {
        <h1>Add New Customer</h1>
        <table border="1" cellpadding="10">
            <tr>
                <td>Customer ID :</td>
                <td>@Html.TextBoxFor(m => m.CustomerID)</td>
            </tr>
            <tr>
                <td>Company Name :</td>
                <td>
                    @Html.TextBoxFor(m => m.CompanyName)
                    @Html.ValidationMessageFor(m => m.CompanyName)
                </td>
            </tr>
            <tr>
                <td>Contact Name :</td>
                <td>@Html.TextBoxFor(m => m.ContactName)</td>
            </tr>
            <tr>
                <td>Country :</td>
                <td>@Html.TextBoxFor(m => m.Country)</td>
            </tr>
            <tr>
                <td colspan="2">
                    <input type="submit" value="Submit" />
                </td>
            </tr>
        </table>
    }

    @Html.ValidationSummary()
</body>
</html>

The view markup is straightforward and uses ValidationMessageFor() and ValidationSummary() helpers to display validation errors.

Run the application and test our validation by entering some invalid CompanyName and Country combinations.

Custom data validation attribute for the whole model class

In the preceding approach you developed [CompanyName] attribute and decorated the CompanyName model property. In this approach you will create [ValidateCustomer] attribute and decorate the Customer class with it. In this case a sample run looks like this:

image

Did you notice the difference? In the precious case ValidationMessageFor() as well as ValidationSummary() emitted the error message. In this case only ValidationSummary() displays the error because we are validating the Customer object as whole rather than its individual properties.

In this case the custom data validation attribute looks like this:

public class ValidateCustomerAttribute : ValidationAttribute
{
    public override bool IsValid(object value)
    {
        bool flag = false;
        Customer obj = (Customer)value;
        switch (obj.Country)
        {
            case "USA":
                if (obj.CompanyName.EndsWith("LLC"))
                {
                    flag = true;
                }
                break;
            case "India":
                if (obj.CompanyName.EndsWith("Ltd"))
                {
                    flag = true;
                }
                break;
            default:
                flag = true;
                break;
        }

        return flag;
    }
}

The ValidateCustomerAttribute class inherits from ValidationAttribute class as before. This time, however, it overrides another version of IsValid() method. This version of IsValid() accepts object value and returns a Boolean value indicating success or failure of the validation. Inside, we perform the same validation as earlier and return flag variable. Notice that since [ValidateCustomer] will be applied to Customer class, the whole Customer object under consideration is passed to the IsValid() method as value parameter. Thus all the properties of Customer class can be accessed inside IsValid() method.

To use [ValidateCustomer] attribute add it on the metadata class as follows:

[ValidateCustomer]
public class CustomerMetadata
{
    ...
}

As you can see [ValidateCustomer] is applied on top of the CustomerMetadata class (and hence Customer model class) rather than CompanyName (or any other) property. Just like any other data validation attribute you can customize the error message by setting the ErrorMessage property of the base class.

[ValidateCustomer(ErrorMessage = 
"Invalid Customer data. Please check all the fields.")]
public class CustomerMetadata
{
  ....
}

That's it! You can now run the application and try entering some invalid values. If all is well you should see our custom error message displayed in the ValidationSummary().

READ MORE

At times you need to pass data from an action method belonging to one controller to an action method belonging to another controller. There are three ways to accomplish this task. They are:

  • Pass data as query string parameters
  • Pass data in TempData dictionary
  • Pass data as route parameters

 Let's quickly see how each of these three approaches work.

Pass data as query string parameters

This approach is possibly the most primitive one and involves no special consideration from your side. The action method sending the data can use Redirect() method or RedirectToAction() method to transfer the control to the receiving action method. The following code shows how this is done:

public ActionResult Index()
{
    Customer data = new Customer()
    {
        CustomerID = 1,
        CustomerName = "Abcd",
        Country = "USA"
    };
    string url=string.Format("/home2/index?customerid={0}
               &customername={1}&country={2}",
               data.CustomerID,data.CustomerName,data.Country);
    return Redirect(url);
}

The above code shows Index() action from Home1 controller. The Index action method instantiates Customer object - the model class - that looks like this:

public class Customer
{
    public int CustomerID { get; set; }
    public string CustomerName { get; set; }
    public string Country { get; set; }
}

It then forms a URL pointing to the Index() action from Home2 controller. Notice how data from Customer object is transferred in the form of query string parameters. In the above example there is no logic for generating model data but in a more realistic case you may have such a logic in this method. And once the data is generated you can pass it to the another controller using query string. The Redirect() method then takes the control to the Index() action of Home2 controller.

The Index() action of Home2 can receive the data as shown below:

public ActionResult Index()
{
    Customer data = new Customer();
    data.CustomerID = int.Parse(Request.QueryString["CustomerID"]);
    data.CustomerName = Request.QueryString["CustomerName"];
    data.Country = Request.QueryString["Country"];
    return View(data);
}

As you can see Request.QueryString collection is being used to read the values passed in the query string. Once a Customer object is formed, it is passed to the Index view.

This technique has an advantage that it is quite simple and requires no additional configuration. However, it's bit crude technique and you should avoid it if any of the other techniques can be used.

Pass data using TempData dictionary

In this technique you store the data to be passed in the TempData dictionary in the sender action method. The receiving action method reads the data from the TempData dictionary. You might be aware that TempData dictionary can hold data till it is read and this can carry data across multiple requests. The following code shows how this is done:

public ActionResult Index()
{
    Customer data = new Customer()
    {
        CustomerID = 1,
        CustomerName = "Abcd",
        Country = "USA"
    };
    TempData["mydata"] = data;
    return RedirectToAction("Index", "Home2");
}

As you can see Index() action instantiates a Customer object as before. This time, however, it stores the Customer object in a TempData key named mydata. The RedirectToAction() method is then used to take the control to the Index() action of Home2 controller.

Inside the Index() of Home2, you can read the value as follows:

public ActionResult Index()
{
    Customer data = TempData["mydata"] as Customer;
    return View(data);
}

The above code reads the Customer object from TempData dictionary and passes it to the Index view.

The TempData technique doesn't require any additional setup but it requires that session state be enabled. Also, TempData is designed to store arbitrary pieces of data. If you are planning to send model objects through TempData, that may be a deviation from standard design practices.

Pass data as route parameters

In this technique you need to do an additional work of defining a route in the system. For example, if you wish to pass the Customer data in the form of route parameters you need to define a route like this:

routes.MapRoute(
    name: "Default2",
    url: "{controller}/{action}/
          {customerid}/{customername}/{country}",
    defaults: new { controller = "Home2", action = "Index" }
);

As shown above, the route includes {customerid}, {customername}, and {country} route parameters and the route is mapped with Index() action of Home2 controller. Once the above configuration is done you can pass data from the sender action as follows:

public ActionResult Index1()
{
    Customer data = new Customer()
    {
        CustomerID = 1,
        CustomerName = "Abcd",
        Country = "USA"
    };
    return RedirectToAction("Index", "Home2", data);
}

Notice that, this time the Customer object is passed as the third parameter of RedirectToAction() method. This way Customer data will be passed in the form of route parameter values. To receive this data the receiver action method should write something like this:

public ActionResult Index()
{
    Customer data = new Customer();
    UpdateModel(data);
    return View(data);
}

// OR

public ActionResult Index(Customer data)
{
    return View(data);
}

As shown above you can either use UpdateModel() method to transfer values from the route to the Customer object or you can have a parameter to the Index() action method.

This technique is quite clean and makes use of MVC specific parts (route and route parameters). It doesn't have any dependency on session state as in the case of TempData technique. On the other hand you need to create a route to deal with the route parameters.

Note about query string and route parameters

Before I conclude this post, it would be interesting to see a small thing about how RedirectToAction() deals with query string and route parameters.

Let's assume that your sender action is like this:

public ActionResult Index()
{
    Customer data = new Customer()
    {
        CustomerID = 1,
        CustomerName = "Abcd",
        Country = "USA"
    };
    return RedirectToAction("Index", "Home2", data);
}

Notice that RedirectToAction() method passes Customer data object to Index() of Home2 as the third parameter.

The interesting thing to note is - If you haven't defined any route to match the data MVC sends it as query string. And if you have defined a route, it passes the values as route parameters. You can confirm this by observing the browser address bar once the Index() of Home2 renders the view. The following figure shows the difference:

image

That also means in the query string technique discussed earlier, you could have used exactly same code in the receiving action as in the case of route parameter technique.

In addition to the three techniques discussed above you can also use Session object but that's not discussed here separately since TempData technique anyway depends on the session storage.

That's it for now. Keep coding!

READ MORE

ASP.NET MVC makes use of MVC design pattern and the result is far different at code level. ASP.NET MVC divides the entire processing logic into three distinct parts namely model, view and controller. In the process views (that represent UI under MVC architecture) needed to sacrifice three important features of web forms viz. Postbacks, ViewState and rich event model. Let's quickly see why this sacrifice is necessary. Remember that in the following sections when I say "web form" I mean the original web form model and when I say "MVC web page" I mean MVC based web forms, though technically they belong to the same inheritance chain.

  • In a web form controls such as Button and LinkButton always submit a form (POST request) to itself. That means under default scheme post backs originating from a web form are handled in the same web form. This contradicts the MVC pattern where a view always talks with a controller and not to itself.
  • First thing to note is that server controls were never designed keeping MVC architecture in mind. They were always intended to be used with "forms based" programming mode. The clever tricks played by web form framework and server controls such as ViewState and events though quite useful in "forms based" model they are of a very little use in MVC architecture. Since a view never submits data to itself (rather it sends it to a controller) ViewState has no role to play in MVC architecture.
  • Web form events can be either "GET" events or "POST" events. Because of the points mentioned above "POST" events of server controls (such as Click event of a Button, SelectedIndexChanged event of GridView and so on) are of little use in MVC.

Considering the above points MVC doesn't offer any direct equivalent of server controls. Under MVC scheme views make use of raw HTML, non-visual helper classes (HTML helpers) and of course third party controls.

Purely for the sake of rough analogy web forms and MVC web pages can be compared like this - The data objects such as DataSets, entities, generic lists etc. go as model under MVC, the markup that renders some UI (typically .aspx files and .ascx files) goes in views and the code that usually goes in event handlers go in controllers.

If you are thinking that the discussion so far is contradicting with the title of the article wait. Though server controls are not a recommended choice under ASP.NET MVC there are situations where you may need to use server controls. Some of these situations include:

  • You are working with server controls for over eight long years. You don't want to dump them immediately just because you wish to use ASP.NET MVC.
  • You are migrating existing ASP.NET web forms based website onto ASP.NET MVC. You simply want to re-use your efforts as much as possible.
  • Your client has asked you to develop a prototype using ASP.NET MVC. You want to do it quickly. Your team is not yet fully acclimatized with ASP.NET MVC.
  • You want to familiarize yourself with MVC concepts first rather than focusing too much on raw HTML and HTML helpers. Over a period of time you plan to master those pieces.
  • You are still evaluating third party MVC controls / helpers. Unless you are convinced that a vendor is meeting your expectations you want to continue using existing controls.

Merely using server controls on an MVC web pages doesn't break MVC architecture in any way. Improper use of the server controls, however, can break the architecture and make your views difficult to understand. When you wish to use server controls in ASP.NET MVC you should keep in mind the following points:

  • Server controls should always post data to a controller. You can use PostbackUrl property of Button and LinkButton controls to achieve this.
  • Server controls and the web forms should never use ViewState. The view will get its data from ViewData collection and send its data to a controller via POST request.
  • MVC web pages can make use of "GET" events (Page_Load for example) if required but they should never make use of "POST" events (SelectedIndexChanged event of GridView for example).

Example Scenario

To illustrate how we can use ASP.NET server controls in ASP.NET MVC web pages we will develop a sample application. In this application we will make use of GridView and DetailsView control. The application adds, edits, deletes and selects records from Employees table. Later we will also add sorting and paging capabilities to our grid.

Just to give you an idea of what we will be building see the following screen shots:
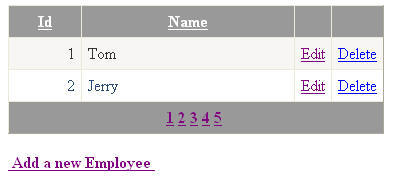
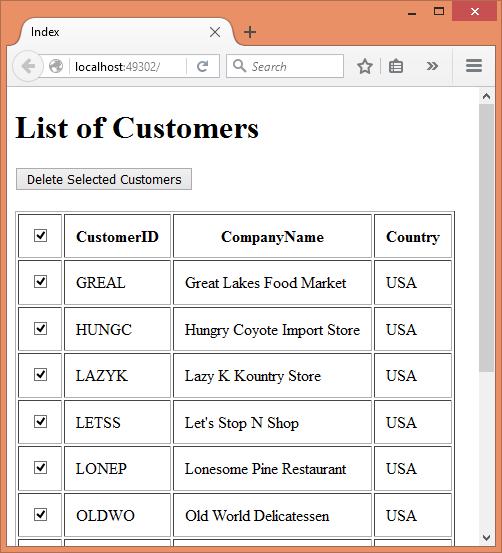
image

Figure 1

We present a list of existing employees to the user. Clicking on "Add a new Employees" link takes you to another page where a new employee record can be added.
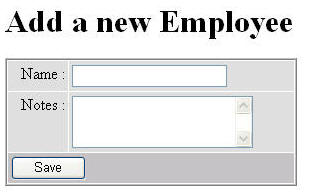
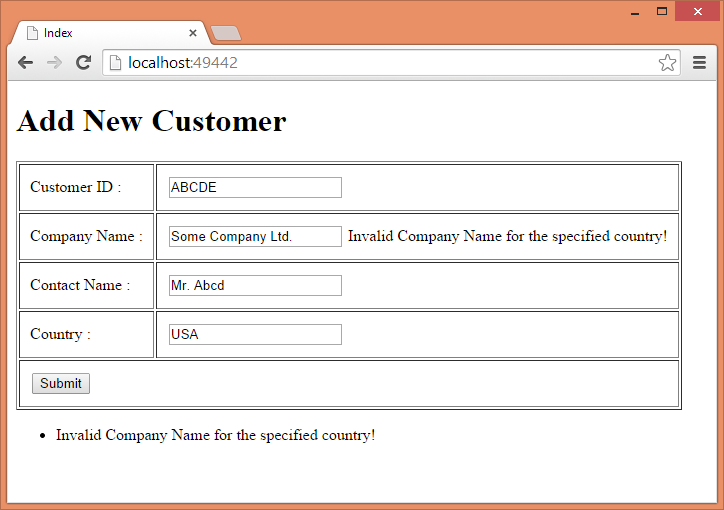
image

Figure 2

Clicking on Edit will take the user to a data entry page where the selected employee record can be edited.
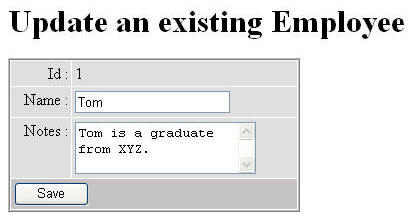
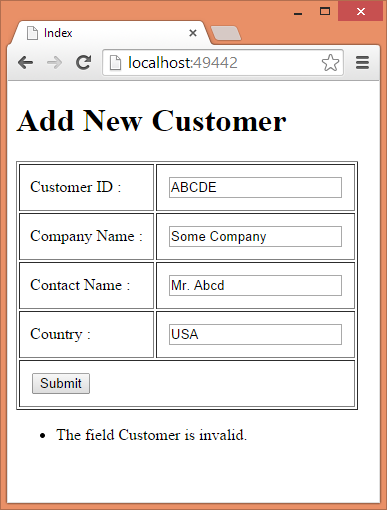
image

Figure 3

Notice that edit and add pages make use of DetailsView control and the listing page makes use of GridView control.

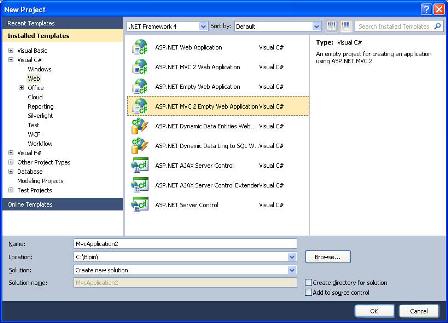
Create an MVC Web Application

Begin by creating a new MVC Web Application in Visual Studio. Select ASP.NET MVC 2 Empty Web Application template as shown below:

image

Creating a Model

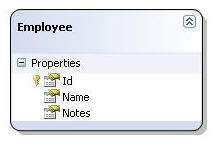
Add a new SQL Server database to the App_Data folder and create a table named Employees. The Employees table contains three columns viz. Id, Name and Notes. Id is an identity column. Add a few sample records in the Employee table for testing purpose.

image

Then add a new LINQ to SQL Classes (.dbml) file to Models folder. Drag and drop Employees table onto its design surface from the Server Explorer. Doing so will create a LINQ to SQL class (Employee) for Employees table. This class will form the model for our MVC pages.

image

Creating a Controller

Now add a new class named EmployeeController in the Controllers folder. The EmployeeController class will have the following action methods:

  • Index : Fetches all the records from Employees table and renders Index view.
  • ShowInsertView : Shows insert view with a DetailsView control in insert mode.
  • Insert : Picks up data submitted by insert view and insert it into the Employees table.
  • ShowUpdateView : Shows update view with a DetailsView control in edit mode.
  • Update : Picks up data submitted by update view and saves it into the Employees table.
  • Delete : Deletes a record from Employees table.

These action methods are discussed next.

public ActionResult Index()
{
    DataClasses1DataContext db = new DataClasses1DataContext();
    IQueryable<Employee> emplist = from rows in db.Employees
                                   select rows;
    ViewData["emplist"] = emplist;
    return View();
}

The Index() action method creates an instance of data context class and then executes a LINQ query to fetch all the rows from Employees table. The returned rows are stored in a ViewData collection so that they can be accessed in the view. Index view is then rendered.

public ActionResult ShowInsertView()
{
    return View();
}

[HttpPost]
public ActionResult Insert(FormCollection collection)
{
    DataClasses1DataContext db = new DataClasses1DataContext();
    Employee item = new Employee();
    item.Name = collection["DetailsView1$txtName"];
    item.Notes = collection["DetailsView1$txtNotes"];
    db.Employees.InsertOnSubmit(item);
    db.SubmitChanges();
    return RedirectToAction("Index");
}

The ShowInsertView() action method simply renders ShowInsertView view. Since we are inserting a new record no data needs to be passed to the view.

Notice the Insert() action method carefully. It is marked with [HttpPost] attribute indicating that only POST requests can invoke this action method. The Insert() method receives the form data as a FormCollection parameter. FormCollection parameter is essentially a key-value collection. See how we retrieve the values entered in the DetailsView control of the view. The DetailsView control will have two textboxes with IDs txtName and txtNotes respectively. As you are probably aware, SP.NET automatically prefixes the IDs of the constituent controls with the parent control ID. So txtName becomes DetailsView1$txtName when the view data is posted. A new Employee object is constructed and inserted in the Employees table. The index view is again rendered so that the user goes back to the employee listing.

public ActionResult ShowUpdateView(int id)
{
    DataClasses1DataContext db=new DataClasses1DataContext();
    var temp = from item in db.Employees
                where item.Id == id
                select item;
    ViewData["emplist"] = temp.ToList();
    return View();
}

[HttpPost]
public ActionResult Update(int id,FormCollection collection)
{
    DataClasses1DataContext db = new DataClasses1DataContext();
    var temp = from item in db.Employees
                where item.Id == id
                select item;
    temp.First().Name=collection["DetailsView1$txtName"];
    temp.First().Notes = collection["DetailsView1$txtNotes"];
    db.SubmitChanges();
    return RedirectToAction("Index");
}

The ShowUpdateView() action method fetches an Employee record whose ID matches with the supplied ID. The ShowUpdateView() method receives an ID from employee listing page (see the first figure). The Employee collection is stored in a ViewData variable and ShowUpdateView view is rendered. Even though the LINQ query is returning a single object we still need to pass it as a generic List beause DetailsView control expects a list or array for the sake of data binding.

The Update() action method is similar to Insert() method we discussed earlier. The only difference is that it modifies an existing record instead of adding a new one. The Id of the employee to be updated is supplied as Id parameter from the view (see the first figure). After the update operation the user is again taken to the employee listing.

public ActionResult Delete(int id)
{
    DataClasses1DataContext db = new DataClasses1DataContext();
    var temp = from item in db.Employees
                where item.Id == id
                select item;
    db.Employees.DeleteOnSubmit(temp.First());
    db.SubmitChanges();
    return RedirectToAction("Index");
}

The Delete() action method simply deletes a specified employee from the Employees table and takes the user back to the employee listing. Notice that unlike Insert() and Update() action methods Delete() method is not marked with [HttpPost] attribute because we are not posting anything to it. The Id parameter will be supplied from the Index view as a part of GET request.

Creating Views

In all we need to create three views viz. Index, ShowInsertView and ShowUpdateView. These views can be seen in the figures shown above.

To create the Index view, add a new View in the Views folder. Drag and drop a GridView control on the view design surface. Add two TemplateField columns and two HyperLink columns to the GridView and configure them as follows:

image

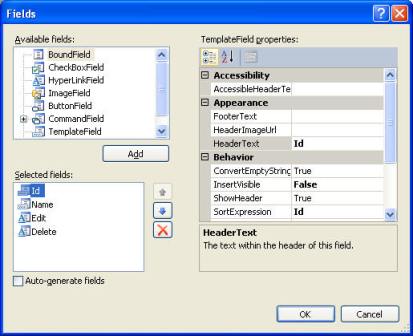
The Id and Name template fields are bound with Id and Name columns of the Employees table. The markup after binding the Id template field is shown below.

<asp:TemplateField HeaderText="Id" InsertVisible="False" 
     SortExpression="Id">
    <ItemTemplate>
        <asp:Label ID="Label1" runat="server" 
        Text='<%# Bind("Id") %>'></asp:Label>
    </ItemTemplate>
</asp:TemplateField>

The Edit and Delete HyperLink columns essentially display a hyperlink that points to the ShowUpdateView and Delete action methods respectively.

<asp:HyperLinkField DataNavigateUrlFields="Id" 
    DataNavigateUrlFormatString="~/Employee/ShowUpdateView/{0}" 
    Text="Edit" >
</asp:HyperLinkField>
<asp:HyperLinkField DataNavigateUrlFields="Id" 
    DataNavigateUrlFormatString="~/Employee/Delete/{0}" 
    Text="Delete" >
</asp:HyperLinkField>

Notice how the DataNavigateUrlField and DataNavigateUrlFormatString properties are used. At run time in place of {0} the employee Id for that row will be substituted. Recollect that the ShowUpdateView() and Delete() actions methods accept employee Id as a parameter.

Now place a HyperLink control below the GridView we just configured. Set its Text and NavigateUrl properties to "Add a new Employee" and ~/Employee/ShowInsertView respectively.

Final task is to bind the GridView with the data we pass through ViewData variable. We do this in the Page_Load event as shown below:

protected void Page_Load(object sender, EventArgs e)
{
    GridView1.DataSource = ViewData["emplist"];
    GridView1.DataBind();
}

This complete the Index view. We will revisit Index view when we implement sorting and paging features to the GridView in Part 2 of this article.

Now add another view in the Views folder and name it as ShowInsertView.aspx. Drag and drop a DetailsView control on it and set its DefaultMode property to Insert. This way when the view is rendered the DetailsView will be ready to accept a new entry. The DetailsView will have two template fields for Name and Notes columns respectively (though we won't bind them with anything as such). Since employee ID is identity column we need not include it in the DetailsView. Design the InsertItemTemplate of both the template fields to include textboxes. Then add a Button control to the footer template of the DetailsView and set its Text and PostbackUrl properties to Save and ~/Employee/Insert respectively. This way clicking the Save button will post the form to Insert() action method we coded earlier. Your DetailsView should resemble Figure 2. The markup of DetailsView is given below:

<asp:DetailsView ID="DetailsView1" runat="server" DefaultMode="Insert">
 <Fields>
     <asp:TemplateField HeaderText="Name :">
         <InsertItemTemplate>
           <asp:TextBox ID="txtName" runat="server" 
             Text='<%# Bind("Name") %>' />
         </InsertItemTemplate>
     </asp:TemplateField>
     <asp:TemplateField HeaderText="Notes :">
        <InsertItemTemplate>
           <asp:TextBox ID="txtNotes" runat="server" 
             Text='<%# Bind("Notes") %>' Rows="3" 
             TextMode="MultiLine"></asp:TextBox>
        </InsertItemTemplate>
    </asp:TemplateField>
    </Fields>
    <FooterTemplate>
     <asp:Button ID="Button1" runat="server" 
       PostBackUrl="~/Employee/Insert" 
       Text="Save" Width="75px" />
    </FooterTemplate>
</asp:DetailsView>

Similarly, add a view named ShowUpdateView.aspx and design its DetailsView as shown in Figure 3. This time the DefaultMode property of the DetailsView should be set to Edit. The DetailsView EditItemTemplate has three template fields viz. Id, Name and Notes. The Id column is not editable. The markup of the DetailsView is given below:

<asp:DetailsView ID="DetailsView1" runat="server" DefaultMode="Edit">
    <Fields>
        <asp:TemplateField HeaderText="Id :">
            <EditItemTemplate>
                <asp:Label ID="Label1" runat="server" 
                 Text='<%# Bind("Id") %>'></asp:Label>
            </EditItemTemplate>
        </asp:TemplateField>
        <asp:TemplateField HeaderText="Name :">
            <EditItemTemplate>
                <asp:TextBox ID="txtName" runat="server" 
                  Text='<%# Bind("Name") %>'></asp:TextBox>
            </EditItemTemplate>
        </asp:TemplateField>
        <asp:TemplateField HeaderText="Notes :">
            <EditItemTemplate>
                <asp:TextBox ID="txtNotes" runat="server" 
                  Text='<%# Bind("Notes") %>' Rows="3" 
                  TextMode="MultiLine"></asp:TextBox>
            </EditItemTemplate>
        </asp:TemplateField>
    </Fields>
    <FooterTemplate>
        <asp:Button ID="Button1" runat="server" 
            PostBackUrl='<%# Eval("Id","~/Employee/Update/{0}") %>' 
            Text="Save" Width="75px" />
    </FooterTemplate>
</asp:DetailsView>

Notice the PostbackUrl property of  the Save button carefully. It is set to ~/Employee/Update/{0}. The Update() action needs employee Id as a parameter. The employee Id is passed via Id property of the model. The DetailsView is finally bound with the model in the Page_Load event as shown below:

protected void Page_Load(object sender, EventArgs e)
{
    object emplist = ViewData["emplist"];
    DetailsView1.DataSource = emplist;
    DetailsView1.DataBind();
}

Recollect that we are saving employee object to be edited in a ViewData variable in the ShowUpdateView() action method. The same object is bound with the DetailsView.

That's it! Run the web application and navigate to Index view (your URL should be something like http://localhost:XXXX/Employee/index where XXXX is the port number assigned by development web server). Try adding new employee entries as well as edit existing records.

Disabling ViewState completely

Though our application is functioning as expected, it has one flaw. The individual views still maintain ViewState of server controls (GridView, DetailsView etc.). In MVC applications the ViewState is of little use and if not disabled unnecessarily makes the view heavier. One quick way to rectify the problem is to set EnableViewState property of the page to false. This way the ViewState will be reduced to a small value.

<input type="hidden" name="__VIEWSTATE" id="__VIEWSTATE" 
value="Ly91biiCAQJThIvtDDyFLvl0HWiJ1O/Egm9fLkQEf72LVCkYT/EI
C88uk3xc+Ku3pXDLM6jhDLA7sY6nOh5Hj1Fg93VSiGZHl5/T5O4U69A=" />

Though we have disabled the ViewState using EnableViewState property the control state is still maintained and cannot be disabled as such. If you wish to get rid of this small chunk of ViewState also then add the following overridden methods in the view page server side code.

protected override void SavePageStateToPersistenceMedium(object state)
{
}

protected override object LoadPageStateFromPersistenceMedium()
{
 return null;
}

The SavePageStateToPersistenceMedium() is intended t save ViewState and ControlState information of the page. We override it with an empty implementation so that no ViewState or ControlState is saved. The LoadPageStateFromPersistenceMedium() simply returns null. This way the ViewState hidden field becomes:

<input type="hidden" name="__VIEWSTATE" 
id="__VIEWSTATE" 
value="" />
READ MORE

In my previous article I illustrated how jQuery can be used to select and delete records in an ASP.NET MVC application. A few readers asked how the same can be accomplished using AngularJS instead of jQuery. This article shows just that.

Recollect how our Index view looks like and how it allows you to select all rows through the header checkbox or individual rows through the respective checkboxes.

image

As you can see there are two ways to select records for deletion:

  • You select checkboxes for rows to be deleted individually.
  • You can check the checkbox placed in the header row to select all the rows. This checkbox toggles the checked state of the other checkboxes.

Once selected you can click on the Delete Selected Customers button to actually delete the records.

In order to implement such a functionality using ASP.NET MVC and AngularJS you will need to modify the Index view as shown below:

@model List<SelectAllDeleteDemo.Models.Customer>
...
...
<html ng-app>
<body ng-controller="MyController">
    <h1>List of Customers</h1>
    <input type="button" id="delete" 
           value="Delete Selected Customers" 
           ng-click="DeleteSelected()" />
    <br /><br />
    <table border="1" cellpadding="11">
        <tr>
            <th><input type="checkbox" id="checkAll" 
                 ng-click="ToggleSelectAll()" /></th>
            <th>CustomerID</th>
            <th>CompanyName</th>
            <th>Country</th>
        </tr>
        @{ int i = 0;}
        @foreach (var item in Model)
        {
            <tr>
                <td><input type="checkbox" 
                     class="checkBox" 
                     value="@item.CustomerID" 
                     ng-checked="selectAll" 
                     ng-model="customerIDs[@i].selected" /></td>
                <td>@item.CustomerID</td>
                <td>@item.CompanyName</td>
                <td>@item.Country</td>
            </tr>
            i++;
        }
    </table>
</body>
</html>

Notice a few things about this markup:

  • The <html> tag has ng-app attribute indicating that this page is an AngularJS application.
  • The <body> tag specifies ng-controller attribute to be MyController. You will write this controller shortly.
  • The Delete Selected Customers button wires a click event handler using ng-click attribute and it is set to DeleteSelected().
  • The header checkbox wires click event handler using ng-click to ToggleSelectAll(). This event handler is responsible for toggling the state of all the checkboxes.
  • The checkboxes in individual rows are bound with selected property of objects stored in customerIDs array. This part will be clear once you see the code shortly.

Now add a script reference to AngularJS and also add a <script> block. Then write the following jQuery code:

<script src="~/Scripts/angular-1.2.js"></script>
<script>
    function MyController($scope, $http) {
        $scope.selectAll = false;
        $scope.customerIDs = new Array();

        @foreach (var item in Model)
        {
            @:$scope.customerIDs.push({ 'customerID': 
             '@item.CustomerID', 'selected': false });
        }

        $scope.DeleteSelected = function () {
            var selectedIDs = new Array();
            angular.forEach
            ($scope.customerIDs, function (item) {
                if(item.selected)
                {
                    selectedIDs.push(item.customerID);
                }
            });
            var promise = $http.post
                    ("/home/delete", selectedIDs);
            promise.success(function (msg) {
                alert(msg);
            }).error(function () {
                alert("Error");
            });
        }

        $scope.ToggleSelectAll = function () {
            $scope.selectAll = !$scope.selectAll;
            angular.forEach(
                $scope.customerIDs, function (item) {
                item.selected = $scope.selectAll;
            });
        }
    }
</script>

The code consists of MyController function - the AngularJS controller - with two model properties and two event handlers.

The selectAll model property is initially set to false indicating that all the checkboxes are unchecked. Recollect that selectAll property is bound with the ng-checked attribute of individual checkboxes. The customerIDs array stores JavaScript objects, each holding a CustomerID and its checked state. Notice how this array is filled by dynamically emitting push() script calls through Razor code block. Recollect that checkboxes from the individual rows are model bound with customerIDs[i].selected property. This way checking or unchecking a checkbox individually (rather than header checkbox) toggles the corresponding entry from the customerIDs array.

The DeleteSelected() function handles the click event of the Delete Selected Customers button. Inside, the code iterates through the customerIDs array using forEach() and determines whether selected property is true or false. If the selected property is true, that customerID is pushed into a local array - selectedIDs. This way you get an array of CustomerIDs that are checked in the table. Then the code makes an Ajax call to the /home/delete action method. This is done using the post() method of $http. The post() method takes two parameters - url of the resource to be invoked and data to be sent along with the request. In this case you pass the selectedIDs array to the Delete() action method. The success() and error() method simply wire the respective callbacks to the promise object returned by the post() method.

The ToggleSelectAll() function acts as the click event handler for the header checkbox. Inside, it toggles the selectAll model property. The code then iterates through all the elements of the customerIDs array and set selected property to the value of selectAll. This way all the checkboxes from the table rows toggle their state.

That's it! Run the application and test the functionality.

READ MORE

Sometimes you need to select records for certain action using checkboxes. For example, you may select records for deleting and then delete them from the database. Consider the following screen shot that shows such an example in action.

image

As you can see there are two ways to select records for deletion:

  • You select checkboxes for rows to be deleted individually.
  • You can check the checkbox placed in the header row to select all the rows. This checkbox toggles the checked state of the other checkboxes.

Once selected you can click on the Delete Selected Customers button to actually delete the records.

Implementing such a functionality is straightforward using ASP.NET MVC, jQuery and Ajax. Let's see how.

As an example we will use Customers table of the Northwind database for this example. You will need to create a model class for the Customers table using EF code first. The Customer class is shown below:

public partial class Customer
{
    [StringLength(5)]
    public string CustomerID { get; set; }

    [Required]
    [StringLength(40)]
    public string CompanyName { get; set; }

    [StringLength(30)]
    public string ContactName { get; set; }

    [StringLength(30)]
    public string ContactTitle { get; set; }

    [StringLength(60)]
    public string Address { get; set; }

    [StringLength(15)]
    public string City { get; set; }

    [StringLength(15)]
    public string Region { get; set; }

    [StringLength(10)]
    public string PostalCode { get; set; }

    [StringLength(15)]
    public string Country { get; set; }

    [StringLength(24)]
    public string Phone { get; set; }

    [StringLength(24)]
    public string Fax { get; set; }
}

The NorthwindDbContext - the DbContext of our model - is shown below:

public partial class NorthwindDbContext : DbContext
{
    public NorthwindDbContext()
        : base("name=NorthwindDbContext")
    {
    }

    public virtual DbSet<Customer> Customers { get; set; }

    protected override void OnModelCreating
                (DbModelBuilder modelBuilder)
    {
        modelBuilder.Entity<Customer>()
            .Property(e => e.CustomerID)
            .IsFixedLength();
    }
}

Notice that the NorthwindDbContext assumes that the database connection string is stored in web.config with a name of NorthwindDbContext.

Now add HomeController and write Index() and Delete() actions as shown below:

public ActionResult Index()
{
    using (NorthwindDbContext db = 
                  new NorthwindDbContext())
    {
        var query = from c in db.Customers
                    select c;
        return View(query.ToList());
    }
}

public ActionResult Delete(string[] customerIDs)
{
    using (NorthwindDbContext db = 
                        ew NorthwindDbContext())
    {
        foreach (string customerID in customerIDs)
        {
            Customer obj = db.Customers.Find(customerID);
            db.Customers.Remove(obj);
        }
        db.SaveChanges();
        return Json("All the customers 
                     deleted successfully!");
    }
}

The code from the Index() action simply picks all the customers from the Customers table and passes them to the Index view for display.

The Delete() action takes a single parameter - array of CustomerIDs to be deleted. The Delete() action will be called through client side jQuery code and while calling the array will be passed to it. The Delete() action simply iterates through the customerIDs array and one-by-one deletes the customers from the database. Finally, a success message is sent back to the caller in JSON format.

Now add Index view and also add a <script> reference to the jQuery library. Then add the following markup in the Index view.

@model List<SelectAllDeleteDemo.Models.Customer>
...
...
<body>
    <h1>List of Customers</h1>
    <input type="button" id="delete" 
         value="Delete Selected Customers" />
    <br /><br />
    <table border="1" cellpadding="10">
        <tr>
            <th><input type="checkbox" id="checkAll"/></th>
            <th>CustomerID</th>
            <th>CompanyName</th>
            <th>Country</th>
        </tr>
        @foreach(var item in Model)
        {
            <tr>
                <td><input type="checkbox" class="checkBox" 
                     value="@item.CustomerID" /></td>
                <td>@item.CustomerID</td>
                <td>@item.CompanyName</td>
                <td>@item.Country</td>
            </tr>
        }
    </table>
</body>
...

Notice a few things about this markup:

  • The customer data - CustomerID, CompanyName and Country - is displayed in a table.
  • The header row contains a checkbox whose ID is checkAll
  • Each table row contains a checkbox whose class attribute is set to checkBox. And its value is set to the CustomerID of that row.
  • The button above the table is used to initiate the delete operation and its ID is delete.

Now add a <script> block and write the following jQuery code:

$(document).ready(function () {

    $("#checkAll").click(function () {
        $(".checkBox").prop('checked', 
            $(this).prop('checked'));
    });

    $("#delete").click(function () {
        var selectedIDs = new Array();
        $('input:checkbox.checkBox').each(function () {
            if ($(this).prop('checked')) {
                selectedIDs.push($(this).val());
            }
        });

        var options = {};
        options.url = "/home/delete";
        options.type = "POST";
        options.data = JSON.stringify(selectedIDs);
        options.contentType = "application/json";
        options.dataType = "json";
        options.success = function (msg) {
            alert(msg);
        };
        options.error = function () {
            alert("Error while deleting the records!");
        };
        $.ajax(options);

    });
});

The code wires click event handlers for the checkAll checkbox and the delete button. The click event handler of the checkAll checkbox toggles the checked state of all the checkboxes. This is done by selecting the checkboxes using the jQuery class selector. The checkboxes whose class attribute is checkBox are matched and their checked property is toggled. Notice the use of prop() method to do this.

The click event handler of the delete button declares an array variable to store the selected CustomerIDs. It then selects all the checkboxes with CSS class of checkBox. The each() method iterates through these checkboxes. If a checkbox is checked its value is pushed into the array. This way we get all the CustomerIDs into the selectedIDs array. The success callback simply displays the success message returned from the Delete() action.

Then options object is created to hold all the Ajax configuration properties. Notice that url property points to the Delete() action and data property holds the JSON version of the selectedIDs array. Finally, $.ajax() is used to make the Ajax call.

That's it! Run the application and test the functionality.

READ MORE

Sometimes you need to display DropDownLists in your ASP.NET MVC views such that values in one DropDownList are dependent on the value selected in another DropDownList. The most common example of such a functionality is countries and states DropDownLists where based on a selected country you need to populate the states DropDownList. This article shows how such a cascading DropDownLists can be developed using ASP.NET MVC and jQuery.

Have a look at the following figure that shows two DropDownLists:

image

As you can see the country DropDownList contains a list of countries along with the first entry of "Please select". Upon selecting a country the states DropDownList displays the states belonging to the selected country. When the page is loaded the country DropDownList has "Please select" entry selected and states DropDownList is disabled. Upon selecting a country the states DropDownList is enabled so that state selection can be made. Clicking on the Submit button submits the form to an action method for further processing.

Begin by creating a new ASP.NET MVC4 project based on empty project template. Add Scripts folder to the project and place jQuery library into it. Then add HomeController to the Controllers folder. In a real world scenario you will get countries and states from a database. Here, for the sake of simplicity, we will use some hardcoded country and state values.

Now add the following action method to the HomeController:

public ActionResult Index()
{
  List<string> items = new List<string>();
  items.Add("Please select");
  items.Add("USA");
  items.Add("UK");
  items.Add("India");
  SelectList countries = new SelectList(items);
  ViewData["countries"] = countries;
  return View();
}

The above code shows Index() action method. Inside the Index() method a generic List of strings is created to hold country names and a few countries are added to it. The DropDownList HTML helper of ASP.NET MVC requires its data in the form of SelectList object. Hence a SelectList is created based on the countries List. The SelectList object is passed to the view using countries ViewData variable.

Next, add another action method to the HomeController as shown below:

public JsonResult GetStates(string country)
{
  List<string> states = new List<string>();
  switch (country)
  {
    case "USA":
      states.Add("California");
      states.Add("Florida");
      states.Add("Ohio");
      break;
    case "UK":
      //add UK states here
      break;
    case "India":
      //add India states hete
      break;
  }
  return Json(states);
}

As you can see the GetStates() action method accepts a string parameter named country and returns JsonResult. The GetStates() returns JsonResult because this method will be called using jQuery and states information is to be returned as JSON data. The GetStates() method contains a simple switch statement that adds a few states to states List based on the country value. Finally, the states generic List is returned to the caller using Json() method. The Json() method converts any .NET object into its JSON equivalent.

Now, add Index view to the Views folder and key-in the following markup to it:

<% using(Html.BeginForm("ProcessForm","Home",FormMethod.Post)){ %>
<div>Select Country :</div>
<%= Html.DropDownList("country", ViewData["countries"] as SelectList)%>
<br /><br />
<div>Select States :</div>
<select id="state"></select>
<br /><br />
<input type="submit" value="Submit" />
<%} %>

The Index view consists of a <form> that houses two DropDownLists. The country DropDownList is rendered using DropDownList HTML helper. The first parameter of the DropDownList() helper is the name of the DropDownList and the second parameter is the SelectList object containing DropDownList values. The second DropDownList is added as raw <select> element whose ID is state. Although the <form> is submitted to ProcessForm action this method is not described below as it's not directly related to the functioning of the DropDownLists.

Now, add a <script> reference to jQuery library and also add a <script> block in the head section of the view. Then write the following jQuery code in the <script> block:

$(document).ready(function () {
  $("#state").prop("disabled", true);
  $("#country").change(function () {
    if ($("#country").val() != "Please select") {
       var options = {};
       options.url = "/home/getstates";
       options.type = "POST";
       options.data = JSON.stringify({ country: $("#country").val() });
       options.dataType = "json";
       options.contentType = "application/json";
       options.success = function (states) {
       $("#state").empty();
       for (var i = 0; i < states.length; i++) {
         $("#state").append("<option>" + states[i] + "</option>");
       }
       $("#state").prop("disabled", false);
    };
    options.error = function () { alert("Error retrieving states!"); };
    $.ajax(options);
  }
  else {
    $("#state").empty();
    $("#state").prop("disabled", true);
  }
 });
});

The above code shows the ready() handler. Inside the ready() handler, you first disable the state DropDownList using prop() method. The prop() method sets the disabled DOM property to true and thus disables the state DropDownList. Then the change() method is used to wire change event handler of the country DropDownList. The change event handler will be called whenever selection in the country DropDownList changes. The change handler function first checks value selected in the country DropDownList. If it is other than "Please select", the code creates an options object. The options object holds various settings for the Ajax request to made to the server for retrieving the state values. The url property points to the GetStates() action method. The type property is set to POST indicating that a POST method will be used while making Ajax request. The data property contains JSON representation of the country selected in the country DropDownList. Note that the name of this property has to match with the name of the GetStates() method parameter. The dataType and contentType are set to json and application/json respectively. These properties indicate the data type of the response and request respectively.

The success handler function is called when the Ajax call to GetStates() is successful. The success handler function receives the states returned from the GetStates() method as an array of JSON objects. Inside the success handler you iterate through the states array and add <option> elements to the state DropDownList using append() method. Before appending the newly fetched states the state DropDownList is emptied. Once t he states are populated the disabled property of the states DropDownList is set to true using prop() method.

The error handler function simply displays an error message in an alert dialog.

Finally, an Ajax call is made using $.ajax() method of jQuery and the options object is passed as its parameter.

That's it! Run the application and test whether states are populated as expected.

READ MORE
...