top button
Flag Notify
    Connect to us
      Site Registration

Site Registration

ASP.NET Core - Old Solution Structure Vs. New Solution Structure

0 votes
484 views

Recently one of the readers, who was quite new to ASP.NET Core, asked this question -

"I am following your instructions to create a working example based on your article. After creating the project my solution explorer looks different than your screen shots. Why is so? Am I missing something?"

Well. That's actually because of a simple setting. But it is always good to know why things are happening in the way they are. So, in this short post I am explaining why you see two different solution structures in Visual Studio 2015.

Solution Structure - ASP.NET MVC 5 Style

Let's create a new ASP.NET MVC 5 project using Visual Studio 2015.

Open Visual Studio 2015 and select File > New > Project. This will open a new project dialog as shown below:

image

Observe this dialog carefully. Specifically note the following:

  • Project name is Project1
  • Solution name is Solution1
  • Create directory for solution checkbox is checked

When you complete the project creation your Solution Explorer will resemble this:

image

If you glance over the folder structure using Windows explorer, you will have this:

image

Notice that under the Demos folder you have Solution1 folder because you selected the "Create directory for solution" checkbox. Inside, you have Project1 folder that contains all the project specific files and folders.

Now, create a new project again but this time uncheck the "Create directory for solution" checkbox.

image

This time Project2 folder (the folder containing project's files and folders) gets created directly inside Demos folder. There is no separate folder for solution since you unchecked the "Create directory for solution" checkbox.

Solution Structure - ASP.NET Core Style

So far so good. Now create a new ASP.NET Core project by checking the "Create directory for solution" checkbox.

image

This time project name is Project3 and solution name is Solution3. This time your solution explorer would look like this:

image

That's bit different! Observe the following differences:

  • There are two top level folders - Solution Items and src.
  • Solution Items contains global.json file.
  • Src folder contains the project - Project3.

Now try adding another project to the same solution by right clicking on Solution3 (this process remains the same as before). After adding the new project your Solution Explorer will resemble this:

image

Thus all the projects belonging to a solution are located inside the Src folder. The physical folder structure will look like this:

image

You may ask - Why this structure?

That's because this structure closely resembles the GitHub project layout. Since ASP.NET Core heavily uses OSS, the new solution structure mimics what people using repositories such as GitHub are familiar with.

You are not limited to these two folders. You can, for example, create Tests folder to store unit testing related things and Documentation folder to store documentation files.

Now you may ask - Can I continue using the older solution structure in ASP.NET Core also?

Yes. You can do that. Simply uncheck the "Create directory for solution" checkbox while creating a project and you will have a solution with older and familiar structure. Here is an example:

image

And  the result is as follows:

image

That's it for now! Keep coding !! 

posted Dec 26, 2016 by Shivaranjini

  Promote This Article
Facebook Share Button Twitter Share Button LinkedIn Share Button


Related Articles

Dependency Injection (DI) is a technique to develop loosely coupled software systems. Although this article won't go into the details of DI as such, the basic idea is this:

Assume that there is a class Class1 that depends on Class2 and Class2 for its functioning. The normal practice is to instantiate the objects of Class2 and Class3 inside Class1 as shown below:

public class Class1
{
   private Class2 objClass2;
   private Class3 objClass3;

    public Class1()
    {
      objClass2 = new Class2();
      objClass3 = new Class3();
    }
   ....
   ....
}

Although this might work as expected it has a problem of its own - there is tight coupling between Class1 and its dependencies (Class2 and Class3). If you wish to replace Class2 and Class3 with some other implementations you need to change the code of Class1 since these objects are created inside the class.

To get away from this dependency you can do the following:

  • Base Class2 and Class3 on some interface.
  • Supply objects of classes implementing the interface (Class2 and Class3 in this case) from external world.

In other words you inject dependencies of a class from the external world. So, Class1 will look like this:

public class Class1
{
    public Class1(ISomeInterface objClass2, 
                  ISomeOtherInterface objClass3)
    {
      ....
    }
}

Ok. Now that you have some idea about DI, let's see how ASP.NET Core 1.0 allows you to work with it.

As far as ASP.NET Core 1.0 is concerned, a type to be injected is called a service. The ASP.NET Core dependency injection framework does two basic tasks for you:

  • It instantiates an object of the said service and supplies it to controllers. The dependencies can be injected through constructor injection or through property injection.
  • It handles the lifetime (when to create an object and when to dispose it) of the injected object.

There are three lifetime modes for a service being injected:

  • Singleton : An object of a service is created and supplied to all the requests to that service. So, basically all requests get the same object to work with.
  • Scoped : An object of a service is created for each and every request. So, each request gets its a new instance of a service to work with.
  • Transient : An object of a service is created every time an object is requested.

Let's see how each of these modes work.

Begin by creating a new ASP.NET Core 1.0 project as outlined. Then add an interface and a class to the Classes (or some other folder of you choice) folder:

public interface IMyServiceInterface
{
    string UniqueID { get; set; }
}

public class MyService:IMyServiceInterface
{
    public string UniqueID { get; set; }

    public MyService()
    {
        this.UniqueID = Guid.NewGuid().ToString();
    }
}

The MyServiceInterface class defines a single property - UniqueID. The MyService class implements IMyServiceInterface. The UniqueID property is set to a new GUID in the constructor of the MyService class. This way you can observe the value of UniqueID to understand the lifetime modes mentioned above.

Then add HomeController and Index view to the project.

Singleton

The DI services and their lifetime modes are registered in the Startup class. So, open the Startup class and modify the ConfigureServices() method as shown below:

public void ConfigureServices(IServiceCollection services)
{
    services.AddMvc();
    services.AddSingleton<IMyServiceInterface,MyService>();
}

Notice the line marked in bold letters. It uses the AddSingleton() method of the IServiceCollection to register MyService class as a service type. As the name suggests AddSingleton() method registers MyService with singleton mode.

Next, open the HomeController and write the following code to it:

public class HomeController : Controller
{
    private IMyServiceInterface obj;

    public HomeController(IMyServiceInterface obj)
    {
        this.obj = obj;
    }

    public IActionResult Index()
    {
        ViewBag.Obj = this.obj;
        return View();
    }
}

The HomeController constructor takes a parameter of IMyServiceInterface. Since a type that implements this interface is registered with the DI framework, an object of MyService is created and supplied to the constructor. The object reference is stored in a local obj variable for later use.

The Index() action, simply sets a ViewBag property to this injected object. The Index view outputs the value of UniqueID property as follows:

<h4>UniqueID of Obj : @ViewBag.Obj.UniqueID</h4>

If you run the application your browser should look something like this:

image

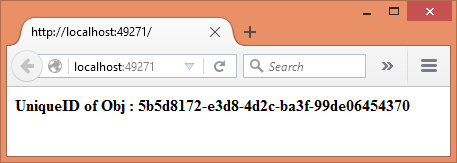
Now open another browser tab and issue another request to /home/index. You will find that both the tabs output the same UniqueID confirming that a singleton object is being created.

Scoped

To change the lifetime mode to Scoped, open Startup class again and change the call as shown below:

 services.AddScoped<IMyServiceInterface,MyService>();

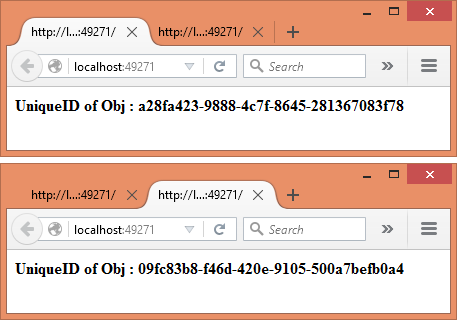
This time the code uses AddScoped() method. After making this change run the application again. Simulate multiple requests as before. This time you will find that each tab displays different UniqueID. This conforms that each request is being supplied with a new object instance.

image

Transient

To test the transient mode you need to change the Startup class like this:

services.AddTransient<IMyServiceInterface,MyService>();

This time the code uses AddTransient() method to register MyService. Now, to simulate multiple object creation requests within a single request-response cycle modify HomeController as shown below:

public class HomeController : Controller
{
    private IMyServiceInterface obj1;
    private IMyServiceInterface obj2;

    public HomeController(IMyServiceInterface obj1, 
                   IMyServiceInterface obj2)
    {
        this.obj1 = obj1;
        this.obj2 = obj2;
    }

    public IActionResult Index()
    {
        ViewBag.Obj1 = this.obj1;
        ViewBag.Obj2 = this.obj2;
        return View();
    }
}

This time the HomeController declares two variables of IMyServiceInterface. The constructor accepts two parameters of IMyServiceInterface - obj1 and obj2. This is just to simulate multiple object creation requests. The obj1 and obj2 are stored in ViewBag as before.

The Index view outputs the UniqueID from both the objects like this:

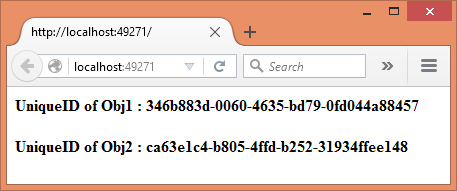
<h4>UniqueID of Obj : @ViewBag.Obj1.UniqueID</h4>
<h4>UniqueID of Obj2 : @ViewBag.Obj2.UniqueID</h4>

To test the transient mode, run the application. You will find that the two UniqueID values are different even for a single HTTP request.

image

Special case of Singleton - instance

You can register a singleton service by creating its instance yourself. In this case you are responsible for creating an object of a service. The DI framework then uses that instance in singleton mode mentioned earlier. For example, you can create an instance of MyService and register it with the DI framework. You can do so in ConfigureServices() as shown below:

public void ConfigureServices(IServiceCollection services)
{
    services.AddMvc();

    MyService obj = new MyService();
    services.AddSingleton<IMyServiceInterface>(obj);
}

As you can see, the code creates an object of MyService instead of relying on DI framework. This manually created object instance is then registered with the DI framework using an overload of AddSingleton() method. Notice that this overload accepts an object instance that is then registered as a singleton instance with the system.

You can run the application as before. You will observe that instance mode works like singleton lifetime mode - the same object instance is supplied to all the requests.

READ MORE

ASP.NET Core is a modern web development framework. Features such as model binding make your life easy by mapping form field values with model properties. So, accessing form and query string values manually might not be needed so often. However, at times you may need to read the form collection and query string values manually. The same can be said about Items collection of HttpContent. This article discusses how the form collection, query string values and Items collection can be accessed in ASP.NET Core. You will also learn how HttpContext can be accessed inside classes other than the controller.

To illustrate what we just mentioned you will develop a simple web application as shown below:

image

As you can see the page consists of a simple form that allows you to enter first name and last name. Upon click the Submit button a welcome message is displayed below.

Reading Form collection

To understand how the form collection can be accessed let's POST the above form to an action :

<h1>Enter your name :</h1>

<form asp-action="ProcessForm"
      asp-controller="Home" method="post">
    <label for="firstName">First Name :</label>
    <input type="text" name="firstname" />
    <label for="lastName">Last Name :</label>
    <input type="text" name="lastname" />
    <input type="submit" value="Submit" />
</form>

<h4>@ViewBag.Message</h4>

The above form consists of two text input fields and a submit button. The form is POSTed to the ProcessForm() action of the HomeController. The ProcessForm() action is shown below:

public IActionResult GetForm()
{
 string firstName = HttpContext.Request.Form["firstname"];
 string lastName = HttpContext.Request.Form["lastname"];
 ViewBag.Message = $"Welcome {firstName} {lastName}!";
 return View("Index");
}

Since the form is submitted to the server using a POST request, its values need to be accessed using the Form collection of the Request object. This is quite similar to ASP.NET Web Forms or ASP.NET MVC. The form collection is a dictionary that can be accessed using a key-value notation. The above code uses firstname and lastname keys to read the respective values. Notice that these keys are same as the name attributes of the text input fields. The code then forms a welcome message and stores it in ViewBag's Message property.

If you run the application you will get results as shown earlier.

Reading query string values

Now, change the method of the <form> element to GET and change the asp-action to ProcessQueryString.

<form asp-action="ProcessQueryString"
      asp-controller="Home" method="get">
...
</form>

Since the form is now being submitted through GET request, the values will be sent through query string. To access these values on the server you need to write ProcessQueryString() action as follows :

public IActionResult ProcessQueryString()
{
 string firstName = HttpContext.Request.Query["firstname"];
 string lastName = HttpContext.Request.Query["lastname"];
 ViewBag.Message = $"Welcome {firstName} {lastName}!";
 return View("Index");
}

In this case you use Query collection (not QueryString ptoperty!). As before Query collection is accessed by specifying a key. A welcome message is formed as before. You can access y string values sent via plain hyperlinks (rather than form submission) in the same manner.

Storing and retrieving items in the Items collection of HttpContext

The Items collection of the HttpContext is used to store data that is accessible within the current request. Once the current request ends the Items collection is emptied. Let's say you wish to store arbitrary number of key-value pairs in Items collection so that they can be accessed in other classes. You can store data in Items collection like this :

 public IActionResult ProcessForm()
{
    HttpContext.Items["firstname"] = 
              HttpContext.Request.Form["firstname"];
    HttpContext.Items["lastname"] = 
              HttpContext.Request.Form["lastname"];
    ViewBag.Message = helper.DoWork();
    return View("Index");
}

The above code shows the modified version of ProcessForm(). The modified ProcessForm() retrieves firstname and lastname from Form collection and stores them in the Items collection of HttpContext. The code then invokes DoWork() method on a helper object. The helper object (discussed later) is supposed to read the Items collection and return the welcome message.

This means inside the helper object you need to access the HttpContext. The HttpContext is available readily in the controller classes but if you wish to access it inside a class (let's call it a helper class for simplicity) you need to do a few things. Firstly, you need to register the HttpContextAccessor (Microsoft.AspNetCore.Http namespace) and your helper class as shown below:

public void ConfigureServices(IServiceCollection services)
{
    services.AddMvc();
    services.AddSingleton
        <IHttpContextAccessor,HttpContextAccessor>();
    services.AddScoped<MyHelperClass>();
}

 Here, you registered HttpContextAccessor as a singleton service. You also registered MyHelperClass as a scoped service. Once registered you can inject the HttpContextAccessor in the MyHelperClass. As the name implies the HttpContextAccessor allows you to access the web application's HttpContext object. The MyHelperClass is shown below:

public class MyHelperClass
{
    IHttpContextAccessor contextAccessor;

    public MyHelperClass(IHttpContextAccessor 
                          contextAccessor)
    {
        this.contextAccessor = contextAccessor;
    }

    public string DoWork()
    {
        string firstName = contextAccessor.
                  HttpContext.Items["firstname"].ToString();
        string lastName = contextAccessor.
                  HttpContext.Items["lastname"].ToString();
        return $"Welcome {firstName} {lastName}!";
    }
}

Notice the MyHelperClass class carefully. It declares a private variable of type IHttpContextAccessor. The IHttpContextAccessor object is injected in the constructor and is stored in the variable. The DoWork() method then retrieves the firstname and lastname items using the HttpContext property of IHttpContextAccessor. This way the web application's HttpContext can be accessed inside any class.

If you run the application you should see the welcome message displayed as expected.

That's it for now! Keep coding!!

READ MORE

Storing and retrieving small pieces of information in cookies a common requirement in many web applications. This article explains with an example how ASP.NET Core 1.0 deals with cookies. You will learn to read and write cookies using ASP.NET Core. You will also learn to configure the cookie properties such as expiration time.

The application you develop in this article looks like this:

image

As you can see the page allows you to specify certain preferences such as font name, font size and color. You can select a preference from the dropdown list and specify its value in the textbox. Clicking on the Write Cookie button saves that preference in a cookie. The Is Persistent checkbox controls whether the cookies are to be stored on the local disk so that they are be read during a different browser session. The read cookies link takes you to another page where the preferences are read and applied to a sample HTML markup.

Begin by creating a new ASP.NET Core Web Application using Visual Studio 2015. Then open the HomeController and add three actions to it - Index(), WriteCookies() and ReadCookies().

The Index() action is quite straightforward and simply returns the Index view to the browser.

public IActionResult Index()
{
    return View();
}

The WriteCookies() action does the job of writing cookies and is shown below:

public IActionResult WriteCookies(string setting,
              string settingValue,bool isPersistent)
{
    if (isPersistent)
    {
        CookieOptions options = new CookieOptions();
        options.Expires = DateTime.Now.AddDays(1);
        Response.Cookies.Append(setting, settingValue,options);
    }
    else
    {
        Response.Cookies.Append(setting, settingValue);
    }
    ViewBag.Message = "Cookie written successfully!";
    return View("Index");
}

The WriteCookies() method receives three parameters namely setting, settingValue and isPersistent through model binding. The setting paremeter will be the value selected in the dropdown list. The settingValue parameter will be the value entered in the textbox and isPersistent will indicate whether isPersistent checkbox is checked or not.

Inside, the code checks the value of isPersistent boolean parameter. If it is true an object of CookieOptions class (Microsoft.AspNetCore.Http namespace) is created. The CookieOptions class allows you to specify the properties of the cookie such as the following:

  • Domain (domain associated with the cookie)
  • Expires (when the cookie should expire)
  • Path (specify path where cookie is applicable)
  • Secure (cookie is sent only on https channel)
  • HttpOnly (client side script can't access the cookie)

In the above example, you set the Expires property of the cookie to one day from now. This way the cookie will be persisted on the client machine for one day. Then a cookie is written to the response using the Append() method of the Cookies collection. The Append() method accepts key, value and CookieOptions object.

The else block of the code simply appends a cookie by setting its key and value (no CookieOptions object is passed).

A ViewBag message indicates to the user that the preference is stored successfully.

Then add Index view and write the following markup into it:

<h1>Specify your preferences :</h1>
<form asp-action="WriteCookies" asp-controller="Home">
    <select name="setting">
        <option value="fontName">Font Name</option>
        <option value="fontSize">Font Size</option>
        <option value="color">Color</option>
    </select>
    <input type="text" name="settingValue" />
    <input type="checkbox" name="isPersistent" 
           value="true" /> Is Persistent?
    <input type="submit" value="Write Cookie" />
</form>

<h4>@ViewBag.Message</h4>

<h4>
    <a asp-action="ReadCookies" asp-controller="Home">
       Read Cookies
    </a>
</h4>

The Index view renders a <form> shown earlier using ASP.NET Core tag helpers and input elements. It also outputs the Message property from ViewBag. A Read Cookies link takes the user to a test page where  preferences are applied.

Now, add ReadCookies() action to the HomeController and write the following code to it :

public IActionResult ReadCookies()
{
    ViewBag.FontName = Request.Cookies["fontName"];
    ViewBag.FontSize = Request.Cookies["fontSize"];
    ViewBag.Color = Request.Cookies["color"];

    if(string.IsNullOrEmpty(ViewBag.FontName))
    {
        ViewBag.FontName = "Arial";
    }
    if (string.IsNullOrEmpty(ViewBag.FontSize))
    {
        ViewBag.FontSize = "22px";
    }
    if (string.IsNullOrEmpty(ViewBag.Color))
    {
        ViewBag.Color = "Blue";
    }
    return View();
}

The ReadCookies() action reads three cookies with the help of their respective keys. This is done using Cookies collection of the Request object. The cookie values are stored in ViewBag properties. A series of if statements check whether a particular preference is empty and if so assign a default value to it.

The ReadCookies view where these preferences are used is shown below:

<div style="font-family:'@ViewBag.FontName';
     font-size:@ViewBag.FontSize;color:
     @ViewBag.Color">
    Hello World! 
</div>

 The ReadCookies view consists of a <div> element whose style attribute makes use of font name, font size and color specified in the respective ViewBag properties.

This completes the application. Run it and specify values to the three preferences. Don't check the Is Persistent checkbox while saving the values. Then click on the Read Cookies link. You should something similar to this:

image

Then run the application again and repeat the process by checking the Is Persistent checkbox. If you observe the browser's cookie cache you will find the three cookies there:

image

That's it for now! Keep coding!!

READ MORE

In the previous article you learnt to consume a Web API created in ASP.NET Core using jQuery client. Although local clients are quite common in Ajax rich applications, many real-world situations require that you call a Web API from a different application. Thus the client application and the Web API application are different and you can't use JavaScript to call the Web API (due to default browser settings). Moreover, if you wish to call a Web API from a desktop application JavaScript is not an option. In such cases you can use HttpClient to call the Web API. This article tells you how.

I assume that you have the Web API we developed in the earlier parts of this series ready with you. Add a new ASP.NET Core project to the same solution and configure it to use ASP.NET Core MVC. We won't go into the details of that configuration here since that's the basic step for creating any web application under ASP.NET Core.

Once you have the new project configured, open Project.json and add the two dependencies:

"System.Net.Http": "4.3.0-preview1-24530-04",
"Newtonsoft.Json": "9.0.2-beta1"

Notice the System.Net.Http entry. This is a NuGet package that supplies us the HttpClient component. The Json.Net component comes from the Newtonsoft.Json NuGet package and does the trick of JSON serialization and deserialization for us.

Now add a new controller - HomeController - to the project (remember now you are coding in the client application's project, not the Web API project). The HomeController will have seven actions as outlined below:

  • Index() : Returns a view displaying a list of existing customers.
  • Insert() and Insert(obj) : Handle the insert operation by adding a new customer.
  • Update(id) and Update(obj) : Handle the update operation by modifying an existing customer.
  • ConfirmDelete() and Delete() : Handle delete confirmation and delete operations by removing a customer.

In the section that follow I won't discuss the views and their markup in detail. They are quite straightforward and similar to ASP.NET MVC views. Our main interest is the actions that make use of HttpClient component to call the Web API.

Displaying a list of customers

The Index view that displays a list of all the customers looks like this:

image

The Index() action behind this view is shown below:

public ActionResult Index()
{
    using (HttpClient client = new HttpClient())
    {
        client.BaseAddress = new Uri
("http://localhost:49387");
        MediaTypeWithQualityHeaderValue contentType = 
new MediaTypeWithQualityHeaderValue("application/json");
        client.DefaultRequestHeaders.Accept.Add(contentType);
        HttpResponseMessage response = client.GetAsync
("/api/customerservice").Result;
        string stringData = response.Content.
ReadAsStringAsync().Result;
        List<Customer> data = JsonConvert.DeserializeObject
<List<Customer>>(stringData);
        return View(data);
    }
}

The Index() action creates a new instance of HttpClient and sets its BaseAddress and accept header accordingly. Make sure to change the base address as per your setup. The code then calls the GetAsync() method of HttpClient to invoke the Get() action of the Web API. Since the content type is set to JSON, the Web API will its data in JSON format. This data is unpacked from the HttpResponseMessage object using the ReadAsStringAsync() method. The JSON string is then deserialized into a List of Customer objects using Json.Net component's JsonConvert class.

Adding a new customer

The Insert view that allows you to add a new customer is shown below:

image

The GET and POST versions of the Insert() action are shown below:

public ActionResult Insert()
{
    return View();
}

[HttpPost]
public ActionResult Insert(Customer obj)
{
    ....
    string stringData = JsonConvert.
SerializeObject(obj);
    var contentData = new StringContent
(stringData, System.Text.Encoding.UTF8, 
"application/json");
    HttpResponseMessage response = client.PostAsync
("/api/customerservice", contentData).Result;
    ViewBag.Message = response.Content.
ReadAsStringAsync().Result;
    return View(obj);
    ....
}

The GET version of Insert() simply returns the Insert view to the browser.

The POST version of Insert() first serializes the Customer object received through the model binding into a JSON string. This is necessary because we want to POST data in JSON format. The code then wraps this JSON string into a StringContent object. Notice that the StringContent constructor sets the encoding to UTF8 and media type to JSON. The code then calls the PostAsync() method of HttpClient and submits the JSON data to the Web API using POST verb. The string message returned by the Web API is unwrapped from HttpResponseMessage object using its ReadAsStringAsync() method.

Modify a customer

The Update view looks like this:

image

And the two Update() actions responsible for the relevant functionality are as shown below:

public ActionResult Update(string id)
{
    HttpResponseMessage response = 
client.GetAsync("/api/customerservice/" + id).Result;
    string stringData = response.Content.
ReadAsStringAsync().Result;
    Customer data = JsonConvert.
DeserializeObject<Customer>(stringData);
    return View(data);
}

[HttpPost]
public ActionResult Update(Customer obj)
{
    string stringData = JsonConvert.SerializeObject(obj);
    var contentData = new StringContent(stringData,
System.Text.Encoding.UTF8,"application/json");
    HttpResponseMessage response = client.PutAsync
("/api/customerservice/" + obj.CustomerID, 
contentData).Result;
    ViewBag.Message = response.Content.
ReadAsStringAsync().Result;
    return View(obj);
}

The GET version of Update() action invokes Get(id) of Web API using the GetAsync() method of HttpClient. Notice that this time CustomerID is appended in the URL. The returned Customer object is unpacked using the ReadAsStringAsync() method and the stringified JSON is collected in a string variable. This JSON string is then deserialized into a Customer object using Deserialize() method if JsonConvert.

The POST version of Update() is quite similar to the POST version of Insert() we discussed earlier. However, this time we use PutAsync() method by passing the CustoemrID and the stringified JSON data. The string message is then read using ReadAsStringAsync() as before.

Deleting a customer

 Clicking the Delete links from the Index view takes you to a confirmation page as shown below:

image

The ConfirmDelete() action behind this view is shown below:

public ActionResult ConfirmDelete(string id)
{
    HttpResponseMessage response = 
client.GetAsync("/api/customerservice/" + id).Result;
    string stringData = response.
Content.ReadAsStringAsync().Result;
    Customer data = JsonConvert.
DeserializeObject<Customer>(stringData);
    return View(data);
}

This action is same as the GET version of Update() action.

When you click on the Delete button to delete the selected customer, the page is POSTed to Delete() action:

[HttpPost]
public ActionResult Delete(string customerid)
{
    HttpResponseMessage response = 
client.DeleteAsync("/api/customerservice/" 
+ customerid).Result;
    TempData["Message"] = 
response.Content.ReadAsStringAsync().Result;
    return RedirectToAction("Index");
}

The Delete() action receives the CustomerID through model binding. Remember to emit this value on the ConfirmDelete view using a hidden field (or any other technique of your choice). The code then calls the DeleteAsync() method if the HttpClient to invoke the Delete() action of Web API. The string message returned from the Web API is stored in a TempData entry so that it can be outputted on the Index view.

That's it! This complete the remote client for the Web API. Run the Index view and test all the CRUD operations.

READ MORE

In the previous article you learnt to create a Web API using ASP.NET Core. A Web API can be consumed by local clients or remote clients. Local clients are the clients that are housed in the same web application as the Web API. Remote clients are the clients that are not part of the Web API application.

As far as web applications are concerned a typical local client takes a form of jQuery (or JavaScript) Ajax driven user interface that consumes the Web API. For example, consider a simple page shown below:

image

The above client to the CustomerService Web API consists of a dropdown list and four textboxes. The dropdown list contains a list of existing CustomerIDs. Selecting a CustomerID populates the other textboxes with the respective values. You can then modify the values and click on Update button to save the changes. To insert a new Customer, specify its CustomerID in the textbox besides the dropdown list, fill other details and hit the Insert button. Finally, to delete a Customer, select its CustomerID from the dropdown list and click on the Delete button.

To create this page, add a new controller - HomeController - in the Controllers folder. Also add Index view and write the following HTML markup into it:

<h1>Customer Manager</h1>
<form>
    <table border="1">
        <tr>
            <td>Customer ID :</td>
            <td>
                <select id="customerid"></select>
                OR
                <input id="newcustomerid" type="text" />
            </td>
        </tr>
        <tr>
            <td>Company Name :</td>
            <td><input id="companyname" type="text" /></td>
        </tr>
        <tr>
            <td>Contact Name :</td>
            <td><input id="contactname" type="text" /></td>
        </tr>
        <tr>
            <td>Country :</td>
            <td><input id="country" type="text" /></td>
        </tr>
        <tr>
            <td colspan="2">
                <input type="button" id="insert" 
                       value="Insert" />
                <input type="button" id="update" 
                       value="Update" />
                <input type="button" id="delete" 
                       value="Delete" />
            </td>
        </tr>
    </table>
    <br />
    <div id="msg"></div>
</form>

To invoke the Web API you created earlier, you will use jQuery Ajax. So, add Scripts folder under the wwwroot folder and place jQuery library into it.

image

Also, add a <script> reference to the jQuery library in the <head> section of the Index view.

 <script src="~/Scripts/jquery-3.1.1.min.js"></script>

There are in all five jQuery Ajax calls needed by our client. They are as follows:

  • As soon as the page loads in the browser, the dropdown list should be filled with all the existing CustomerIDs. This is done by calling the Get() Web API action through jQuery Ajax.
  • When you pick a CustomerID from the dropdown list its details such as CompanyName, ContactName and Country are displayed in the respective textboxes. This is done by calling the Get(id) Web API action from the change event handler of the dropdown list.
  • Clicking Insert, Update and Delete buttons call the Post(), Put() and Delete() Web API actions respectively, again through jQuery Ajax.

Ok. Let's go ahead and write the first Ajax call.

Filling the dropdown list with CustomerIDs

$(document).ready(function () {
    var options = {};
    options.url = "/api/customerservice";
    options.type = "GET";
    options.dataType = "json";
    options.success = function (data) {
        data.forEach(function (element) {
            $("#customerid").append("<option>" 
            + element.customerID + "</option>");
        });
    };
    options.error = function () {
        $("#msg").html("Error while 
                  calling the Web API!");
    };
    $.ajax(options);
});

The above code makes an Ajax request using $.ajax() method of jQuery. Notice how the url, type and dataType properties of the options object are specified. Since we wish to invoke Get() action, the url points to the Web API end point. The HTTP verb used is GET and the response data type is set to json.

The success function simply fills the dropdown list with a series of <option> element each wrapping a CustoemrID. The error function displays an error message in case something goes wrong while calling the Web API.

Displaying details of a selected customer

The change event handler of the dropdown looks like this:

$("#customerid").change(function () {
    var options = {};
    options.url = "/api/customerservice/" + 
                   $("#customerid").val();
    options.type = "GET";
    options.dataType = "json";
    options.success = function (data) {
        $("#companyname").val(data.companyName);
        $("#contactname").val(data.contactName);
        $("#country").val(data.country);
    };
    options.error = function (a, b, c) {
        alert(a.responseText);
        $("#msg").html("Error while 
                  calling the Web API!");
    };
    $.ajax(options);
});

This code is quite similar to the previous one. However, it appends the CustomerID whose details are to be fetched to the url. The success function fills the three textboxes with CompanyName, ContactName and Country. Notice something important - the property names are automatically converted to use camel casing. This way client side code gets to stick with the JavaScript ways of naming the things whereas server side code can continue to stick to the C# ways of naming the things.

Adding a new customer

The click event handler of the Insert button is shown below:

$("#insert").click(function () {
    var options = {};
    options.url = "/api/customerservice";
    options.type = "POST";

    var obj = {};
    obj.customerID = $("#newcustomerid").val();
    obj.companyName = $("#companyname").val();
    obj.contactName = $("#contactname").val();
    obj.country = $("#country").val();

    options.data = JSON.stringify(obj);
    options.contentType = "application/json";
    options.dataType = "html";

    options.success = function (msg) {
        $("#msg").html(msg);
    };
    options.error = function () {
        $("#msg").html("Error while 
                  calling the Web API!");
    };
    $.ajax(options);
});

The above code uses POST verb to make the Web API call. Moreover, it sets data, dataType and contentType properties. The data property is set to the stringified version of the new customer object. Notice that this new object also uses camel casing while setting the properties. The dataType property is set to html because our Post() action returns a plain string. The contentType property indicates the request's data type - JSON in this case.

The success function simply displays the message returned by the Post() action into the msg <div> element.

Modifying an existing customer

The click event of the Update button is shown below:

$("#update").click(function () {
    var options = {};
    options.url = "/api/customerservice/" 
                  + $("#customerid").val();
    options.type = "PUT";

    var obj = {};
    obj.customerID = $("#customerid").val();
    obj.companyName = $("#companyname").val();
    obj.contactName = $("#contactname").val();
    obj.country = $("#country").val();

    options.data = JSON.stringify(obj);
    options.contentType = "application/json";
    options.dataType = "html";
    options.success = function (msg) {
        $("#msg").html(msg);
    };
    options.error = function (a, b, c) {
        alert(c);
        $("#msg").html("Error while 
                  calling the Web API!");
    };
    $.ajax(options);
});

Most of the above code is similar to the code you wrote in the insert click event handler. The CustomerID being modified is appended to the url. The HTTP verb is set to PUT.

Deleting a customer

Finally, the code that deletes a customer is shown below:

$("#delete").click(function () {
    var options = {};
    options.url = "/api/customerservice/" 
                  + $("#customerid").val();
    options.type = "DELETE";
    options.dataType = "html";
    options.success = function (msg) {
        $("#msg").html(msg);
    };
    options.error = function () {
        $("#msg").html("Error while 
                  calling the Web API!");
    };
    $.ajax(options);
});

The above code sets the HTTP verb to DELETE and makes an Ajax call as before.

This completes the jQuery client to the Web API. Run the Index view and test all the operations.

In the next article you will develop a remote client to consume the Web API. Till then keep coding!!

READ MORE
...