top button
Flag Notify
    Connect to us
      Site Registration

Site Registration

Consume ASP.NET Core Web API Using JQuery

+1 vote
658 views

In the previous article you learnt to create a Web API using ASP.NET Core. A Web API can be consumed by local clients or remote clients. Local clients are the clients that are housed in the same web application as the Web API. Remote clients are the clients that are not part of the Web API application.

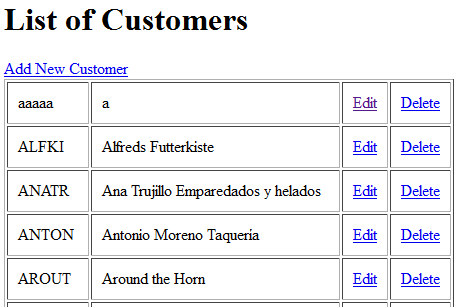
As far as web applications are concerned a typical local client takes a form of jQuery (or JavaScript) Ajax driven user interface that consumes the Web API. For example, consider a simple page shown below:

image

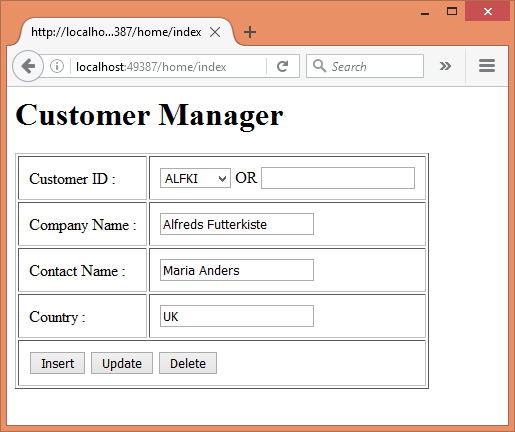
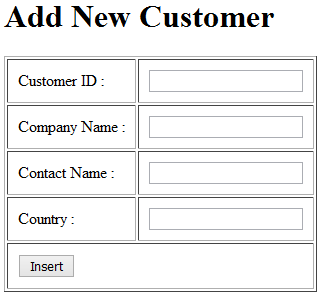
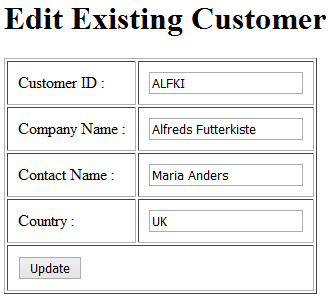
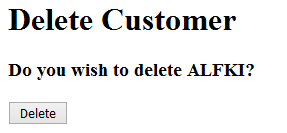
The above client to the CustomerService Web API consists of a dropdown list and four textboxes. The dropdown list contains a list of existing CustomerIDs. Selecting a CustomerID populates the other textboxes with the respective values. You can then modify the values and click on Update button to save the changes. To insert a new Customer, specify its CustomerID in the textbox besides the dropdown list, fill other details and hit the Insert button. Finally, to delete a Customer, select its CustomerID from the dropdown list and click on the Delete button.

To create this page, add a new controller - HomeController - in the Controllers folder. Also add Index view and write the following HTML markup into it:

<h1>Customer Manager</h1>
<form>
    <table border="1">
        <tr>
            <td>Customer ID :</td>
            <td>
                <select id="customerid"></select>
                OR
                <input id="newcustomerid" type="text" />
            </td>
        </tr>
        <tr>
            <td>Company Name :</td>
            <td><input id="companyname" type="text" /></td>
        </tr>
        <tr>
            <td>Contact Name :</td>
            <td><input id="contactname" type="text" /></td>
        </tr>
        <tr>
            <td>Country :</td>
            <td><input id="country" type="text" /></td>
        </tr>
        <tr>
            <td colspan="2">
                <input type="button" id="insert" 
                       value="Insert" />
                <input type="button" id="update" 
                       value="Update" />
                <input type="button" id="delete" 
                       value="Delete" />
            </td>
        </tr>
    </table>
    <br />
    <div id="msg"></div>
</form>

To invoke the Web API you created earlier, you will use jQuery Ajax. So, add Scripts folder under the wwwroot folder and place jQuery library into it.

image

Also, add a <script> reference to the jQuery library in the <head> section of the Index view.

 <script src="~/Scripts/jquery-3.1.1.min.js"></script>

There are in all five jQuery Ajax calls needed by our client. They are as follows:

  • As soon as the page loads in the browser, the dropdown list should be filled with all the existing CustomerIDs. This is done by calling the Get() Web API action through jQuery Ajax.
  • When you pick a CustomerID from the dropdown list its details such as CompanyName, ContactName and Country are displayed in the respective textboxes. This is done by calling the Get(id) Web API action from the change event handler of the dropdown list.
  • Clicking Insert, Update and Delete buttons call the Post(), Put() and Delete() Web API actions respectively, again through jQuery Ajax.

Ok. Let's go ahead and write the first Ajax call.

Filling the dropdown list with CustomerIDs

$(document).ready(function () {
    var options = {};
    options.url = "/api/customerservice";
    options.type = "GET";
    options.dataType = "json";
    options.success = function (data) {
        data.forEach(function (element) {
            $("#customerid").append("<option>" 
            + element.customerID + "</option>");
        });
    };
    options.error = function () {
        $("#msg").html("Error while 
                  calling the Web API!");
    };
    $.ajax(options);
});

The above code makes an Ajax request using $.ajax() method of jQuery. Notice how the url, type and dataType properties of the options object are specified. Since we wish to invoke Get() action, the url points to the Web API end point. The HTTP verb used is GET and the response data type is set to json.

The success function simply fills the dropdown list with a series of <option> element each wrapping a CustoemrID. The error function displays an error message in case something goes wrong while calling the Web API.

Displaying details of a selected customer

The change event handler of the dropdown looks like this:

$("#customerid").change(function () {
    var options = {};
    options.url = "/api/customerservice/" + 
                   $("#customerid").val();
    options.type = "GET";
    options.dataType = "json";
    options.success = function (data) {
        $("#companyname").val(data.companyName);
        $("#contactname").val(data.contactName);
        $("#country").val(data.country);
    };
    options.error = function (a, b, c) {
        alert(a.responseText);
        $("#msg").html("Error while 
                  calling the Web API!");
    };
    $.ajax(options);
});

This code is quite similar to the previous one. However, it appends the CustomerID whose details are to be fetched to the url. The success function fills the three textboxes with CompanyName, ContactName and Country. Notice something important - the property names are automatically converted to use camel casing. This way client side code gets to stick with the JavaScript ways of naming the things whereas server side code can continue to stick to the C# ways of naming the things.

Adding a new customer

The click event handler of the Insert button is shown below:

$("#insert").click(function () {
    var options = {};
    options.url = "/api/customerservice";
    options.type = "POST";

    var obj = {};
    obj.customerID = $("#newcustomerid").val();
    obj.companyName = $("#companyname").val();
    obj.contactName = $("#contactname").val();
    obj.country = $("#country").val();

    options.data = JSON.stringify(obj);
    options.contentType = "application/json";
    options.dataType = "html";

    options.success = function (msg) {
        $("#msg").html(msg);
    };
    options.error = function () {
        $("#msg").html("Error while 
                  calling the Web API!");
    };
    $.ajax(options);
});

The above code uses POST verb to make the Web API call. Moreover, it sets data, dataType and contentType properties. The data property is set to the stringified version of the new customer object. Notice that this new object also uses camel casing while setting the properties. The dataType property is set to html because our Post() action returns a plain string. The contentType property indicates the request's data type - JSON in this case.

The success function simply displays the message returned by the Post() action into the msg <div> element.

Modifying an existing customer

The click event of the Update button is shown below:

$("#update").click(function () {
    var options = {};
    options.url = "/api/customerservice/" 
                  + $("#customerid").val();
    options.type = "PUT";

    var obj = {};
    obj.customerID = $("#customerid").val();
    obj.companyName = $("#companyname").val();
    obj.contactName = $("#contactname").val();
    obj.country = $("#country").val();

    options.data = JSON.stringify(obj);
    options.contentType = "application/json";
    options.dataType = "html";
    options.success = function (msg) {
        $("#msg").html(msg);
    };
    options.error = function (a, b, c) {
        alert(c);
        $("#msg").html("Error while 
                  calling the Web API!");
    };
    $.ajax(options);
});

Most of the above code is similar to the code you wrote in the insert click event handler. The CustomerID being modified is appended to the url. The HTTP verb is set to PUT.

Deleting a customer

Finally, the code that deletes a customer is shown below:

$("#delete").click(function () {
    var options = {};
    options.url = "/api/customerservice/" 
                  + $("#customerid").val();
    options.type = "DELETE";
    options.dataType = "html";
    options.success = function (msg) {
        $("#msg").html(msg);
    };
    options.error = function () {
        $("#msg").html("Error while 
                  calling the Web API!");
    };
    $.ajax(options);
});

The above code sets the HTTP verb to DELETE and makes an Ajax call as before.

This completes the jQuery client to the Web API. Run the Index view and test all the operations.

In the next article you will develop a remote client to consume the Web API. Till then keep coding!!

posted Nov 22, 2016 by Shivaranjini

  Promote This Article
Facebook Share Button Twitter Share Button LinkedIn Share Button


Related Articles

In the previous article you learnt to consume a Web API created in ASP.NET Core using jQuery client. Although local clients are quite common in Ajax rich applications, many real-world situations require that you call a Web API from a different application. Thus the client application and the Web API application are different and you can't use JavaScript to call the Web API (due to default browser settings). Moreover, if you wish to call a Web API from a desktop application JavaScript is not an option. In such cases you can use HttpClient to call the Web API. This article tells you how.

I assume that you have the Web API we developed in the earlier parts of this series ready with you. Add a new ASP.NET Core project to the same solution and configure it to use ASP.NET Core MVC. We won't go into the details of that configuration here since that's the basic step for creating any web application under ASP.NET Core.

Once you have the new project configured, open Project.json and add the two dependencies:

"System.Net.Http": "4.3.0-preview1-24530-04",
"Newtonsoft.Json": "9.0.2-beta1"

Notice the System.Net.Http entry. This is a NuGet package that supplies us the HttpClient component. The Json.Net component comes from the Newtonsoft.Json NuGet package and does the trick of JSON serialization and deserialization for us.

Now add a new controller - HomeController - to the project (remember now you are coding in the client application's project, not the Web API project). The HomeController will have seven actions as outlined below:

  • Index() : Returns a view displaying a list of existing customers.
  • Insert() and Insert(obj) : Handle the insert operation by adding a new customer.
  • Update(id) and Update(obj) : Handle the update operation by modifying an existing customer.
  • ConfirmDelete() and Delete() : Handle delete confirmation and delete operations by removing a customer.

In the section that follow I won't discuss the views and their markup in detail. They are quite straightforward and similar to ASP.NET MVC views. Our main interest is the actions that make use of HttpClient component to call the Web API.

Displaying a list of customers

The Index view that displays a list of all the customers looks like this:

image

The Index() action behind this view is shown below:

public ActionResult Index()
{
    using (HttpClient client = new HttpClient())
    {
        client.BaseAddress = new Uri
("http://localhost:49387");
        MediaTypeWithQualityHeaderValue contentType = 
new MediaTypeWithQualityHeaderValue("application/json");
        client.DefaultRequestHeaders.Accept.Add(contentType);
        HttpResponseMessage response = client.GetAsync
("/api/customerservice").Result;
        string stringData = response.Content.
ReadAsStringAsync().Result;
        List<Customer> data = JsonConvert.DeserializeObject
<List<Customer>>(stringData);
        return View(data);
    }
}

The Index() action creates a new instance of HttpClient and sets its BaseAddress and accept header accordingly. Make sure to change the base address as per your setup. The code then calls the GetAsync() method of HttpClient to invoke the Get() action of the Web API. Since the content type is set to JSON, the Web API will its data in JSON format. This data is unpacked from the HttpResponseMessage object using the ReadAsStringAsync() method. The JSON string is then deserialized into a List of Customer objects using Json.Net component's JsonConvert class.

Adding a new customer

The Insert view that allows you to add a new customer is shown below:

image

The GET and POST versions of the Insert() action are shown below:

public ActionResult Insert()
{
    return View();
}

[HttpPost]
public ActionResult Insert(Customer obj)
{
    ....
    string stringData = JsonConvert.
SerializeObject(obj);
    var contentData = new StringContent
(stringData, System.Text.Encoding.UTF8, 
"application/json");
    HttpResponseMessage response = client.PostAsync
("/api/customerservice", contentData).Result;
    ViewBag.Message = response.Content.
ReadAsStringAsync().Result;
    return View(obj);
    ....
}

The GET version of Insert() simply returns the Insert view to the browser.

The POST version of Insert() first serializes the Customer object received through the model binding into a JSON string. This is necessary because we want to POST data in JSON format. The code then wraps this JSON string into a StringContent object. Notice that the StringContent constructor sets the encoding to UTF8 and media type to JSON. The code then calls the PostAsync() method of HttpClient and submits the JSON data to the Web API using POST verb. The string message returned by the Web API is unwrapped from HttpResponseMessage object using its ReadAsStringAsync() method.

Modify a customer

The Update view looks like this:

image

And the two Update() actions responsible for the relevant functionality are as shown below:

public ActionResult Update(string id)
{
    HttpResponseMessage response = 
client.GetAsync("/api/customerservice/" + id).Result;
    string stringData = response.Content.
ReadAsStringAsync().Result;
    Customer data = JsonConvert.
DeserializeObject<Customer>(stringData);
    return View(data);
}

[HttpPost]
public ActionResult Update(Customer obj)
{
    string stringData = JsonConvert.SerializeObject(obj);
    var contentData = new StringContent(stringData,
System.Text.Encoding.UTF8,"application/json");
    HttpResponseMessage response = client.PutAsync
("/api/customerservice/" + obj.CustomerID, 
contentData).Result;
    ViewBag.Message = response.Content.
ReadAsStringAsync().Result;
    return View(obj);
}

The GET version of Update() action invokes Get(id) of Web API using the GetAsync() method of HttpClient. Notice that this time CustomerID is appended in the URL. The returned Customer object is unpacked using the ReadAsStringAsync() method and the stringified JSON is collected in a string variable. This JSON string is then deserialized into a Customer object using Deserialize() method if JsonConvert.

The POST version of Update() is quite similar to the POST version of Insert() we discussed earlier. However, this time we use PutAsync() method by passing the CustoemrID and the stringified JSON data. The string message is then read using ReadAsStringAsync() as before.

Deleting a customer

 Clicking the Delete links from the Index view takes you to a confirmation page as shown below:

image

The ConfirmDelete() action behind this view is shown below:

public ActionResult ConfirmDelete(string id)
{
    HttpResponseMessage response = 
client.GetAsync("/api/customerservice/" + id).Result;
    string stringData = response.
Content.ReadAsStringAsync().Result;
    Customer data = JsonConvert.
DeserializeObject<Customer>(stringData);
    return View(data);
}

This action is same as the GET version of Update() action.

When you click on the Delete button to delete the selected customer, the page is POSTed to Delete() action:

[HttpPost]
public ActionResult Delete(string customerid)
{
    HttpResponseMessage response = 
client.DeleteAsync("/api/customerservice/" 
+ customerid).Result;
    TempData["Message"] = 
response.Content.ReadAsStringAsync().Result;
    return RedirectToAction("Index");
}

The Delete() action receives the CustomerID through model binding. Remember to emit this value on the ConfirmDelete view using a hidden field (or any other technique of your choice). The code then calls the DeleteAsync() method if the HttpClient to invoke the Delete() action of Web API. The string message returned from the Web API is stored in a TempData entry so that it can be outputted on the Index view.

That's it! This complete the remote client for the Web API. Run the Index view and test all the CRUD operations.

READ MORE

Most of the times the JavaScript event handlers attached with an element fire every time the event under consideration is raised. For example, if you wire a click event handler to the click event of a button then clicking that button will invoke the event handler function every time. At times, however, this behavior is undesirable.

Suppose that you have a hyperlink or a button and clicking on that element causes an Ajax request to be sent to the server. The Ajax request returns some data that is loaded in some other element. Once the data is retrieved there is no need for the click event handler to fire. If you keep firing the click event handler you would be unnecessary making Ajax requests to the server.

One way to avoid these unwanted Ajax requests is to maintain a flag that tells you whether data for an element has already been retrieved or not. However, this may slightly complicate the JavaScript code. As an alternative you can unsubscribe the click event handler when it gets executed the first time. That means you need to create event handlers that fire only one time. Luckily, jQuery provides an inbuilt way to accomplish this task - one() method.

To understand how the one() method is used you will create an ASP.NET Web Form as shown below:

image

As you can see the above Web Form consists of a GridView control that lists EmployeeID, FirstName and LastName from the Employees table of Northwind database. The Get Notes column is a a HyperLinkField and doesn't have any server side functionality. Clicking on the Get Notes link executes some Ajax code that retrieves Notes for an employee. The Notes are appended to a Label control placed below the GridView. Once retrieved there is no need to retrieve Notes of the same employee again and hence the click event handler of the Get Notes link for that employee can be removed.

To develop this example, create an empty ASP.NET Web Forms application. Then add the ADO.NET Entity Framework Data Model for the Employees table. The following figure shows how the Employee entity class looks like:

image

Then add a Web Form to the project and place a GridView on it. Add two BoundField columns and one HyperLinkField column to the GridView and design it as shown in the beginning of  this article. Also, place a Label control below the GridView.

Now, set the SelectMethod property of the GridView to GridView1_GetData and add the GridView1_GetData() method in the code behind. This method does the job of fetching employee records from the database and is shown below:

public IQueryable GridView1_GetData()
{
    NorthwindEntities db=new NorthwindEntities();
    var query = from emp in db.Employees
                where emp.Country=="USA"
                orderby emp.EmployeeID
                select new { EmployeeID=emp.EmployeeID,
                             FirstName=emp.FirstName,
                             LastName=emp.LastName };
    return query;
}

The GridView1_GetData() returns all the Employee records where Country is USA. Only the EmployeeID, FirstName and LastName columns are returns because our example needs only these columns.

Now, add a [WebMethod] named GetNotes() as shown below:

[WebMethod]
public static string GetNotes(int employeeid)
{
  NorthwindEntities db = new NorthwindEntities();
  var query = from emp in db.Employees
              where emp.EmployeeID == employeeid
              select emp.Notes;
  return query.SingleOrDefault().ToString();
}

The GetNotes() web method is intended to be called from the client side script using Ajax. The GetNotes() method accepts an EmployeeID and returns the Notes for that employee.

Next, add a <script> reference to jQuery library and also add a <script> block in the head section of the Web Form. Key in the following jQuery code in the <script> block:

$(document).ready(function () {
  $("a").one("click", function (evt) {
    var empId = $(evt.target).closest("tr").children(":first-child").text();
    $.ajax({
      url: "WebForm1.aspx/getnotes",
      type: "POST",
      data: JSON.stringify({ employeeid: empId }),
      dataType: "json",
      contentType: "application/json",
      success: function (result) {
        $("#lblNotes").append(result.d + "<hr />");
      },
      error: function () { alert('error'); }
   });
  });
});

The above code uses one() method of jQuery to wire a one time event handler to all the hyperlink elements from the Web Form. In our case this will cause all Get Notes links to have the specified function as the one time click event handler. The first parameter of the one() method is the type of event that is to be handled (click in this case). The second parameter is the event handler function. The event handler function retrieves the EmployeeID from the first column of the row whose Get Notes link is clicked. Notice the use of closest(), children() methods and :first-child selector to accomplish this task.

Then an Ajax call is made to the GetNotes() web method using jQuery .$ajax(). The EmployeeID retrieved earlier is passed as the data parameter. The success function receives the return value of the web method. In this case the success function will receive the Notes for that employee. The Notes are then appended in the Label (lblNotes) using append() method.

To test the function of the Web Form, set a breakpoint at the GetNotes() web method and run the application. You will observe that when you click on the Get Notes link for an employee for the first time, the Ajax call is made and the Notes are retrieved from the database. This will be evident from the fact that your execution will halt at the breakpoint. Once Notes for an Employee are retrieved clicking on Get Notes doesn't cause the Ajax call and the web method won't be called again and again. That's what we wanted!

That's it! Keep coding.

READ MORE

In this article I have taken the example of submitting a contact form consisting of name and address field.

Step 1: Create a New Project.

Go To File -> New -> Select Empty and Checked MVC -> OK


Step 2: Now Right Click on Controllers -> Add -> New Controller -> Name it as HomeController


Step 3: In the HomeController there is Index method create View for it.


Step 4: Now right click on Models -> New -> Class.


In the Contact class write the field which will be on your form. In my form I want only three fields so I have written it as:


Step 5: Go to the Index.cshtml and write the code for form in the body element and don’t give any action to form.


Step 6: Now to submit the form asynchronously we use JQuery. Write the code for it in <script> in the head or you can write it in external file also ,just don’t forgot to give its reference on the page.

In the code we are using the jquery submit event for submitting the form it actually overrides the form submit action. In the $.post(‘url’,serialized form data).success(function(response){//to do}.

The success event get triggers if the data posted successfully. It takes response from the server I am giving alert of the response here.


Step 7: Now we have to write controller method to get the form data. Write method in the HomeController I have named it ‘submit’ as I gave in the url. And the submit method takes model contact class as argument which gets filled with the form data; after submitting the form also returns nothing. Give [HttpPost] Annotation to the submit method. Also we are writing in the response that ‘form is submitted successfully’ using Response.writemethod.which gets send to the success event of $.post.


Step 8: Now put breakpoint at your submit method and start debugging your Index.cshtml page. Fill the fields and submit.


After submitting you will find the submitted data in controller method argument and further you will get the alert.


Run

READ MORE
...