top button
Flag Notify
    Connect to us
      Site Registration

Site Registration

Jazz Up Your Web Forms Using JQuery Animation Effects

+1 vote
264 views

The previous part of this series dealt with event handling mechanism of jQuery. In this part I cover how to add jazz to your web forms using jQuery effects. jQuery provides a set of methods that allow you to create animations in your web pages. Collectively these methods are called as Effects. The effects they render include fading in and out, sliding in and out, changing opacity of elements, hiding and showing elements and so on. You can, of course, define custom animations. The following table lists some of the important effect methods :

Method Description
show Shows selected elements. If duration parameter is specified then it animates width, height and opacity simultaneously.
hide Hides selected elements. If duration parameter is specified then it animates width, height and opacity simultaneously.
fadeIn Adds fade-in effect to selected elements. Opacity is increased from lower to higher value.
fadeOut Adds fade-out effect to selected elements. Opacity is decreased from higher to lower value.
slideDown Adds slide-down effect to selected elements. Height is increased from lower to higher value.
slideUp Adds slide-up effect to selected elements. Height is decreased from higher to lower value.
animate Allows to define a custom animation.
delay Introduces a delay between two effects.
stop Stops the currently running animation.

To understand how jQuery effects work we will develop three examples.

Animated Tooltips

The first one will be a simple tooltip as shown below :

image

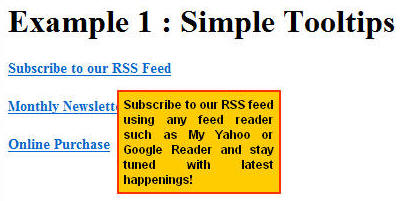
Here, we have few link buttons. When you hover your mouse pointer onto some link a tooltip pops up in animated fashion. This example makes use of show() and hide() methods.

The web form consists of three LinkButton controls and three Panel controls. The following markup shows these controls :

<div id="example1">
<asp:LinkButton ID="LinkButton1" runat="server" Font-Bold="True" 
    Font-Size="14px">Subscribe to our RSS Feed</asp:LinkButton>
<br />
<br />
<asp:LinkButton ID="LinkButton2" runat="server" Font-Bold="True" 
    Font-Size="14px">Monthly Newsletter</asp:LinkButton>
<br />
<br />
<asp:LinkButton ID="LinkButton3" runat="server" Font-Bold="True" 
    Font-Size="14px">Online Purchase</asp:LinkButton>
<br />
<asp:Panel ID="tooltipLinkButton1" runat="server">
    Subscribe to our RSS feed using any feed reader such as My Yahoo or Google 
    Reader and stay tuned with latest happenings!
</asp:Panel>
<asp:Panel ID="tooltipLinkButton2" runat="server">
    Subscribe to our monthly newsletter and get news, announcements, tips and tricks 
    directly in your inbox!
</asp:Panel>
<asp:Panel ID="tooltipLinkButton3" runat="server">
    Purchase our books, DVDs and other accessories through our secure payment 
    processing system!
</asp:Panel>
</div>        

The look and feel of Panel controls is taken care by a CSS class named Tooltip.

.Tooltip
{
    border:solid 2px #FF3300;
    background-color:#FFCC00;
    padding:5px;
    position:absolute;
    font-family:Arial;
    font-size:12px;
    font-weight:bold;
    text-align:justify;
    width:150px;
}

The jQuery code that actually displays the tooltips is shown below :

$(document).ready(OnReady);

function OnReady() {
    $("#example1 div").addClass("Tooltip")
                      .hide();
    $("#example1 a").hover(OnMouseOver, OnMouseOut);
}

function OnMouseOver(event) {
    var id = event.target.id;
    $("#example1 div[id $='" + id + "']").css("left", event.pageX + 15)
                               .css("top", event.pageY + 15)
                               .show(500);
}

function OnMouseOut(event) {
    var id = event.target.id;
    $("#example1 div[id $='" + id + "']").hide(500);
}

When the page is loaded we hide all the Panel controls (DIV elements) using hide() method. When you use hide() method without any parameter it essentially sets "display" CSS property to "none". We then handle hover event of all LinkButton controls (A elements). In the OnMouseOver() function we first get hold of DIV associated with that link. Notice that we have assigned IDs of Panel controls such that they contain associated LinkButton IDs. This way it is easier for us to detect a Panel corresponding to a LinkButton. We then set left and top properties of the Panel to pageX and pageY coordinates. The show() method displays the Panel. If show() method is used without any duration parameter then the underlying element is shown without any animation. Specifying duration parameter (500 in above example) means that show() method should show the element with animated height, width and opacity. The duration is in milliseconds. Lower the duration higher the animation speed and vice a versa. So duration parameter is essentially tells "show me this animation for n milliseconds".

The OnMouseOut() function calls hide() method on the previously shown Panel. This time hide() method has duration parameter specified indicating the speed of animation.

There are inbuilt string constants "fast" and "slow" that represent 200 and 600 milliseconds respectively. We can use these strings with show() and hide() methods instead of specifying milliseconds as number.

Master-details

The next example consists of a master-details kind of web form wherein there are two DataList controls. The outer DataList displays Customer records (master) and the inner DataList displays Orders by a customer (details). The web form looks like this :

image

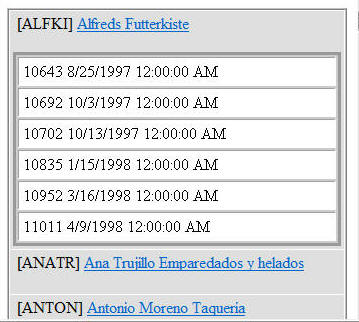
The CompanyName column is displayed as a LinkButton. When you click on the CompanyName link all the orders by that customer are displayed with animation effect. If you click on the link again orders are hidden with animation effect. The jQuery code that makes it work is as follows :

$(document).ready(OnReady);

function OnReady() {
    $("div[id $= 'orders']").css("display", "none");
    $("a[id $= 'lnkCompanyName']").click({animationType:'custom'},ShowOrders);
}

function ShowOrders(event) {
    switch (event.data.animationType) {
        case "simple":
            if ($("#" + event.target.id + " ~ div").is(":visible")) {
                $("#" + event.target.id + " ~ div").hide(1000);
            }
            else {
                $("#" + event.target.id + " ~ div").show(1000);
            }
            break;
        case "fade":
            if ($("#" + event.target.id + " ~ div").is(":visible")) {
                $("#" + event.target.id + " ~ div").fadeOut(2000);
            }
            else {
                $("#" + event.target.id + " ~ div").fadeIn(2000);
            }
            break;
        case "slide":
            if ($("#" + event.target.id + " ~ div").is(":visible")) {
                $("#" + event.target.id + " ~ div").slideUp(1000);
            }
            else {
                $("#" + event.target.id + " ~ div").slideDown(1000);
            }
            break;
        case "custom":
            $("#" + event.target.id + " ~ div").animate({
                    opacity: 'toggle',
                    width: 'toggle',
                    height: 'toggle'
                  }, 2000, function() {});
            break;
    }
    event.preventDefault();
}

The ready event handler attaches a click event handler for all the CompanyName links. Notice how we use $= (ends with) operator to select LinkButtons. We need to use $= operator because LinkButtons are inside DataList1 and their client side ID after rendering in the browser will be something like DataList1_ctl01_lnkCompanyName. While attaching the event handler we pass animationType as custom event data. This way we can easily change the type of animation (slide-down, fade-in etc.).

The ShowOrder() event handler function checks the value of animationType passed and accordingly calls appropriate animation methods. Methods of our interest, in this example, are slideDown(), slideUp(), fadeIn(), fadeOut() and animate(). All of these methods except animate() are very identical in terms of usage syntax. They accept duration parameter and animate the selected elements for that much duration of time. You can see all of them in action by changing the animationType.

The animate() method needs special attention. The animate() method accepts animation settings, duration of animation and a callback function to be called once the animation has run. Using the animation settings parameter you can specify height, width and opacity values. The "toggle" string literal used in the above example simply changes their values from lower to higher and higher to lower. Some other examples of using animation settings parameter are as follows :

{width: '+=50'}

{height: '200'}

{height: '+=20', width: '200'}

The above example doesn't use callback function.

Progress Indicator

In this final example of this article we will develop a progress indicator that visually notifies the user that some processing is going on. Our progress indicator will look similar to a progress bar but with to and fro movement.

image

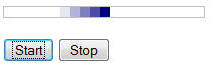
Clicking on Start button starts the progress indicator and clicking on Stop button stops the animation. The progress indicator is actually a series of DIV elements as shown below :

    <div id="container" class="container">
        <div id="block" class="block">
        <div id="block5" class="block5"></div>
        <div id="block4" class="block4"></div>
        <div id="block3" class="block3"></div>
        <div id="block2" class="block2"></div>
        <div id="block1" class="block1"></div>
        </div>
    </div>

The outermost DIV (the boundary of progress indicator bar) has ID container. Inside there are five DIVs with 10px height and width. Their opacity is set in such a way that together they give that fading look. The CSS classes used in the above markup are as follows :

.block
{
    width:50px;
    position:absolute;
    display:none;
}
.block1
{
    width:10px;
    height:10px;
    background-color:Navy;
    opacity:1;
    float:left;
}
.block2
{
    width:10px;
    height:10px;
    background-color:Navy;
    opacity:0.7;
    float:left;
}
.block3
{
    width:10px;
    height:10px;
    background-color:Navy;
    opacity:0.5;
    float:left;            
}
.block4
{
    width:10px;
    height:10px;
    background-color:Navy;
    opacity:0.3;
    float:left;            
}
.block5
{
    width:10px;
    height:10px;
    background-color:Navy;
    opacity:0.1;
    float:left;            
}
.container
{
    width:200px;
    height:10px;
    border:solid 1px silver;
}

Initially DIV with ID "block" is hidden (display : none). When the page is loaded we attach event handlers to the Start and Stop buttons.

$(document).ready(OnReady);

function OnReady() {
    $("#start").click(function(event) { flag = true; ShowProgressIndicator(0); 
      event.preventDefault(); });
    $("#stop").click(function(event) { flag = false; 
      event.preventDefault(); });
}

The click event of start button sets a global JavaScript variable flag to true and then calls ShowProgressIndicator() function by passing 0 as its parameter. The ShowProgressIndicator() function will be discussed shortly. The click event handler of Stop button sets the flag variable to false. As you might have guessed, the flag variable determines whether to continue the animation or not.

function ShowProgressIndicator(dir) {
    $("#block").show();
    if (dir == 0) {
        $("#block").animate({ left: '160' }, 5000, OnAnimationComplete);
    }
    else {
        $("#block").animate({ left: '10' }, 5000, OnAnimationComplete);
    }
}

The ShowProgressIndicator() function takes direction of movement (0 - left to right 1 - right to left) as parameter and shows the five DIVs that make the moving part of the indicator. Depending on the direction it calls animate() method on the block. If we are moving from left to right then we pass maximum left coordinate as 160. The outermost DIV has width 200px so here we pass 160px. If you change the width of outermost DIV then change 160 to whatever new value. Passing left as 160 and duration as 5000 means "move the block till its left coordinate is 160px in 5 seconds". Similarly while moving in the reverse direction we pass left coordinate as 10. The OnAnimationComplete function is a callback function that is triggered at the end of animation (i.e. after 5000 milliseconds).

function OnAnimationComplete() {
    $("#block > div").each(function(index) {
        if ($(this).hasClass("block1")) {
            $(this).removeClass();
            $(this).addClass("block5");
        }
        else if ($(this).hasClass("block2")) {
            $(this).removeClass();
            $(this).addClass("block4");
        }
        else if ($(this).hasClass("block3")) {
            $(this).removeClass();
            $(this).addClass("block3");
        }
        else if ($(this).hasClass("block4")) {
            $(this).removeClass();
            $(this).addClass("block2");
        }
        else if ($(this).hasClass("block5")) {
            $(this).removeClass();
            $(this).addClass("block1");
        }
    });
    if (flag == true) {
        if ($("#block1").hasClass("block1")) {
            ShowProgressIndicator(0);
        }
        else {
            ShowProgressIndicator(1);
        }

    }
    else {
        $("#block").hide();
    }
}

The OnAnimationComplete() function essentially toggles the CSS classes of the five DIVs that make the moving block of the indicator. It does so by using hasClass() method. The hasClass() method returns true if the specified class is applied to the element. This way the opacity values while moving from left to right are 0.1, 0.3, 0.5, 0.7, 1.0 and while moving from right to left are 1.0, 0.7, 0.5, 0.3, 0.1. In effect we feel as if DIVs has reversed their positions.

Then we check the global flag variable to determine whether to continue the animation or not. If the flag is true then we run the animation again by calling ShowProgressIndicator() method. Otherwise the animation ends and the block is hidden.

I hope you enjoyed the animation effects of jQuery. In the next part I will discuss about making AJAX calls from jQuery to ASP.NET web services, page methods and WCF services. Stay tuned!

posted Nov 15, 2016 by Shivaranjini

  Promote This Article
Facebook Share Button Twitter Share Button LinkedIn Share Button


Related Articles

Many websites display notifications or prompts in what is called as information bar or notification bar. Such an information bar typically contains some text, graphics or any other HTML markup along with a close button. The information bar is always visible and is flushed with the top edge of the browser window. Once user closes it it remains hidden for the active session. Such an information bar can be easily developed using jQuery. The remainder of this article explains how.

To begin developing your own information bar, create an empty ASP.NET website and add a web form to it. Then add a folder named Scripts and add a JavaScript file to it. You will be developing a jQuery - InfoBar - plugin to display the information bar. If you are not familiar with jQuery plugins read this article first. Then key in the following code into the JavaScript file :

(function ($) {
    //infobar plugin
    $.fn.InfoBar = function (params) {
        //store div element reference for future use
        var bar = $(this);

        //infobar options
        var options = { 'CssClass': 'InfoBar', 'CloseButtonId': 
                    'InfoBarButton', 'CookieName': 'ShowInfoBar' };
        if (params) {
            $.extend(options, params);
        }

        //function to read cookie value
        var GetCookieValue = function (name) {
            var cookieName = name + "=";
            var cookieArray = document.cookie.split(';');
            for (var i = 0; i < cookieArray.length; i++) {
                var c = cookieArray[i];
                while (c.charAt(0) == ' ') c = 
                       c.substring(1, c.length);
                if (c.indexOf(cookieName) == 0) 
                    return c.substring
                    (cookieName.length, c.length);
            }
            return null;
        }

        //handle scroll event of window to keep infobar always visible
        $(window).scroll(function () {
            if (GetCookieValue(options.CookieName) == null) {
                $(bar).css("display", 'none');
                $(bar).css("marginTop", $(window).scrollTop());
                $(bar).css("display", 'block');
            }
        });

        //hide infobar if user has previously clicked close button
        if (GetCookieValue(options.CookieName) != null) {
            $(bar).css('display', 'none');
        }

        //store a cookie to indicate that user has clicked close button
        $("#" + options.CloseButtonId).click(function (e) {
            $(bar).slideUp('slow');
            document.cookie = options.CookieName + "=false;path=/";
            e.preventDefault();
        });

        //display infobar and apply CSS class
        return this.each(function (index) {
            if (GetCookieValue(options.CookieName) == null) {
                $(bar).addClass(options.CssClass);
                $(bar).css('display', 'block');
            }
        });
    }
})(jQuery);

Let's dissect the above code step-by-step.

(function ($) {
    $.fn.InfoBar = function (params) {
        var bar = $(this);
...

First, you define a jQuery plugin - InfoBar. The plugin can take parameters as a JSON object as indicated by params function parameter. Inside a plugin "this" keyword points to the DOM element on which the plugin has been initialized. You store this reference in a local variable - bar - for later use.

 var options = { 'CssClass': 'InfoBar', 'CloseButtonId': 
                'InfoBarButton', 'CookieName': 'ShowInfoBar' };
if (params) {
   $.extend(options, params);
} 

Then you define a set of configuration options for the plugin. The options include - CssClass, CloseButtonId and CookieName. The CssClass option will indicate the name of CSS class that is to be applied to the base DOM element. Any information bar usually contains a close button and ID of this button can be configured via CloseButtonId option. To remember whether a user has previously closed the info bar or not you will use a Cookie. Name of this cookie can be specified via CookieName option. All the three options mentioned above have default values of InfoBar, InfoBarButton and ShowInfoBar respectively. If you wish to override these defaults you will need to pass the alternate values via params function parameter. You then merge options and params using $.extend() to arrive at the resultant set of options.

var GetCookieValue = function (name) {
  var cookieName = name + "=";
  var cookieArray = document.cookie.split(';');
  for (var i = 0; i < cookieArray.length; i++) {
    var c = cookieArray[i];
    while (c.charAt(0) == ' ') c = c.substring(1, c.length);
    if (c.indexOf(cookieName) == 0) return c.substring
                            (cookieName.length, c.length);
  }
  return null;
}

The GetCookieValue() function is a helper function that accepts a cookie name and returns its value. If the cookie doesn't exist it returns null. Remember that JavaScript cookies are stored in document.cookie property as a semicolon separated pairs. The above code essentially iterates through the available cookies and returns value of a specific cookie.

 $(window).scroll(function () {
  if (GetCookieValue(options.CookieName) == null) {
    $(bar).css("display", 'none');
    $(bar).css("marginTop", $(window).scrollTop());
    $(bar).css("display", 'block');
  }
});

 You need to handle scroll event of the window to keep our info bar always visible to the user. Inside the scroll event handler you essentially check if user has opted to close the infor bar using GetCookieValue() function. If user has not clicked the close button you set the marginTop property of the info bar to scrollTop value. To reduce the flicker you may consider hiding and showing the info bar before and after setting the marginTop property.

 if (GetCookieValue(options.CookieName) != null) {
   $(bar).css('display', 'none');
}

This fragment of code will check for the existence of info bar cookie and hide the info bar accordingly.

 $("#" + options.CloseButtonId).click(function (e) {
  $(bar).slideUp('slow');
  document.cookie = options.CookieName + "=false;path=/";
  e.preventDefault();
});

This code wires an event handler function to the click event of the close button. The click event handler essentially hides the info bar with a smooth sliding up effect. This is done using jQuery slideUp() function. The parameter to slideUp() governs the speed of sliding operation. Then the code sets a info bar cookie using document.cookie property. Notice that the cookie name will be as specified in the CookieName option (ShowInfoBar by default) and its value will be set to false. Also notice that the path of the cookie is set to root of the website and the cookie doesn't have any expiration date. This way the cookie will be active only during the active session of the browser. When user starts a fresh instance of the browser this cookie will not be present. If for some reason you wish to set some expiration date and time explicitly just modify this line of code.

return this.each(function (index) {
  if (GetCookieValue(options.CookieName) == null) {
    $(bar).addClass(options.CssClass);
    $(bar).css('display', 'block');
  }
});

The final piece of code simply adds the CSS class to the DOM element and displays the info bar.

This completes the info bar plugin code. Now let's use the info bar plugin in a web form.

Add a new Style Sheet to the website and add InfoBar CSS class to it:

.InfoBar
{
    background-color: silver;
    color: #333333;
    font-weight: bold;
    position: absolute;
    width: 100%;
    top: 0px;
    left: 0px;
    text-align: center;
    border-bottom-width: 1px;
    border-bottom-color: #666666;
    border-bottom-style: solid;
}

The InfoBar CSS class governs the look and feel of the info bar.

Next, refer jQuery library, info bar plugin and the style sheet file in the default web form.

 <script src="Scripts/jquery-1.4.4.min.js" type="text/javascript">
</script>
<script src="Scripts/InfoBar.js" type="text/javascript">
</script>
<link href="StyleSheet.css" rel="stylesheet" type="text/css" />

Add a <DIV> element inside the form as shown below :

<div id="infobarDiv">
    <table cellpadding="10" width="100%" border="0">
    <tr>
        <td align="center" width="95%">This is InfoBar developed 
        in ASP.NET and jQuery.
        </td>
        <td align="left" width="5%">
          <input id="Button1" type="button" value="Close" />
        </td>
    </tr>
    </table>
</div>

The infobarDiv element essentially displays a message and close button.

To complete the web form, add the following script block immediately after the script references :

<script type="text/javascript">
    $(document).ready(function () {
        $("#infobarDiv").InfoBar({ 'CssClass': 'InfoBar', 
         'CloseButtonId': 'Button1', 
         'CookieName': 'ShowInfoBar' });
    })
</script>

The above script block handles the ready() jQuery event and initializes the info bar plugin on infobarDiv element. Notice how parameters are passed in JSON format.

That's it! Run the web form and you should see something like this :

image

You can use the info bar plugin in individual web forms or put it in a master page.

READ MORE

In the previous article you learnt to create a Web API using ASP.NET Core. A Web API can be consumed by local clients or remote clients. Local clients are the clients that are housed in the same web application as the Web API. Remote clients are the clients that are not part of the Web API application.

As far as web applications are concerned a typical local client takes a form of jQuery (or JavaScript) Ajax driven user interface that consumes the Web API. For example, consider a simple page shown below:

image

The above client to the CustomerService Web API consists of a dropdown list and four textboxes. The dropdown list contains a list of existing CustomerIDs. Selecting a CustomerID populates the other textboxes with the respective values. You can then modify the values and click on Update button to save the changes. To insert a new Customer, specify its CustomerID in the textbox besides the dropdown list, fill other details and hit the Insert button. Finally, to delete a Customer, select its CustomerID from the dropdown list and click on the Delete button.

To create this page, add a new controller - HomeController - in the Controllers folder. Also add Index view and write the following HTML markup into it:

<h1>Customer Manager</h1>
<form>
    <table border="1">
        <tr>
            <td>Customer ID :</td>
            <td>
                <select id="customerid"></select>
                OR
                <input id="newcustomerid" type="text" />
            </td>
        </tr>
        <tr>
            <td>Company Name :</td>
            <td><input id="companyname" type="text" /></td>
        </tr>
        <tr>
            <td>Contact Name :</td>
            <td><input id="contactname" type="text" /></td>
        </tr>
        <tr>
            <td>Country :</td>
            <td><input id="country" type="text" /></td>
        </tr>
        <tr>
            <td colspan="2">
                <input type="button" id="insert" 
                       value="Insert" />
                <input type="button" id="update" 
                       value="Update" />
                <input type="button" id="delete" 
                       value="Delete" />
            </td>
        </tr>
    </table>
    <br />
    <div id="msg"></div>
</form>

To invoke the Web API you created earlier, you will use jQuery Ajax. So, add Scripts folder under the wwwroot folder and place jQuery library into it.

image

Also, add a <script> reference to the jQuery library in the <head> section of the Index view.

 <script src="~/Scripts/jquery-3.1.1.min.js"></script>

There are in all five jQuery Ajax calls needed by our client. They are as follows:

  • As soon as the page loads in the browser, the dropdown list should be filled with all the existing CustomerIDs. This is done by calling the Get() Web API action through jQuery Ajax.
  • When you pick a CustomerID from the dropdown list its details such as CompanyName, ContactName and Country are displayed in the respective textboxes. This is done by calling the Get(id) Web API action from the change event handler of the dropdown list.
  • Clicking Insert, Update and Delete buttons call the Post(), Put() and Delete() Web API actions respectively, again through jQuery Ajax.

Ok. Let's go ahead and write the first Ajax call.

Filling the dropdown list with CustomerIDs

$(document).ready(function () {
    var options = {};
    options.url = "/api/customerservice";
    options.type = "GET";
    options.dataType = "json";
    options.success = function (data) {
        data.forEach(function (element) {
            $("#customerid").append("<option>" 
            + element.customerID + "</option>");
        });
    };
    options.error = function () {
        $("#msg").html("Error while 
                  calling the Web API!");
    };
    $.ajax(options);
});

The above code makes an Ajax request using $.ajax() method of jQuery. Notice how the url, type and dataType properties of the options object are specified. Since we wish to invoke Get() action, the url points to the Web API end point. The HTTP verb used is GET and the response data type is set to json.

The success function simply fills the dropdown list with a series of <option> element each wrapping a CustoemrID. The error function displays an error message in case something goes wrong while calling the Web API.

Displaying details of a selected customer

The change event handler of the dropdown looks like this:

$("#customerid").change(function () {
    var options = {};
    options.url = "/api/customerservice/" + 
                   $("#customerid").val();
    options.type = "GET";
    options.dataType = "json";
    options.success = function (data) {
        $("#companyname").val(data.companyName);
        $("#contactname").val(data.contactName);
        $("#country").val(data.country);
    };
    options.error = function (a, b, c) {
        alert(a.responseText);
        $("#msg").html("Error while 
                  calling the Web API!");
    };
    $.ajax(options);
});

This code is quite similar to the previous one. However, it appends the CustomerID whose details are to be fetched to the url. The success function fills the three textboxes with CompanyName, ContactName and Country. Notice something important - the property names are automatically converted to use camel casing. This way client side code gets to stick with the JavaScript ways of naming the things whereas server side code can continue to stick to the C# ways of naming the things.

Adding a new customer

The click event handler of the Insert button is shown below:

$("#insert").click(function () {
    var options = {};
    options.url = "/api/customerservice";
    options.type = "POST";

    var obj = {};
    obj.customerID = $("#newcustomerid").val();
    obj.companyName = $("#companyname").val();
    obj.contactName = $("#contactname").val();
    obj.country = $("#country").val();

    options.data = JSON.stringify(obj);
    options.contentType = "application/json";
    options.dataType = "html";

    options.success = function (msg) {
        $("#msg").html(msg);
    };
    options.error = function () {
        $("#msg").html("Error while 
                  calling the Web API!");
    };
    $.ajax(options);
});

The above code uses POST verb to make the Web API call. Moreover, it sets data, dataType and contentType properties. The data property is set to the stringified version of the new customer object. Notice that this new object also uses camel casing while setting the properties. The dataType property is set to html because our Post() action returns a plain string. The contentType property indicates the request's data type - JSON in this case.

The success function simply displays the message returned by the Post() action into the msg <div> element.

Modifying an existing customer

The click event of the Update button is shown below:

$("#update").click(function () {
    var options = {};
    options.url = "/api/customerservice/" 
                  + $("#customerid").val();
    options.type = "PUT";

    var obj = {};
    obj.customerID = $("#customerid").val();
    obj.companyName = $("#companyname").val();
    obj.contactName = $("#contactname").val();
    obj.country = $("#country").val();

    options.data = JSON.stringify(obj);
    options.contentType = "application/json";
    options.dataType = "html";
    options.success = function (msg) {
        $("#msg").html(msg);
    };
    options.error = function (a, b, c) {
        alert(c);
        $("#msg").html("Error while 
                  calling the Web API!");
    };
    $.ajax(options);
});

Most of the above code is similar to the code you wrote in the insert click event handler. The CustomerID being modified is appended to the url. The HTTP verb is set to PUT.

Deleting a customer

Finally, the code that deletes a customer is shown below:

$("#delete").click(function () {
    var options = {};
    options.url = "/api/customerservice/" 
                  + $("#customerid").val();
    options.type = "DELETE";
    options.dataType = "html";
    options.success = function (msg) {
        $("#msg").html(msg);
    };
    options.error = function () {
        $("#msg").html("Error while 
                  calling the Web API!");
    };
    $.ajax(options);
});

The above code sets the HTTP verb to DELETE and makes an Ajax call as before.

This completes the jQuery client to the Web API. Run the Index view and test all the operations.

In the next article you will develop a remote client to consume the Web API. Till then keep coding!!

READ MORE
...