top button
Flag Notify
    Connect to us
      Site Registration

Site Registration

What is the uses of Namespaces in XAML?

+3 votes
404 views

What is Namespace?

Before using or talking about namespaces let's talk about what is this? Namespaces are an abstract container or environment created to hold a logical grouping of unique identifiers or symbols. An identifier defined in a namespace is associated only with that namespace. The same identifier can be independently defined in multiple namespaces. That is, the meaning associated with an identifier defined in one namespace may or may not have the same meaning as the same identifier defined in another namespace. Languages that support namespaces specify the rules that determine to which namespace an identifier belongs.

XML Namespaces

<?xml version="1.0" encoding="UTF-8"?>
<users xmlns=" http://www.w3.org/1999/xhtml">
  <siteuser>
    <url>http://www.itorian.com/</url>
    <user>akvatsa</user>
    <name>ABHIMANYU KUMAR VATSA</name>
  </siteuser>
</users>

As in the above code, the xmlns name is a uniform resource identifier (URI). Typically, the URI chosen for the namespace of a given XML vocabulary describes a resource under the control of the author or organization defining the vocabulary, such as a URL for the author's Web server. However, the namespace specification does not require nor suggest that the namespace URI be used to retrieve information; it is simply treated by an XML parser as a string. For example, the document at http://www.w3.org/1999/xhtml itself does not contain any code. It simply describes the XHTML namespace to human readers. Using a URI (such as "http://www.w3.org/1999/xhtml" ) to identify a namespace, rather than a simple string (such as "xhtml"), reduces the possibility of different namespaces using duplicate identifiers. Although the term namespace URI is widespread, the W3C Recommendation refers to it as the namespace name. The specification is not entirely prescriptive about the precise rules for namespace names (it does not explicitly say that parsers must reject documents where the namespace name is not a valid Uniform Resource Identifier), and many XML parsers allow any character string to be used. In version 1.0 of the recommendation, the namespace name becomes an Internationalized Resource Identifier, which licenses the use of non-ASCII characters that in practice were already accepted by nearly all XML software. The term namespace URI persists, however, not only in popular usage but also in many other specifications from W3C and elsewhere.

XAML Namespaces

Look at the sample code shown below of a XAML file; remember the code we have already used in the Hello Program.

<UserControl
          xmlns="http://schemas.microsoft.com/winfx/2006/xaml/presentation"

          xmlns:x="http://schemas.microsoft.com/winfx/2006/xaml"
          x:Class="SilverlightApplication1.MainPage"
          Width="640" Height="480">

          <Grid x:Name="LayoutRoot" Background="White" ShowGridLines="True">

          </Grid>

</UserControl>

A XAML namespace is an extension of the concept of an XML namespace. The techniques of specifying a XAML namespace matches with XML namespace syntax (little), the convention of using URIs as namespace identifiers, using prefixes to provide a means to reference multiple namespaces from the same markup source, and so on. The primary concept that is added to the XAML definition of the XML namespace is that a XAML namespace implies both a scope of uniqueness for the markup usages, and also influences how markup entities are potentially backed by specific CLR namespaces and referenced assemblies. A XAML file must have only one root element, in order to be both a well-formed XML file and a valid XAML file. The root element also contains the attributes xmlns and xmlns:x. These attributes indicate to a XAML processor which XAML namespaces contain the type definitions for backing types that the markup will reference as elements. The xmlns attribute specifically indicates the default XAML namespace. Within the default XAML namespace, object elements in the markup can be specified without a prefix. The xmlns:x attribute indicates an additional XAML namespace, which maps the XAML language namespace http://schemas.microsoft.com/winfx/2006/xaml. This usage of xmlns to define a scope for usage and mapping of a name scope is consistent with the XML 1.0 specification. XAML name scopes are different from XML name scopes only in that a XAML name scope also implies something about how the name scope's elements are backed by types when it comes to type resolution and parsing the XAML. Please note that the xmlns attributes are only strictly necessary on the root element of each XAML file. xmlns definitions will apply to all descendant elements of the root element. Attributes are also permitted on other elements underneath the root, and would apply to any descendant elements of the defining element. However, frequent definition or redefinition of XAML namespaces can result in a XAML markup style that is difficult to read.

xmlns:x

In the previous example, the prefix x: was used to map the XAML namespacehttp://schemas.microsoft.com/winfx/2006/xaml,  which is the dedicated XAML namespace that supports XAML language constructs. This x: prefix is used for mapping this XAML namespace in the templates for projects, in examples, and in documentation throughout this SDK. The XAML namespace for the XAML language contain several programming constructs that you will use very frequently in your XAML. The following examples are most common x: prefix programming constructs we use:

  • x:Name

    This attribute specifies a run-time object name for the instance that exists in run-time code after an object element is processed. 

  • x:Class

    This attribute specifies the namespace and class name for the class that provides code-behind for a XAML page. We must have a class to support code-behind.

Note

If you are aware of WPF namespaces, you will notice that default namespaces are not the same because Silverlight XAML is a subset of WPF XAML.


Using own Namespaces


In many situations we need to use custom Silverlight controls that may be developed by you or another developer. In this case you will have to access to your own namespace to use that control. For this you have to define a new namespace prefix and map it to your assembly. Look at the syntax you need:


<Canvas x:Name="demoCanvas"

      Xmlns:a="clr-namespace:Widgets;assembly=ClientBin/Widgets.dll"

::::::::::::::

<TextBox a:Name="txtInput" Margin="5"/>

::::::::::::::


In above example, 'a' is the namespace prefix I will be using, you can choose anything you want but remember it doesn't conflict with another used namespace prefix. The 'clr' namespace declared within assembly that contains the public type to expose as element and class is located in 'Widgets' namespace, classes are part of 'Widgets.dll' assembly. We always precede this assembly with ClientBin.

posted Jan 29, 2016 by Jdk

  Promote This Article
Facebook Share Button Twitter Share Button LinkedIn Share Button


Related Articles


The great thing about XAML is that you can easily change the foreground colour of controls, such as a TextBlock, to be exactly what you want it to be. Whether that is through the built-in colour names or a HEX colour is completely your choice.


However there may be times when you simply wish to change the colour of a control dependent on the value that it is displaying. In this example we will be using a TextBlock that has it's Text value assigned to it using data context binding.


MainPage.xaml

<Page        
    x:Class="MainPage"    
    xmlns="http://schemas.microsoft.com/winfx/2006/xaml/presentation"    
    xmlns:x="http://schemas.microsoft.com/winfx/2006/xaml"    
    xmlns:local="using:TestProject"    
    xmlns:d="http://schemas.microsoft.com/expression/blend/2008"    
    xmlns:mc="http://schemas.openxmlformats.org/markup-compatibility/2006"        
    mc:Ignorable="d">    
    <Page.Resources>    
        <DataTemplate x:Key="listViewItems">    
            <StackPanel>    
                <TextBlock        
                    Margin="5,5,5,5"        
                    Text="{Binding Name}"        
                    Style="{StaticResource BaseTextBlockStyle}"/>    
                <TextBlock        
                    Margin="5,5,5,5"        
                    Text="{Binding Ripeness}"        
                    Style="{StaticResource BaseTextBlockStyle}"/>    
            </StackPanel>    
        </DataTemplate>    
    </Page.Resources>    
    <Grid Background="{ThemeResource ApplicationPageBackgroundThemeBrush}">    
        <ListView        
            x:Name="listViewTest"        
            Margin="5,5,5,5"        
            VerticalAlignment="Center"        
            HorizontalAlignment="Center"        
            ItemsSource="{Binding}"        
            SelectionMode="None"        
            IsItemClickEnabled="False"        
            ItemTemplate="{StaticResource listViewItems}"        
            ContainerContentChanging="listViewUpdated"></ListView>    
        <TextBlock        
            x:Name="listViewNoItems"        
            Margin="5,5,5,5"        
            VerticalAlignment="Center"        
            HorizontalAlignment="Center"        
            Text="There are no fruits in your list to display!"        
            Style="{StaticResource BaseTextBlockStyle}"        
            Visibility="Collapsed"/>    
        <Button        
            Width="150"        
            Height="50"        
            Margin="20"        
            VerticalAlignment="Center"        
            HorizontalAlignment="Right"        
            Content="Clear fruit"        
            Click="clearFruitBasket"/>    
    </Grid>    
</Page>  


MainPage.xaml.cs


using System.Collections.ObjectModel;    
using Windows.UI.Xaml;    
using Windows.UI.Xaml.Controls;    
namespace CSharpCornerTestProject     
{    
    public class Fruit     
    {    
        public string Name    
        {    
            get;    
            set;    
        }    
        public string Ripeness     
        {    
            get;    
            set;    
        }    
    }    
    public sealed partial class MainPage: Page     
    {    
        private ObservableCollection < Fruit > fruitList = new ObservableCollection < Fruit > ();    
        public MainPage()     
        {    
            this.InitializeComponent();    
            fruitList.Add(new Fruit()    
            {    
                Name = "Apple", Ripeness = "Ok"    
            });    
            fruitList.Add(new Fruit()    
            {    
                Name = "Banana", Ripeness = "Bad"    
            });    
            fruitList.Add(new Fruit()    
            {    
                Name = "Kiwi", Ripeness = "Rotten"    
            });    
    
            listViewTest.ItemsSource = fruitList;    
        }    
        private void listViewUpdated(ListViewBase sender, ContainerContentChangingEventArgs args) {    
            if (listViewTest.Items.Count == 0)     
            {    
                listViewNoItems.Visibility = Visibility.Visible;    
                listViewTest.Visibility = Visibility.Collapsed;    
            }     
            else     
            {    
                listViewNoItems.Visibility = Visibility.Collapsed;    
                listViewTest.Visibility = Visibility.Visible;    
            }    
           }    
        private void clearFruitBasket(object sender, RoutedEventArgs e)    
        {    
            // clear the fruit list!        
            if (fruitList != null) fruitList.Clear();    
        }    
    }    
}

As I stated above, this is the code base that we used in my previous article about displaying a message once a ListView control no longer has any items in it. We will slightly modify this now so that the ripeness of the fruit in our fruit basket is colour-coded depending on its value.


The first thing we need to do is to create a convertor class for us to use when binding data to the list view. This is a very simple affair and just requires you to add a new "Class file" to your project.


FruitBasketConvertor.cs

using System;    
using Windows.UI;    
using Windows.UI.Xaml.Data;    
using Windows.UI.Xaml.Media;    
namespace CSharpCornerTestProject.Convertors     
{    
    public class fruitBasketRipenessForegroundConvertor: IValueConverter    
    {    
        public object Convert(object value, Type targetType, object parameter, string language)    
        {    
            string ripeness = (value as string);    
            if (ripeness == "Ok") return new SolidColorBrush(Colors.ForestGreen);    
            else if (ripeness == "Bad") return new SolidColorBrush(Colors.OrangeRed);    
            else if (ripeness == "Rotten") return new SolidColorBrush(Colors.DarkRed);    
            // default return value of lime green      
            return new SolidColorBrush(Colors.LimeGreen);    
        }    
        public object ConvertBack(object value, Type targetType, object parameter, string language)    
        {    
            throw new NotImplementedException();    
        }    
    }    
}  

That is all there is to our file, just those 30 lines. Do take note, however, that we have placed the convertors under their own namespace, CSharpCornerTestProject.Convertors.


Using convertors isn't all as daunting as it seems. You create your own custom class, making sure that it derives from IValueConvertor.  Then all we need are two functions.

public object Convert(object value, Type targetType, object parameter, string language)  
{  
    // your convertor code goes here    
}  
public object ConvertBack(object value, Type targetType, object parameter, string language)   
{  
    // your convert back code goes here    
}

The Convert function takes the raw value of your binding and allows you to access anything associated with that, whether it is a class, a string, or anything of your choosing.


The ConvertBack function is generally not used all that often and so in our example we are leaving it asthrow new NotImplementedException();. Its main use would be if you wanted to convert the value back to its original state.


Returning to the Convert function, this is very simple and there isn't all that much to it at all. All we do here is take the object value and store it into our string variable, ripeness.  

public object Convert(object value, Type targetType, object parameter, string language)   
{  
    string ripeness = (value as string);  
    if (ripeness == "Ok") return new SolidColorBrush(Colors.ForestGreen);  
    else if (ripeness == "Bad") return new SolidColorBrush(Colors.OrangeRed);  
    else if (ripeness == "Rotten") return new SolidColorBrush(Colors.DarkRed);  
    // default return value of lime green      
    return new SolidColorBrush(Colors.LimeGreen);  
}   

Since we have different forms of Ripeness in our Fruit class, we have three separate if statements to determine which colour we should return for our Foreground colour.


When converting a Foreground (or Background) XAML member, it expects a SolidColorBrush to be returned and so that is what we are giving it.


That is everything that we need to do for the code side of things with our convertor, the next step is much simpler and only requires us to add three new lines of code to the existing MainPage.xaml file that we have.


In our Page control, we need to add a new member, highlighted in bold Green.

<Page  
x:Class="MainPage"  
    xmlns="http://schemas.microsoft.com/winfx/2006/xaml/presentation"  
    xmlns:x="http://schemas.microsoft.com/winfx/2006/xaml"  
    xmlns:local="using:rTestProject"  
    xmlns:d="http://schemas.microsoft.com/expression/blend/2008"  
    xmlns:mc="http://schemas.openxmlformats.org/markup-compatibility/2006"  
    xmlns:utils="using:TestProject.Convertors"  
mc:Ignorable="d">  

This will allow us to access the custom convertor class that we just created in FruitBasketConvertor.cs.


Now that we have done that, we need to add our convertor function as a page resource and provide it a key. This will allow us to access it when using the binding convertor. Once again, the addition is highlighted in bold Green.

<Page.Resources>  
    <utils:fruitBasketRipenessForegroundConvertor x:Key="ripenessConvertor"/>  
    <DataTemplate x:Key="listViewItems">  
        <StackPanel>  
            <TextBlock      
                Margin="5,5,5,5"      
                Text="{Binding Name}"      
                Style="{StaticResource BaseTextBlockStyle}"/>  
            <TextBlock      
                Margin="5,5,5,5"      
                Text="{Binding Ripeness}"      
                Style="{StaticResource BaseTextBlockStyle}"/>  
        </StackPanel>  
    </DataTemplate>  
</Page.Resources>

Now that we have given our convertor a key, we can access it anywhere in the MainPage.xaml file when we are binding items. We just have one last thing to do now, that is to add a Foreground member to the TextBlock control that is telling us how ripe our fruit is.

<TextBlock    
    Foreground="{Binding Ripeness, Converter={StaticResource ripenessConvertor}}"    
    Margin="5,5,5,5"    
    Text="{Binding Ripeness}"    
    Style="{StaticResource BaseTextBlockStyle}"/>    

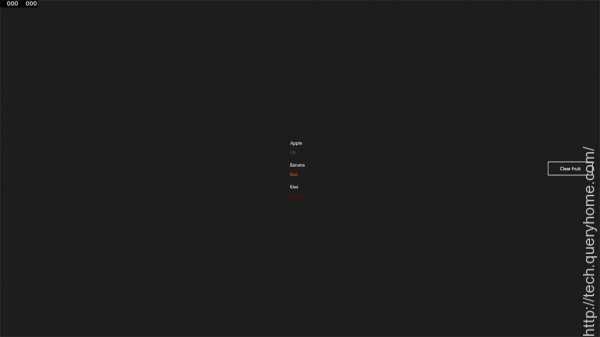
That is everything that we need to do to start dynamically changing the foreground colour of our XAML controls dependent on what the value they're displaying is. If you run the app your fruit basket should now show the Ripeness of each fruit in the three different colours that we assigned earlier on whilst creating our convertor function.


READ MORE

Why XAML is Important

XAML is a modern UI design Markup Language, it helps design a rich UI, 2d and 3d animation, plugin based applications and we also use XAML for:

  • Defining workflow content in Windows Workflow Foundation.
  • Defining services in Windows Communication Foundation.
  • A UI for Silverlight and Windows Presentation Foundation.
  • Rich graphics and animation based application.
  • Arranging controls based on fixed pixel coordinates.

The following summarizes the differences among Windows, Web and XAML Layout applications.

Normal Windows Layout Application

  • Controls have fixed coordinates.
  • The Location property has x and y coordinates representing the upper-left corner of the control retrieve to upper-left corner of container.
  • Some flexibility to dock the ok and cancel buttons to the lower right.
  • Anchor a list box to the left of the form using flow layout to arrange controls in a flow layout.
  • Use table layout to arrange controls in a table format.

Web Form Layout

  • Controls are, by default, anchored relative to the upper-left of the page.
  • You can specify absolute positioning if you want.
  • Re-sizing a window does not change the position of controls.

XAML Layout

  • XAML provides a rich set of built-in layout panels that help you to avoid the common pitfalls.
  • Flow Based Layout.
  • Content is organized in a Container.
  • All Containers are derived from Systems.Window.control.
  • Resolution and Size Independency.
  • Layout automatically adjusts if the screen resolution changes.

Element Size in XAML

  • The size can be specified as an absolute amount of logical units, as a percentage value or automatically.
  • Size is determined by calculating the available screen space, size of constraints and layout-specific properties (Margin, Padding, etc.) behavior of the present Panel.
  • Fixed size of logical units (1/96 inch).
  • Auto takes as much space as needed by the contained control.
  • Star (*) takes as much space as available (after filling all auto and fixed sized columns), proportionally divided over all star-sized columns. So 3*/5* means the same as 30*/50*.

Remember that star-sizing does not work if the grid size is calculated based on its content.

Panels in XAML

  • Grid Panel.
  • Stack Panel.
  • Dock Panel.
  • Wrap Panel.
  • Canvas Panel.

Grid Panel: combination of row and column layout is a Grid Panel; in other words, a Grid Panel arranges controls in a tabular format. The functionality is similar to the HTML table but more flexible as in the following example we try to show a row and column combination for the windows. There are 4 rows and 4 columns.

  • Row and Column definitions in a grid indicate row and column. If you create additional rows and columns, you have to add RowDefinition items to the RowDefinitions collection and ColumnDefinition items to the ColumnDefinitions collection, as the above example shows a grid with 4 rows and 4 columns.

Add controls in Grid Panel

To add controls to the grid layout panel ,just put the declaration between the opening and closing tags of the Grid. Keep in mind that the row and columndefinitions must proceed any definition of child controls.

The grid layout panel provides the two attached properties Grid.Column and Grid.Row to define the location of the control.

In the following example I try to show one normal data entry form design using XAML:


StackPanel

StackPanel is a useful XAML layout. It keeps a control horizontal and vertical; using a stack we design the application like many controls.

Stack Panel common properties are:

  • Stack child element horizontally or vertically.
  • Default is vertical.
  • Use orientation to change to horizontal.
  • Controls positioning of elements by setting their horizontal alignment or vertical alignment properties.
  • Control spacing by setting a margin and padding properties of elements.


Wrap Panel


In a Wrap Panel the child elements are positioned sequentially, from left to right and top to bottom.

By default the layout orientation is horizontal and the controls flow left to right; depending on the screen size the control might wrap to the next line.

By default the screen and code:

    <Grid>
      <Grid.RowDefinitions>
          <RowDefinition></RowDefinition>
      </Grid.RowDefinitions>  
      <Grid.ColumnDefinitions>
            <ColumnDefinition></ColumnDefinition>
        </Grid.ColumnDefinitions>        
        <WrapPanel Grid.Row="0" Grid.Column="0">
            <Button Margin="10">Mango</Button>
            <Button Margin="10">Apple</Button>
            <Button Margin="10">Grape</Button>
            <Button Margin="10">Banana</Button>
            <Button Margin="10">Bilberry</Button>
            <Button Margin="10">Lemon</Button>
        </WrapPanel>
    </Grid>


Elements wrap to the next line once to reduce screen width:


DockPanel: Dock Panel is a most useful layout panel in XAML, it arranges controls to the top, left, bottom, right and remaining space. A useful property is:

  • DockPanel.Dock Property indicates where the element controls are docked.

The default is left; if we don't set the dock property then it will be left:

  • DockPanel.lastChildFill DockPanel will fill up the remaining space of the window.


Canvas Layout:

  • Elements are placed according to coordinates
  • The Canvas layout is similar to Windows forms layout.
  • Elements do not resize automatically at run time.
  • Use canvas.left, canvas.right, canvas.top and canvas.buttom.

Drawbacks:

  • Time consuming and laborious.
  • Harder to line up elements.
  • No resolution and size independence.

Code

    <Canvas>
            <Label Content="Canvas Layout Demo"  FontSize="15" FontWeight="Bold"
                    Foreground="Red"  Canvas.Top="10" Canvas.Left="25"/> 
            <Label Content="ContactInfo" FontSize="12"  Canvas.Top="66" Canvas.Left="10"/> 
            <Label Content="Name"  Canvas.Top="45" Canvas.Left="93"/> 
            <Label Content="Address"  Canvas.Top="90" Canvas.Left="93"/>
            <TextBox  FontSize="15" FontWeight="Bold"         Canvas.Top="45" Canvas.Left="185" Width="93"/>
            <TextBox FontSize="15" FontWeight="Bold"          Canvas.Top="90" Canvas.Left="185" Width="93"/>
   </Canvas>


One small simple Data Entry Form Demo using all panels: stack, dock, wrap, and canvas.

In this example we try to show the real use of these panels and controls in WPF:


READ MORE

The most useful layout elements in XAML are those derived from the Panel class: CanvasDockPanel,GridStackPanelVirtualizingStackPanel, and WrapPanel.  Of these elements, DockPanel, StackPanel, and Grid are arguably the most useful in terms of developing fluid application layouts in Avalon.


Element Name

Description

DockPanel

Defines an area within which you can arrange child elements either horizontally or vertically, relative to each other.

StackPanel

Arranges child elements into a single line that can be oriented horizontally or vertically.


Grid

Defines a flexible grid area consisting of columns and rows. Child elements of a Grid can be positioned precisely using the Margin property.

   
   Element names and descriptions taken from Microsoft's WinFX SDK


However, it is also possible to override the default behavior of any of these elements to create other custom components derived from the Panel class.


DockPanel

Below is an example screen layout accomplished using DockPanel. Coupled with the Grid element, this component provides an easy mechanism for managing content on the screen.  Using this component, controls may be "docked" to a specific side of a screen or aligned in relation to other screen elements.

<!-- Window.xaml -->

<Window x:Class="WindowsApplication1.Window1"

xmlns="http://schemas.microsoft.com/winfx/2006/xaml/presentation"

xmlns:x="http://schemas.microsoft.com/winfx/2006/xaml"

Title="WindowsApplication1" Width="550" Height="400">

          <Grid>

                   <DockPanel>

                             <Border Height="75" Background="Red" DockPanel.Dock="Top">

                                      <TextBlock>Dock = "Top"</TextBlock>

                             </Border>

                             <Border Height="75" Background="Blue" DockPanel.Dock="Bottom">

                                      <TextBlock>Dock = "Bottom"</TextBlock>

                             </Border>

                             <Border Width="150" Background="Green" DockPanel.Dock="Left">

                                      <TextBlock>Dock = "Left"</TextBlock>

                             </Border>

                             <Border Background="White">

                                      <TextBlock>This content will "Fill" the remaining space</TextBlock>

                             </Border>

                   </DockPanel>

          </Grid>


</Window>

When compiled, the above example results in the following layout:

screen.gif 

Using this approach, developers gain scalability, an additional benefit of Avalon's layout model.  Any layout created using the DockPanel element will be enlarged or constrained depending on the parent window's dimensions. 

StackPanel

The StackPanel element is used to either "stack" components on top of each other or align them sequentially.  Child elements of a StackPanel are displayed as block elements as opposed to being layered on top of each other with incrementing z-indexes.  By default, a StackPanel's orientation is vertical.


Below is an example layout using StackPanel.


<Window x:Class="WindowsApplication1.Window1"

xmlns="http://schemas.microsoft.com/winfx/2006/xaml/presentation"

xmlns:x="http://schemas.microsoft.com/winfx/2006/xaml"

Title="WindowsApplication1" Width="550" Height="400">

          <StackPanel Margin="90">


                   <TextBlock Background="Red" Padding="20">Position 1</TextBlock>


                   <TextBlock Background="Yellow" Padding="20">Position 2</TextBlock>


                   <TextBlock Background="Blue" Padding="20">Position 3</TextBlock>


                   <TextBlock Background="Green" Padding="20">Position 4</TextBlock>


          </StackPanel> 

</Window>


Compiling this sample results in the following display:


stack1.gif 


Setting the StackPanel's orientation to horizontal, allows elements to be positioned horizontally:


<Window x:Class="WindowsApplication1.Window1"

xmlns="http://schemas.microsoft.com/winfx/2006/xaml/presentation"

xmlns:x="http://schemas.microsoft.com/winfx/2006/xaml"

Title="WindowsApplication1" Width="550" Height="400">

          <StackPanel Margin="90" Orientation="Horizontal">


                   <TextBlock Background="Red" Padding="20">Position 1</TextBlock>


                   <TextBlock Background="Yellow" Padding="20">Position 2</TextBlock>


                   <TextBlock Background="Blue" Padding="20">Position 3</TextBlock>


                   <TextBlock Background="Green" Padding="20">Position 4</TextBlock>


          </StackPanel> 

</Window>                               


This sample results in the following display:
 

 stack2.gif

READ MORE

Introduction

XAML provides UI element objects that can host child collection items. XAML also provides support to work with .NET collection types as data sources.

XAML Collections

A collection element usually is a parent control with child collection elements. The child collection elements are an ItemCollection that implements IList<object>. A ListBox element is a collection of ListBoxItem elements.

The code listing in Listing 1 creates a ListBox with a few ListBoxItems.


  1. <ListBox Margin="10,10,0,13" Name="listBox1" HorizontalAlignment="Left"  
  2. VerticalAlignment="Top" Width="194" Height="200">  
  3.   
  4. <ListBoxItem Content="Coffie"></ListBoxItem>  
  5. <ListBoxItem Content="Tea"></ListBoxItem>  
  6. <ListBoxItem Content="Orange Juice"></ListBoxItem>  
  7. <ListBoxItem Content="Milk"></ListBoxItem>  
  8. <ListBoxItem Content="Iced Tea"></ListBoxItem>  
  9. <ListBoxItem Content="Mango Shake"></ListBoxItem>  
  10.   
  11. </ListBox>  


Listing 1

The code listed above in Listing 1 generates Figure 1.

Figure 1

Add Collection Items

In the previous section, we saw how to add items to a ListBox at design-time from XAML. We can add items to a ListBox from the code.

Let's change our UI and add a TextBox and a button control to the page. See Listing 2.


  1. <TextBox Height="23" HorizontalAlignment="Left" Margin="8,14,0,0"  
  2. Name="textBox1" VerticalAlignment="Top" Width="127" />  
  3. <Button Height="23" Margin="140,14,0,0" Name="button1" VerticalAlignment="Top" HorizontalAlignment="Left" Width="76" Click="button1_Click">  
  4. Add Item  
  5. </Button>  


Listing 2

The final UI looks like Figure 2.

Figure 2.

We can access collection items using the Items property. On the button click event handler, we add the content of the TextBox to the ListBox by calling the ListBox.Items.Add method. The code in Listing 3 adds the TextBox content to the ListBox items.


  1. private void button1_Click(object sender, RoutedEventArgs e)  
  2. {  
  3. listBox1.Items.Add(textBox1.Text);  
  4. }  


Listing 3

Now if you enter text into the TextBox and click the Add Item button, it will add the contents of the TextBox to the ListBox. See Figure 3.

Figure 3

Delete Collection Items

We can use the ListBox.Items.Remove or ListBox.Items.RemoveAt method to delete an item from the collection of items in the ListBox. The RemoveAt method takes the index of the item in the collection.

Now, we modify our application and add a new button called Delete Item. The XAML code for this button looks as in the following.


  1. <Button Height="23" Margin="226,14,124,0" Name="DeleteButton"  
  2. VerticalAlignment="Top" Click="DeleteButton_Click">  
  3. Delete Item</Button>  


Listing 4

The button click event handler looks like the following. On this button click, we find the index of the selected item and call the ListBox.Items.RemoveAt method as in the following.


  1. private void DeleteButton_Click(object sender, RoutedEventArgs e)  
  2. {  
  3. listBox1.Items.RemoveAt  
  4. (listBox1.Items.IndexOf(listBox1.SelectedItem));  
  5. }  


Listing 5

Collection Types

XAML allows developers to access .NET class library collection types from the scripting language. The code snippet in the Listing creates an array of String types, a collection of strings. To use the Array and String types, we must import the System namespace.

The code listing in Listing 6 creates an Array of String objects in XAML. As you may noticed in Listing 2, you must import the System namespace in XAML using the xmlns.


  1. <Window x:Class="XamlCollectionsSample.MainWindow"  
  2. xmlns="http://schemas.microsoft.com/winfx/2006/xaml/presentation"  
  3. xmlns:x="http://schemas.microsoft.com/winfx/2006/xaml"  
  4. xmlns:sys="clr-namespace:System;assembly=mscorlib"  
  5. Title="MainWindow" Height="402.759" Width="633.345">  
  6.   
  7. <Window.Resources>  
  8. <x:Array x:Key="AuthorList" Type="{x:Type sys:String}">  
  9. <sys:String>Mahesh Chand</sys:String>  
  10. <sys:String>Praveen Kumar</sys:String>  
  11. <sys:String>Raj Beniwal</sys:String>  
  12. <sys:String>Neel Beniwal</sys:String>  
  13. <sys:String>Sam Hobbs</sys:String>  
  14. </x:Array>  
  15. </Window.Resources>  
  16.   
  17. </Window>  


Listing 6

The ItemsSource property if ListBox in XAML is used to bind the ArrayList. See Listing 7.


  1. <ListBox Name="lst" Margin="5" ItemsSource="{StaticResource AuthorList}" />  


Listing 7

Summary

XAML supports collections including collection items and working with .NET collection types. In this article, we saw how to create a control with collection items and how to access its items dynamically.

READ MORE

The WPF Expander represents a control with an expanded view where the contents of the expanded area can be expanded or collapsed.

The following XAML code shows how to create an Expander control in WPF.

<Expander Name="ExpanderControl" Header="Click to Expand"   
          HorizontalAlignment="Left" >  
    <TextBlock TextWrapping="Wrap" FontSize="14" FontWeight="Light" Foreground="Black">  
        This is an Expander control. Within this control, all contents will be wrapped.  
        At run-time, you may expand or collapse this control. Type more text here to be typed.  
        Jump around and hype.   
    </TextBlock>  
</Expander> 

The default view of an Expander control looks like this.


If you click on the header, the expanded view looks like this.


Most of the time, you would want the header of the Expander control to look different from the contents. This can be done by simply setting the font properties of the Expander control different from the contents.
 

This code sets the FontSize and FontWeight of the Expander control different from the contents of the Expander control. 

<Window x:Class="ExpanderControlSample.Window1"  
        xmlns="http://schemas.microsoft.com/winfx/2006/xaml/presentation"  
        xmlns:x="http://schemas.microsoft.com/winfx/2006/xaml"  
        Title="Window1" Height="300" Width="300">  
    <Grid>  
        <Expander Name="ExpanderControl" Background="LavenderBlush"   
          HorizontalAlignment="Left" Header="Click to Expand"   
          ExpandDirection="Down" IsExpanded="False" Width="200"  
                  FontSize="20" FontWeight="Bold" Foreground="Green">  
            <TextBlock TextWrapping="Wrap" >  
                This is an Expander control. Within this control, all contents will be wrapped.  
                At run-time, you may expand or collapse this control. Type more text here to be typed.  
                Jump around and hype.   
            </TextBlock>  
        </Expander>  
    </Grid>  
</Window> 

The new output looks like this. As you can see from this figure, the header of the Expander control is different from the contents.


How to create an Expander control dynamically

The Expander class in WPF represents an Expander control.

This code snippet creates an Expander control at run-time.

private void CreateDynamicExpander()  
{  
   Expander dynamicExpander = new Expander();  
   dynamicExpander.Header = "Dynamic Expander";  
   dynamicExpander.HorizontalAlignment = HorizontalAlignment.Left;  
   dynamicExpander.Background = new SolidColorBrush(Colors.Lavender);  
   dynamicExpander.Width = 250;  
   dynamicExpander.IsExpanded = false;  
   dynamicExpander.Content = "This is a dynamic expander";  
  
   RootGrid.Children.Add(dynamicExpander);  

How to set the direction of an Expander Control
 

The ExpandDirection property of the Expander control sets the direction of the Header. It can be Up, Down, Left or Right. The following code snippet sets the ExpandDirection to Up.

<Expander Name="ExpanderControl" Background="LavenderBlush"   
          HorizontalAlignment="Left" Header="Click to Expand"   
          ExpandDirection="Up" IsExpanded="False" Width="200"  
                  FontSize="20" FontWeight="Bold" Foreground="Green">  
     <TextBlock TextWrapping="Wrap" >  
         This is an Expander control. Within this control, all contents will be wrapped.  
         At run-time, you may expand or collapse this control. Type more text here to be typed.  
         Jump around and hype.   
     </TextBlock>  
</Expander>

The control with Up direction looks like this.


How to set an image in an Expander Header

Expander.Header property may be used to style the header of an Expander control. Within the Header, you can set whatever contents you would like including an Image.
 

This code adds in image and text in the header of an Expander.

<Expander Name="ExpanderControl"   
  HorizontalAlignment="Left" Background="LavenderBlush"   
  ExpandDirection="Down"  IsExpanded="False" Width="250"  
          FontSize="20" FontWeight="Bold" Foreground="Green" >  
    <Expander.Header>  
        <BulletDecorator>  
            <BulletDecorator.Bullet>  
                <Image Width="50" Source="Flowers.jpg"/>  
            </BulletDecorator.Bullet>  
            <TextBlock Margin="20,0,0,0">Flower Header</TextBlock>  
        </BulletDecorator>  
    </Expander.Header>  
  
    <TextBlock TextWrapping="Wrap" FontSize="14" FontWeight="Light" Foreground="Black">  
        This is an Expander control. Within this control, all contents will be wrapped.  
        At run-time, you may expand or collapse this control. Type more text here to be typed.  
        Jump around and hype.   
    </TextBlock>  
</Expander>  

The control with an image header looks like this.


How to add scrolling to an Expander Control
 

Adding a Scrollviewer control in the contents of an Expander adds scrolling to the Expander. This code adds scrolling to the contents of an Expander. 

<Expander Name="ExpanderControl"   
  HorizontalAlignment="Left" Background="LavenderBlush"   
  ExpandDirection="Down"  IsExpanded="False" Width="250"  
          FontSize="20" FontWeight="Bold" Foreground="Green" >  
    <Expander.Header>  
        <BulletDecorator>  
            <BulletDecorator.Bullet>  
                <Image Width="50" Source="Flowers.jpg"/>  
            </BulletDecorator.Bullet>  
            <TextBlock Margin="20,0,0,0">Flower Header</TextBlock>  
        </BulletDecorator>  
    </Expander.Header>  
    <Expander.Content>  
        <ScrollViewer Height="100" VerticalAlignment="Top" >  
            <TextBlock TextWrapping="Wrap" FontSize="14" FontWeight="Light" Foreground="Black">  
                This is an Expander control. Within this control, all contents will be wrapped.  
                At run-time, you may expand or collapse this control. Type more text here to be typed.  
                Jump around and hype. This is an Expander control. Within this control, all contents will be wrapped.  
                At run-time, you may expand or collapse this control. Type more text here to be typed.  
                Jump around and hype.  
            </TextBlock>  
        </ScrollViewer>  
    </Expander.Content>  
</Expander> 

The Expander control with a scroll viewer looks like this.

READ MORE

The WPF Frame control using XAML and C# supports content navigation within content. A Frame can be hosted within a WindowNavigationWindowPageUserControl, or a FlowDocument control.

How to create a Frame in WPF

This XAML code shows how to create a Frame control and sets its Source property to load a XAML page within it.

  1. <Window x:Class="FrameSample.Window1"  
  2.     xmlns="http://schemas.microsoft.com/winfx/2006/xaml/presentation"  
  3.     xmlns:x="http://schemas.microsoft.com/winfx/2006/xaml"  
  4.     Title="Window1" Height="300" Width="300">  
  5.     <Grid>          
  6.         <TextBlock>Outside area of frame</TextBlock>  
  7.         <Frame Source="Page1.xaml">              
  8.         </Frame>  
  9.     </Grid>  
  10. </Window>  

The Window looks like this. The Purple area is the Page1.xaml and the White area is outside of the frame.


Now you can manage the contents of a frame the way you want.

For example, the following code rotates the contents of the frame to a 45 degree angle.

  1. <Frame Source="Page1.xaml">  
  2.     <Frame.LayoutTransform>  
  3.         <RotateTransform Angle="45" />  
  4.     </Frame.LayoutTransform>  
  5. </Frame>  

The new output looks like this.


How to Navigate to a URI in a WPF Frame

The following code creates a Frame within a window and adds a button control to the window. On the button click event handler we will navigate to a URI using a Frame.

  1. <Window x:Class="FrameSample.Window1"  
  2.     xmlns="http://schemas.microsoft.com/winfx/2006/xaml/presentation"  
  3.     xmlns:x="http://schemas.microsoft.com/winfx/2006/xaml"  
  4.     Title="Window1" Height="300" Width="300">  
  5.     <Grid>  
  6.         <TextBlock>Outside area of frame</TextBlock>  
  7.         <Frame Name="FrameWithinGrid" >  
  8.         </Frame>  
  9.         <Button Height="23" Margin="114,12,25,0"   
  10.                 Name="button1" VerticalAlignment="Top" Click="button1_Click">Navigate to C# Corner  
  11.         </Button>  
  12.     </Grid>  
  13. </Window>  

The Navigate method of Frame is used to navigate to a URI. The following code navigates to Page1.xaml.

  1. private void button1_Click(object sender, RoutedEventArgs e)  
  2. {  
  3.     FrameWithinGrid.Navigate(new System.Uri("Page1.xaml",  
  4.              UriKind.RelativeOrAbsolute));  
  5. }  

The following code navigates to an external website URL and opens the ASPX page within a Frame.

  1. FrameWithinGrid.Source = new Uri("http://www.c-sharpcorner.com/Default.aspx", UriKind.Absolute);  

If you need to open a URI in a new browser window, the following code will do that. This code first creates a NavigationWindow and then sets its Source to a URI.

  1. NavigationWindow window = new NavigationWindow();  
  2. Uri source = new Uri("http://www.c-sharpcorner.com/Default.aspx", UriKind.Absolute);  
  3. window.Source = source; window.Show();  
READ MORE
...