There can be scenarios, where you need to generate multiple flat files using an informatica mapping based on the source data content or some other business rule, from a single data source. For example, you may need to generate last month’s top revenue generating customer list, which is split into multiple files based on the customer residence state. In this article we will see how to split your target file dynamically based on the business rule.
For the demonstration purpose, let’s take a simple business case where we need to split the customer data into multiple files based on the customer residential state.
As the first step let’s create the flat file definition using Target Designer
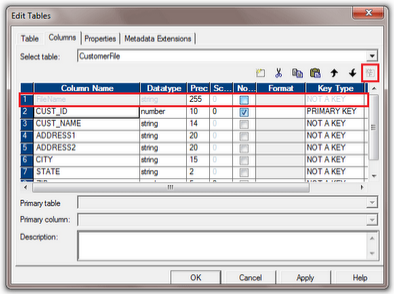
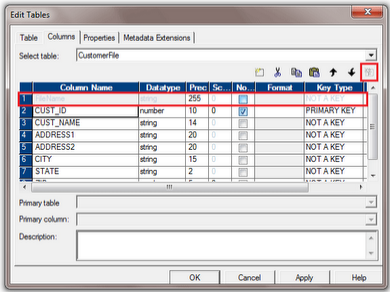
Now let’s add one new column 'FileName' using the 'Add File Name Column' button which is highlighted at the top right corner as shown in the below image. This is the column based on the file name is dynamically changed.
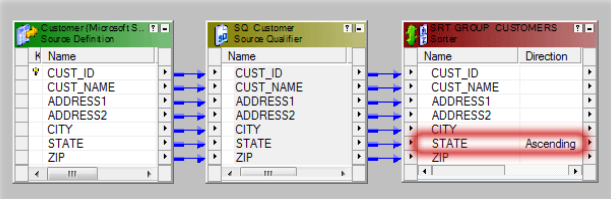
Let’s build the mapping as we have it in below image, Here we are sorting the data using the SORTER transformation. After the sorting, we will get the customers grouped together based on customer's state of residence.
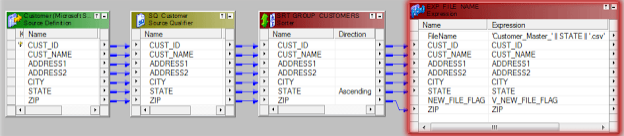
Now we need to add an EXPRESSION transformation to set a boundary flag for each customer group based on customer's state of residence. We are creating a port NEW_FILE_FLAG for the same
In the expression transformation we are adding following ports.
- V_NEW_FILE_FLAG as Variable Port.
- V_STATE as Variable Port.
- NEW_FILE_FLAG as Output Port.
And the following are the expressions for the ports.
- V_NEW_FILE_FLAG :- IIF(STATE = V_STATE, 'N', 'Y')
- V_STATE :- STATE
- NEW_FILE_FLAG :- V_NEW_FILE_FLAG
Apart from setting NEW_FILE_FLAG, we need to create the port FileName, based on which the target file name is dynamically changed.
- File Name as Output Port.
And the following is the expression for the port.
- FileName :- 'Customer_Master_' || STATE || '.csv'
Based on the flag we created in the EXPRESSION transformation, we are going to split the file in the next step. We will use TRANSACTION CONTROL transformation to do the same. Set the 'Transaction Control Condition' property of the transformation with the below expression.
- IIF(NEW_FILE_FLAG='Y',TC_COMMIT_BEFORE,TC_CONTINUE_TRANSACTION)

