top button
Flag Notify
    Connect to us
      Site Registration

Site Registration

SVN Cheat Sheet (Commonly Used commands)

+9 votes
1,024 views

Create a Repository
To store projects in Subversion, first you must create a repository. This must be done to a local drive on a local machine. Creating a repository on a network drive is not supported. To create a repository type:

UNIX:  svnadmin create /path/to/repository
Windows:  svnadmin create d:/path_to_repository

By default this sets up a Berkeley database to store the repository. Individual projects should be created as subdirectories of the repository directory (the forward slashes are required even on Windows)

Add a New Project - svn import

To add a project, the Subversion documentation suggests that you create a directory structure like the following:
Directory

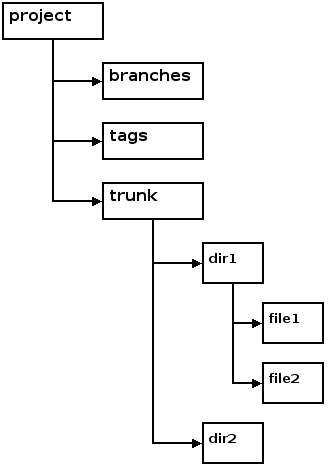
A root project directory contains three subdirectories, branches, tags, and trunk. Your files and directories are stored under the trunk directory.

Create the directories as described. Assuming the project directory is a subdirectory of the current directory, you would enter the following command

UNIX: svn import project file:///repository_name/project -m "First Import"
Windows: svn import project file:///d:/repository_name/project -m "First Import"
Network:  svn import project http://host_name/svn_dir/repository_name/project -m "First Import"

Commonly Used Commands

1.) Checkout the code

$svn checkout http://192.168.0.54/svn/repos/server_code server_code

If your repository requires authentication:

$svn checkout –username my_username http://192.168.0.54/svn/repos/server_code server_code

Update your working copy:

$svn update
(update from current)
$svn update -r BASE server_code
(update foo from base revision)
$svn update -r 1200 server_code (update foo from revision number 1200)

2.) Make changes:

$svn add eg svn add new_directory
(add a new directory foo)
$svn delete
$svn copy directory1 directory2
(copy directory directory1 to directory2)
$svn move directory2 renamed_directory
(rename?)

3.) Examine your changes (Can be done even with no network access to the subversion repository):

$svn status (To get an overview of all your changes)
$svn diff  (to show changes between current working directory and the same directory in the repository)

4.) Possibly undo some changes

$svn revert
After running svn revert as a way to resolve local conflict with the repository copy, Run:

$svn resolve
To inform svn that the conflict has been resolved. You will now be able to successfully run svn update in case of previous conflicts.

5.) Resolve Conflicts (Merge Others’ Changes):

$svn update
$svn resolved

6.) Commit your changes:

$svn commit
eg
$svn commit -m “Removed out of mem errors.”
or
$svn commit -F comment.txt
or
$svn commit –file comment.txt

6. Logs:

$svn log (use current working directory as the default target)
$svn log server_code
(current working directory/file is server_code)
$svn log -r 5:19
(shows logs 5 through 19 in chronological order of working directory)
$svn log -r 19:5
(shows logs 5 through 19 in reverse order of working directory)
$svn log -r 8
(shows log for revision 8 of working directory)
$svn log -r 8 -v
(shows verbose? log for revision 8 of working directory)

7. Diffs (Changes):

$svn diff
$svn diff -r 3 rules.txt
(or svn diff –revision 3 rules.txt)
$svn diff -r 2:3 rules.txt
(revisions 2 and 3 are directly compared)
$svn diff -c 3 rules.txt
(compare changes between current revision and revision 2)

8. Browse a file directly:

svn cat -r 2 rules.txt
svn cat -r 2 rules.txt > rules.txt.v2 (send cat output directly to a file)

9. Browse a folder directly:

svn list http://svn.collab.net/repos/svn
svn list -v http://svn.collab.net/repos/svn

10. Fetching older repository snapshots:

$svn checkout -r 1729
(Checks out a new working copy at r1729)
$svn update -r 1729
(Updates an existing working copy to r1729)

11. Checkout based on revisions:

$svn checkout -r {2006-02-17}
$svn checkout -r {15:30}
$svn checkout -r {15:30:00.200000}
$svn checkout -r {“2006-02-17 15:30″}
$svn checkout -r {“2006-02-17 15:30 +0230″}
$svn checkout -r {2006-02-17T15:30}
$svn checkout -r {2006-02-17T15:30Z}
$svn checkout -r {2006-02-17T15:30-04:00}
$svn checkout -r {20060217T1530}
$svn checkout -r {20060217T1530Z}
$svn checkout -r {20060217T1530-0500}

12. Logs based on revisions:

$svn log -r {2006-11-28}
$svn log -r {2006-11-20}:{2006-11-29}

13. Locking files:

$svn lock banana.jpg -m “Editing file for tomorrow’s release.”
‘banana.jpg’ locked by user ‘harry’.

14. Creating branches:

$svn checkout http://svn.example.com/repos/calc bigwc
A bigwc/trunk/
A bigwc/trunk/Makefile
A bigwc/trunk/integer.c
A bigwc/trunk/button.c
A bigwc/branches/
Checked out revision 340.

Now create the branch;

$cd bigwc
$svn copy trunk branches/my-calc-branch
$svn status
A + branches/my-calc-branch

$svn commit -m “Creating a private branch of /calc/trunk.”
Adding branches/my-calc-branch
Committed revision 341.
posted Jan 21, 2014 by Sheetal Chauhan

  Promote This Article
Facebook Share Button Twitter Share Button LinkedIn Share Button


Related Articles

  • checking out files

    cvs co module
    cvs co -r tag module
    cvs co -D date module

    module: the name of a package or sub-package (e.g. Offline)
    tag: the name of a cvs tag (e.g. v0_0_3)
    date: for example "2014-01-26 01:30"

The date option will select the most recent files with a commit date no later than the date specified as the argument.

  • Comparing your current working files to the version that was checked out.
    cvs diff filename(s)
    cvs diff

    The first version will compare the specified file(s). If any of the filenames are directories, the cvs will recursively descend through the directory and compare all files.
    The second version compares all files in the directory tree rooted at .

  • commit your changes
    cvs commit -m "Comment text goes here." filename(s)
    cvs commit filename(s)

    Both versions will commit the named files to the repository.
    You may use wildcards to specify multuiple files.
    If a filename is a directory, cvs will recursively descend through the directory and commit all modified or added files.
    In the first version the comment is given inline.
    In the second version cvs will open an editor window to allow you to give a longer comment.

  • adding files
    There are separate instructions for adding a directory. Adding a new file is a three step process.

    Create the file(s)
    cvs add filename(s)
    cvs commit -m "Comment" filename(s)

In the add and commit commands, you can use wildcards and/or you may list several files on one line. Be careful with wildcards so that you do not add or commit unintended files. If you accidentally add a file, simply skip the commit for that file.

  • adding directories
    You cannot commit an empty directory. You must create a file in the directory first.

    mkdir directoryname
    cd directoryname
    Create one or more files
    cd ..
    cvs add directoryname
    cvs add directoryname/file1 directoryname/file2 ...
    cvs commit -m "Comment text." directoryname

This will add and commit both the directory and all of the files that you added in step 6.

  • removing files
    rm file(s)
    cvs remove file(s)
    cvs commit -m "Comment text" file(s)

    You must rm the file before issuing the cvs remove command.
    The remove is not final until the commit has been issued.

  • removing directories
    cvs does not let you remove directories. However it does let you ignore any directories that are empty.

    cvs co -P Offline
    cvs update -PdA

    In both cases, the -P option says to prune empty directories.
    If you remove all ordinary files from a directory tree, leaving only subdirectories, then the -P option will skip the full directory tree.

  • updating
    cvs update -PdA

    The options mean:
    P: Prune empty directories
    d: create new directories
    A: Reset sticky tags

This changes only files in your working copy. No changes are made to the respository. If there were no conflicts between changes made in your working copy and changes made in the repository, then cvs update will sync your working copy with changes from the repository. This includes adding new files from the repository, deleting files that were deleted in the repository and changing files that were changed in the repository.

If you want your changes to be put in the repository you still must do a cvs commit. cvs will do this recursively, starting in your current working directory and working down through the directory tree.

  • check the history and the commit comments for a specific file
    cvs log filename

  • some useful history commands
    cvs history -c -a -D "1 day ago" -z CDT
    find all changes submitted to the repository by anyone in the past day

    cvs history -c -a -D "1 day ago" -f Mu2eG4/src -z CDT
    find all changes submitted to Mu2eG4/src (or any other subdirectory) by anyone in the past day

    cvs history -c -u user "1 day ago" -f Mu2eG4/src -z CDT
    find all changes submitted by user to Mu2eG4/src in the past day

    The -z CDT argument tells cvs to print the dates in CDT time ( Central Daylight Time - Fermilab summer time ). You can substitute other time zone abbreviations

  • command line help
    cvs -H command e.g., cvs -H history

  • Tagging

    cvs tag tag [files ...]
    cvs tag -c tag [files ...]
    cvs rtag tag module [module...]

    Here tag is the name of the tag, for example v1_2_3.
    "cvs tag" takes as arguments the names of checked out files whereas "rtag" takes as arguments the names of modules in the repository.

    For cvs tag:
    If a named file is a directory, then cvs tag will work recursively down through that directory.
    If no files are named, then cvs tag will work recursively down from the current working directory.
    Before tagging, make sure that your current working copy is up to date with the respository: the thing that is tagged is the version at the head of the repository, not your working copy. Another way to say this is that tag does not have an implied commit.
    The -c option will check the named files to make sure that all files are up to date with the repository before tagging. If there are any problems, nothing is tagged.
    For cvs rtag:
    The tag is placed on files at the head of repository.

  • Moving tags.
    cvs tag -r revision -F tag [files ...]

where revision is the internal cvs revsion number of the version which is to receive the tag and where tag is the name of the tag to be moved. Never move a tag on code that has been used to create results that are in any way "official"; if it is necessary to bug fix production code, use a branch instead of moving tags.

  • Checking the status of a file.
    cvs status filename

where filename is the name of a checked out file. This command will let you know if the checked out version of the file is in sync with the repository, if the file has been modified since you checked it out or if the repository version of the file has been modified since you checked it out.

  • Other information about a file
    cvs log filename

where filename is the name of a checked out file. This command will print out information about all existing versions of the file, including all of the comments made at commit-time. The printout includes the list of which revision numbers belong in which tag.

READ MORE
...