Graphics Programming using AWT
Abstract Window Toolkit (AWT) represents a class library to develop applications using GUI. The java.awt package got classes and interfaces to develop GUI and let the users interact in a more friendly way with the applications.
Whenever an application (or software) is created, the user can work with it in two ways. The first way is where the user can remember some commands on which the application is built and type those commands to achieve the respective tasks. For example, the user may have to type a PRINT command to send a file contents to a printer. Here, the user should know the syntax and correct usage of the PRINT command. Then only he can interact with the application properly. This is called CUI (Character User Interface) since the user has to use characters or commands to interact with the application. The main disadvantage in CUI is that the user has to remember several commands and their use with correct syntax.
Hence, CUI is not user-friendly. A person who does not know any thing about computers will find this CUI very difficult.
The second way is where the user need no t remember any commands but interacts with any application by clicking on some images or graphics. For example, if the user want to print a file, he can click on a printer image and the rest of the things will be taken care of by the application. The user has to tell how many copies he wants and printing continues. This is very easy for the user since the user remembers only some symbols or images, like a magnifying glass symbol for searching, a briefcase symbol for a directory, etc. This environment where the user can interact with an application through graphics or images is called GUI (Graphics User Interface).
GUI has the following advantages:
1) It is user-friendly. The user need not worry about any commands. Even a layman will be able to work with application developed using GUI.
2) It adds attraction and beauty to any application by adding pictures, colors, menus, animation, etc. We can observe almost all websites lure their visitors on Internet since they are developed attractively using GUI.
3) It is possible to simulate the real life objects using GUI. For example, a calculator program may actually display a real calculator on the screen. The user feels that he is interacting with a real calculator and he would be able to use it without any difficulty or special training. So, GUI eliminates the need of user training.
4) GUI helps to create graphical components like push buttons, radio buttons and check boxes use them effectively in our programs.
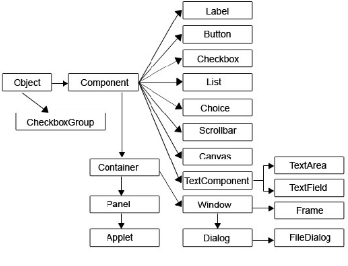
Fig: Classes of AWT
Components
A Component represents an object which is displayed pictorially on the screen. For example, we create an object of Button class as:
Button b= new Button();
Now, b is the object of Button class. If we display this b on the screen, it displays a push button. Therefore, the object b, on going to the screen is becoming a component called 'push button',. In the same way, any component is a graphical representation of an object. Push button, radio buttons, check boxes, etc. are all components.

