In the previous part of this series I discussed how HTML DOM can be manipulated using jQuery. Now let's proceed with one of the most common task you do in JavaScript - handling events. jQuery streamlines the JavaScript event handling mechanism by providing you a uniform and easy way to wire events with their handlers without bothering about the cross browser issues. The following table lists some frequently used jQuery events :
| Event | Description |
| click | Occurs when you click on an element |
| dblclick | Occurs when you double click on an element |
| hover | Allows you to trap mouse entry and exit from an element |
| mousedown | Occurs when a mouse button is pressed but not yet released |
| mouseup | Occurs when a pressed mouse button is released |
| keydown | Occurs when a keyboard key is pressed but is yet to be released |
| keyup | Occurs when a keyboard key is released |
| keypress | Occurs when any of the input key is pressed. Normally used when you are only interested in data entered and not in state of Shift or Ctrl keys. |
| blur | Occurs when focus leaves an element |
| focus | Occurs when an element receives focus |
| change | Occurs when value of <input>, <textarea> and <select> changes. |
| select | Occurs when text is selected from <input> or <textarea> |
| submit | Occurs when a form is being submitted. Valid only on <form> element. |
| resize | Occurs when browser windows is resized |
| ready | Occurs when DOM tree is completely loaded |
One nice feature about jQuery event handling is the event object that gets passed to the handlers in a standard way. The event object passed to the event handlers contain several pieces of information about the event such as :
| Event object property / method | Description |
| target | The DOM element that triggered the event |
| data | User specific data passed to the event handler. This is optional. |
| pageX | X coordinate of mouse within the document |
| pageY | Y coordinate of mouse within the document |
| preventDefault() | Allows you to cancel the default action on an event (say form submission when clicked on Submit buttons) |
| which | Indicates the key code of the keyboard key that was pressed |
| type | Type of the event such as click or keydown |
| altKey | Returns true/false depending on whether ALT key is pressed on not |
| shiftKey | Returns true/false depending on whether SHIFT key is pressed on not |
| ctrlKey | Returns true/false depending on whether CTRL key is pressed on not |
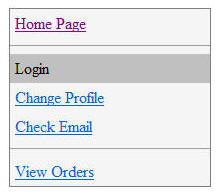
To understand how event handling as described above works let's develop an example. In this example we will create a custom context menu (shortcut menu or right click menu) that displays some options specific to our website instead of the normal context menu of the browser. See below for an example :
Begin by adding a new web form and add script reference to jQuery library as before. Then add a <DIV> somewhere in the HTML body as shown below :
<div id="menuContainer"></div>
Our custom context menu will be a DIV with ID menuContainer. We won't store menu options statically. Rather we will put them in an XML file and then retrieve them from jQuery code. The XML file that contains the menu options has the following structure :
<menu>
    <menuitem id="item1" text="Home Page" navigateUrl="url1.aspx"></menuitem>
    <menuitem id="item2" text="--"></menuitem>
    <menuitem id="item3" text="Login"></menuitem>
    <menuitem id="item4" text="Administer Users" navigateUrl="url3.aspx"></menuitem>
    <menuitem id="item5" text="Check Email" navigateUrl="url4.aspx"></menuitem>
    <menuitem id="item6" text="--"></menuitem>
    <menuitem id="item7" text="View Orders" navigateUrl="url6.aspx"></menuitem>
</menu>
The root tag is <menu>. In this example we won't go into nested menus. Each menu item is represented by <menuitem> element. The three possible attributes of <menuitem> element are id, text and navigateUrl. The id attribute uniquely identifies a menu item and is used on client side to determine which menu option was clicked by the user. The text attribute indicates the menu item text and the navigateUrl attribute attribute indicates the target URL. If navigateUrl attribute is missing then the menu item becomes clickable one. If text attribute is -- then a menu separator (<HR>) is added.
Now switch to the HTML source view of the web form and define two CSS classes as shown below :
.Hover
{
    background-color:silver;
    cursor:hand;
}
.MenuPad
{
    background-color:whitesmoke;
    border:solid 1px gray;
    width:200px;
    position:absolute;
}
The Hover CSS class defines the appearance of a menu item under the mouse pointer. The MenuPad CSS class defines the overall appearance of the context menu. Notice that MenuPad class sets the position attribute to absolute because we want to display the context menu at the place where user right clicks.
Add a <script> block in the head section of the web form and set ready event handler as shown below :
$(document).ready(OnReady);
The OnReady function looks like this :
function OnReady() {
    $.get("Menu.xml", OnSuccess);
    $(document)[0].oncontextmenu = function() { return false; }
    $(document).mousedown(function(event) {
        if (event.which == 3) {
            $("#menuContainer").css("left", event.pageX)
                               .css("top", event.pageY)
                               .show();
        }
    })
    ,
    $(document).keydown(function(event) {
        if (event.which == 27) {
            $("#menuContainer").hide();
        }
    })

}
The OnReady event handler essentially does four things. Firstly, it retrieves the menu definition file Menu.xml residing on the server. It does so using get() method you learnt in the previous part. The OnSuccess() function will be called upon successfully retrieving Menu.xml. OnSuccess() function is discussed later. Secondly, it suppresses the browser's default context menu from popping up. It is done by handling oncontextmenu event and then returning false from the event handler so that the event is cancelled. Then it handles mousedown and keydown events of document object.
Notice how the event object is passed to the event handler. The mousedown event handler checks the which property of the event object to determine which mouse button was clicked. The value of 3 indicates right click. It then sets the left and top properties using css() method. The event.pageX and event.pageY will give you the mouse pointer coordinates within the document. The show() method makes the menuContainer visible. You could have also set visible attribute to visible but using show() is easier.
The displayed context menu can be discarded by pressing Escape key. The keydown event handler again checks which property and if it is 27 (key code for Esc key) then it hides the menuContainer using hide() method.
The OnSuccess function receives XML menu definition and is shown below :
function OnSuccess(menuData) {
    $(menuData).find("menuitem").each(ProcessMenuItem);
    $("#menuContainer").addClass("MenuPad")
                       .hide();
    $("#menuContainer div").hover(OnMouseOver, OnMouseOut)
                           .css("padding", "5px");
}
For each <menuitem> element it calls ProcessMenuItem function. The ProcessMenuItem function add individual menu items to the menuContainer. Initially when the page loads the menuContainer is invisible. So after adding all the menu items we hide the menuContainer. We also handle hover() event for each menu item <DIV> element. The hover event takes two functions one that is called when mouse enters the element and another that is called when mouse leaves the element. The OnMouseOver and OnMouseOut functions are shown below :
function OnMouseOver(event) {
    $(this).addClass("Hover");
}

function OnMouseOut(event) {
    $(this).removeClass("Hover");
}
The OnMouseOver function adds Hover CSS class to the current menu item using addClass() method. Similarly, OnMouseOut function removes the Hover CSS class using removeClass() method.
function ProcessMenuItem(index) {
    var item = $(this);
    var text = item.attr("text");
    var url = item.attr("navigateUrl");

    var menuItemHtml = "";
    if (text == "--") {
        menuItemHtml = "<hr />";
    }
    else if(url==null) {
        menuItemHtml = "<div>" + text + "</div>";
    }
    else {
        menuItemHtml = "<div>" +
                       "<a href='" + url + "'>" + text + "</a>" +
                       "</div>";
    }
    $("#menuContainer").append(menuItemHtml);
    if (url == null) {
        $("#menuContainer div:last-child")
            .click({ menuItemId: text }, OnMenuItemClick);
    }

}
The ProcessMenuItem function is an important one because menu items are added along with their handlers in this function. The ProcessMenuItem function first retrieves the text and navigateUrl attribute values. If text property is -- we wish to add a menu separator in the form of <HR> element. If the URL is specified we wish to display a hyperlink otherwise we simple display menu item text. The new menu item is appended to the menuContainer using append() method (you learnt about append() method in the previous part). Notice the last line carefully. Here, we handle click event of the last menu item. This way click event handler will be attached only to the recently added menu item. Note the first parameter of click event i.e. the one in { and }. This is how you can pass custom data to the event handler (OnMenuItemClick in our case). The first part i.e. menuItemId will appear as a property of event.data object and the later is its value. You can pass multiple pieces of information by separating them with a comma (,) e.g. { piece1:val1,piece2:val2 }.
function OnMenuItemClick(event) {
    alert("You clicked : " + event.data.menuItemId);
    $("#menuContainer").hide();
}
The OnMouseClick function is called when user clicks on a menu item that doesn't have navigateUrl attribute. Notice how we access the custom event data (event.data.menuItemId ). You can use this menuItemId to have a if...else or switch...case statements and perform different actions depending on the menu item clicked. Once the menu item action is performed we hide the menuContainer.
In the next part I will discuss some of the effects that can jazz up your HTML elements. Stay tuned!

