top button
Flag Notify
    Connect to us
      Site Registration

Site Registration

Spring Setup in Eclipse IDE

+1 vote
340 views

Spring

Spring is a lightweight and open source framework. Spring is a complete and a modular framework, and it can be used for all layer implementations for a real
time application. The spring framework comprises several modules such as IOC, AOP, DAO, Context, ORM, WEB MVC etc.
Spring

Spring Framework Modules
Spring Architecture

To set up Spring Framework you required these tools or software to be install in your system.
1. Setup Java Development Kit (JDK)
Install latest version of Java and set environment path for the same.
2. Install Apache Common Logging API
Download the latest version of Apache Commons Logging API from https://commons.apache.org/logging/ unzip the .zip file.
3. Setup Eclipse IDE
Download any latest version of Eclipse IDE and open to create your new project.
4. Setup Spring Framework Libraries
Let’s proceed to setup the spring framework. Download the latest version of spring framework binaries from https://repo.spring.io/release/org/springframework/spring and
unzip the file.


Configuration of spring in Eclipse IDE
Follow the steps to create a simple Java project –
I. Create Java Project
In Eclipse IDE > File > New > others > search Java Project > select Next

  1. Write Project name

  2. Take the proper JRE file location option > select Finish

II. Add Required Libraries

  1. Add common logging API libraries

    Right click current Java Project > select Properties > select Java Build Path
    Add External JARs as shown below

  1. Add Spring Libraries
    Go to Add libraries > User Library > User Libraries > New
    Write Spring Jars > in User Libraries & add External JARs


Apply and say ok to finish the setting up of jar files


III. Create Source Files
Package com.bean.User class

 package com.bean;
public class User {
String name;
int age;
//Setter & Getter

Package com.main.MainClass java class

import org.springframework.context.ApplicationContext;
import org.springframework.context.support.ClassPathXmlApplicationContext;
import com.bean.User;
public class MainClass {
public static void main(String[] args) {
ApplicationContext context =
new ClassPathXmlApplicationContext("SpringConfig.xml");
User user= (User) context.getBean("userbean");
System.out.println("Name: "+ user.getName());
System.out.println("Age: "+ user.getAge());
}
}

SpringConfig.xml​

<?xml version="1.0" encoding="UTF-8"?>
<beans xmlns = "http://www.springframework.org/schema/beans"
xmlns:xsi = "http://www.w3.org/2001/XMLSchema-instance"
xsi:schemaLocation = "http://www.springframework.org/schema/beans
http://www.springframework.org/schema/beans/spring-beans-3.0.xsd">
<bean id = "userbean" class = "com.bean.User">
<property name = "name" value = "Atindra"/>
<property name = "age" value = "24"/>
</bean>
</beans>

IV. Running the Program

output

posted Jul 2, 2017 by Atindra Kumar Nath

  Promote This Article
Facebook Share Button Twitter Share Button LinkedIn Share Button


Related Articles

Hibernate is based on the Java technologies and it is used in the Java applications for developing the data access layer for the application.

Hibernate

Steps to create Hibernate based applications

Step 1: Create database and tables

Step 2: Create POJO class

Step 3: Create mapping meta-data

Step 4: CRUD operations


Configuring the Hibernate environment

I am using Eclipse IDE to perform configuration of Hibernate environment. Install Eclipse and add required JDK version of Java. Create a Java Project in Eclipse and follow the steps below:-


Add required Jar files to Java Project

Downloading the latest version of Hibernate, It includes the libraries necessary to run the Hibernate based applications.

Java Build Path

Note: Please download only the required version of hibernate jar file from official website at http://hibernate.org/orm/downloads/

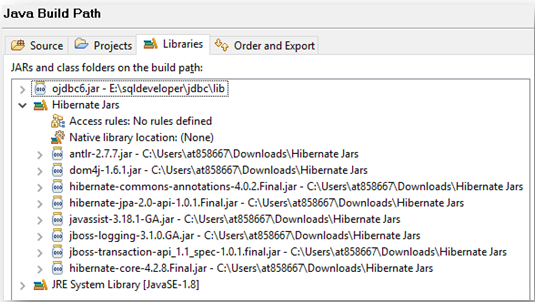
Installing Hibernate is very easy process, you just have to unzip and then copy the library files from its lib directory. If you are using Eclipse, you have to copy the files into lib directory of your project. After coping the file in your project's lib directory, add the lib files in the class build path as shown in above figure.

For copying the file into build path:

Right click on the project > Java Build Path > select "Libraries" > Add JARs > then select the jar files from your project, this will make the jar files available in your project.


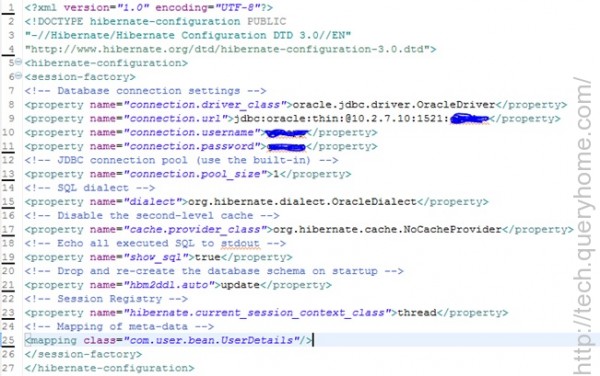
Hibernate Configuration files

The Hibernate framework uses the hibernate.cfg.xml and other optional files for configuring the ORM runtime. The things you will have to change is the dialect, database url, database username and database password.

Here are the important properties of the file:

hibernate.connection.driver_class - The JDBC Driver class

hibernate.connection.url - Database URL

hibernate.connection.username - Database user name

hibernate.connection.password - Password to connect to database

hibernate.connection.pool_size - Default connection pool size

show_sql - If it is true it will show all the sql generated by Hibernate

dialect - Database dialect

Setup the MySQL database

I have used MySQL Database for developing the tutorial. MySQL is free database which works well with the Hibernate framework. We can use other database by changing few settings in the xml file and connect to the supported database.

Download the MySQL database and then setup of your computer. After installing MySQL database you should create database and table in the database. Add database driver into your Java Project. See in figure 1: I have added ojdbc6.jar file in my Java Project.

Note: remember the user name, password and port number of MySQL database.
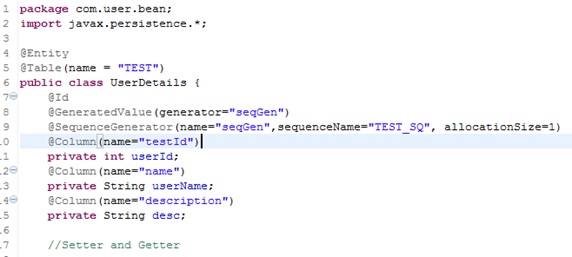
Create a POJO class

Add the following code in package “com.user.bean”

Create connect class to connect your database in package “com.user.utill”

Write the code for Main class in package “com.user.main”

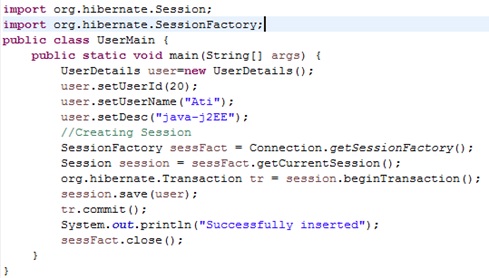
After executing the Main class you will get successful Insertion

You can use the Hibernate to perform operations like select, insert, update and delete the records in the table. Hibernate automatically generates the SQL query automatically to perform these operations against database.

READ MORE
...