AngularJS applications may need to communicate across the controllers. Such a communication might be needed to send notifications or to pass data between the controllers. Although there can be different approaches to achieve this goal, one that is readily available is the event system of $scope and $rootScope. Both of these objects - $scope and $rootScope - support three methods namely $broadcast(), $emit() and $on() that facilitate event driven publisher-subscriber model for sending notifications and passing data between the controllers. In this article I will discuss how to raise events using $broadcast() and $emit() and then how to handle those events using $on().
If you ever used jQuery custom events, the AngularJS event system mentioned above should look familiar to you. However, unlike jQuery custom events the AngularJS event system requires bit more understanding as multiple controllers are involved.
Overview of $broadcast(), $emit() and $on()
Before you dig into the examples discussed below it would be worthwhile to take a quick look at the purpose and use of $broadcast(), $emit() and $on().
$broadcast() as well as $emit() allow you to raise an event in your AngularJS application. The difference between $broadcast() and $emit() is that the former sends the event from the current controller to all of its child controllers. That means $broadcast() sends an even downwards from parent to child controllers. The $emit() method, on the other hand, does exactly opposite. It sends an event upwards from the current controller to all of its parent controllers. From the syntax point of view a typical call to $broadcast() and $emit() will look like this:
$scope.$broadcast("MyEvent",data);
$scope.$emit("MyEvent",data);
Here, MyEvent is the developer defined name of the event that you wish to raise. The optional data parameter can be any type of data that you wish to pass when MyEvent is dispatched by the system. For example, if you wish to pas data from one controller to another that data can go as this second parameter.
An event raised by $broadcast() and $emit() can be handled by wiring an event handler using $on() method. A typical call to $on() will look like this:
$scope.$on("MyEvent", function(evt,data){
  // handler code here });
Now that you know what $broadcast(), $emit() and $on() do let's put them to use in the following examples.
Event system on $scope and $rootScope
When it comes to communicating between two or more AngularJS controllers there can be two possible arrangements:
- Controllers under consideration are nested controllers. That means they have parent-child relationship.
- Controllers under consideration are sibling controllers. That means they are at the same level without any parent-child relationship.
In the former case you will use $broadcast(), $emit() and $on() on the $scope object whereas in the later case you will use these methods on the $rootScope object. Let's see each of the possibility with an example.
Nested controllers
To see how $broadcast(), $emit() and $on() can be used with nested controllers, you will develop a simple application as shown below:
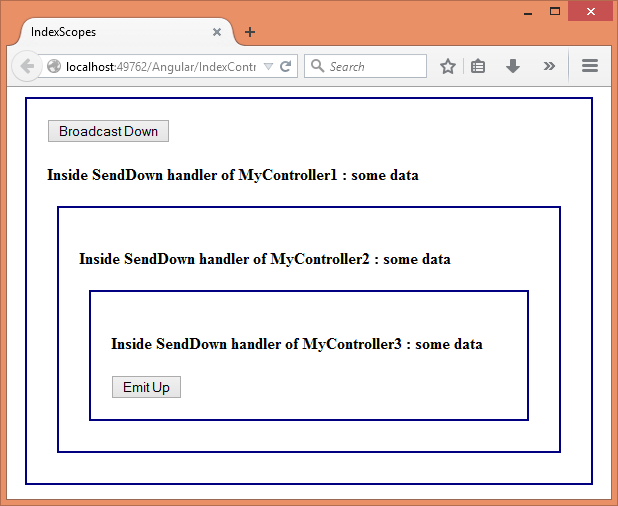
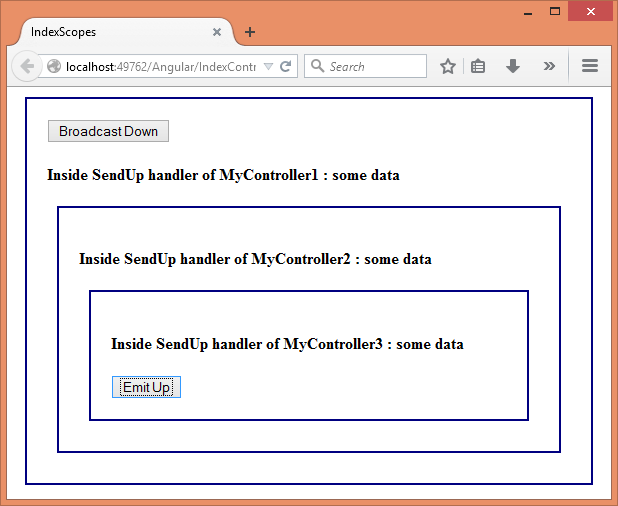
The above application consists of three AngularJS controllers - MyController1, MyController2 and MyController3 - nested inside each other. The outermost <div> (MYController1) has a button for raising an event handled SendDown. Similarly, the innermost <div> (MyController3) has a button for raising an event named SendUp. Thus the SendDown event is raised in MyController1 and can be handled by MyController1, MyController2 and MyController3. On the same lines SendUp event us raised inside MyController3 and is handled by MyController3, MyController2 and MyController1. Notice that although both the events look similar, the SendDown event travels from MyController1 to MyController3 whereas SendUp travels from MyController3 to MyController1.
Both the events send a string data ("some data") when the corresponding event is dispatched. You can easily substitute an object instead of string data. Upon handling the respective events a message is shown inside each <div> just to confirm that the handler has indeed executed and the data is received successfully.
Ok. Now let's see the code of all the controllers mentioned above. The MyController1 looks like this:
app.controller("MyController1", function ($scope, $rootScope) {

    //broadcast the event down
    $scope.OnClick = function (evt) {
        $scope.$broadcast("SendDown", "some data");
    }

    //handle SendDown event
    $scope.$on("SendDown", function (evt, data) {
        $scope.Message = "Inside SendDown handler
                          of MyController1 : " + data;
    });

    //handle SendUp event
    $scope.$on("SendUp", function (evt, data) {
        $scope.Message = "Inside SendUp handler
                          of MyController1 : " + data;
    });
});
MyController1 does three things. Firstly, it raises SendDown event using $broadcast() method. It uses $broadcast() because we wish to send the event from parent controller to child controllers. So, the SendData is dispatched by MyController inside the click event handler of the Broadcast button. Secondly, MyController1 handles SendData event using $on(). Since SendData is raised by MyController itself this step might not be needed at all. I am still handling the event just to point out that something like that is possible. The SendDown handler simply sets Message property of the $scope object. This Message will be displayed in the corresponding <div> element. Thirdly, MyController1 handles SendUp event. Recollect that this event is raised by MyController3 in the upward direction (child to parent) and MyController1 simply handles it.
The code of MyController2 is quite straightforward and is shown below:
app.controller("MyController2", function ($scope, $rootScope) {

    //handle SendDown event
    $scope.$on("SendDown", function (evt, data) {
        $scope.Message = "Inside SendDown handler of
                          MyController2 : " + data;
    });

    //handle SendUp event
    $scope.$on("SendUp", function (evt, data) {
        $scope.Message = "Inside SendUp handler of
                          MyController2 : " + data;
    });

});
MyController2 simply handles SendDown and SendUp events and sets Message property on the $scope object.
Finally, MyController3 does the following:
app.controller("MyController3", function ($scope, $rootScope) {

    //handle SendDown event
    $scope.$on("SendDown", function (evt, data) {
        $scope.Message = "Inside SendDown handler of
                          MyController3 : " + data;
    });

    //emit SendUp event up
    $scope.OnClick = function (evt) {
        $scope.$emit("SendUp", "some data");
    }

    //handle SendUp event
    $scope.$on("SendUp", function (evt, data) {
        $scope.Message = "Inside SendUp handler of
                          MyController3 : " + data;
    });
});
MyController3 is quite similar to MyController1. However, it raises SendUp event using $emit() method. This way SendUp event travels from child (MyController3) to the parents (MyController2 and MyController1). The event handlers of SendDown and SendUp simply assign the Message property.
The HTML markup of the page will look like this:
<body ng-app="MyApp">
 <div ng-controller="MyController1">
  <input type="button" value="Broadcast Down"
         ng-click="OnClick($event)" />
  <h4>{{Message}}</h4>
   <div ng-controller="MyController2">
    <h4>{{Message}}</h4>
    <div ng-controller="MyController3">
     <h4>{{Message}}</h4>
     <input type="button" value="Emit Up"
            ng-click="OnClick($event)" />
    </div>
   </div>
  </div>
</body>
If you run the application and click on the Broadcast button you should get results as shown above. Clicking on Emit button will produce the following result:
Sibling controllers
The above examples achieves communication and passes data between controllers having parent-child relationship. What if you wish to achieve the communication between sibling controllers? If so, you need to use $rootScope instead of $scope. That's because since there is no parent-child relationship, each controller will have its own scope and there won't be any inherited scope as in the previous example. Moreover, $emit() won't serve much purpose in case of sibling controllers. This is because $rootScope is a container scope for all the other scopes and can dispatch events only to its child controllers. So, only $broadcast() will serve some useful purpose in this case.
Assuming that there are three sibling controllers - MyController1, MyController2 and MyController3 - the application will take this form:
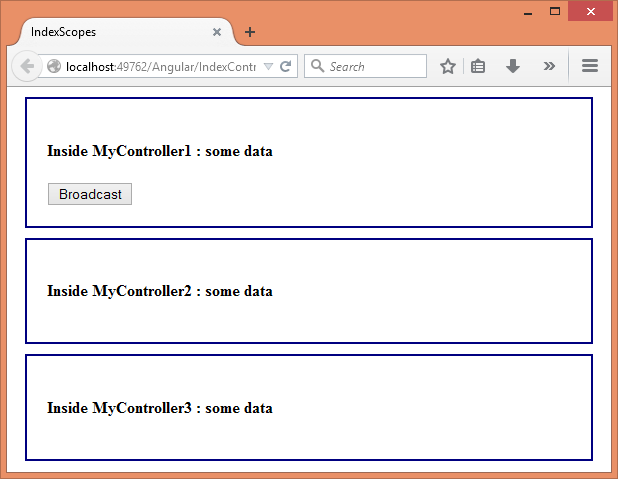
As before there are three controllers but they are siblings. The topmost <div> (MyController1) has Broadcast button that raises SendDown event on $rootScope object. All the controllers handle the SendData event and set Message property on their individual $scope object. The complete code of all the three controllers is shown below:
app.controller("MyController1", function ($scope, $rootScope) {
    //raise event on $rootScope
    $scope.OnClick = function (evt) {
        $rootScope.$broadcast("SendDown", "some data");
    }

    //event handler
    $scope.$on("SendDown", function (evt, data) {
        $scope.Message = "Inside MyController1 : " + data;
    });

});

app.controller("MyController2", function ($scope, $rootScope) {
    //event handler
    $scope.$on("SendDown", function (evt, data) {
        $scope.Message = "Inside MyController2 : " + data;
    });

});

app.controller("MyController3", function ($scope, $rootScope) {
    //event handler
    $scope.$on("SendDown", function (evt, data) {
        $scope.Message = "Inside MyController3 : " + data;
    });
});
As you can see, this time $broadcast() is called on $rootScope object to raise SendDown event. SendDown is handled by individual $scope objects as before.
A word of caution before I conclude this article - although event system discussed above looks straightforward and simple, if used excessively it can get messy in terms of overall management and application flow. So, give a thought before you jump in to raise too many events.
That's it for this article! Keep coding.

