Data annotation based validations validate one property at a time. For example, if you decorate CustomerID property of a class with [Required] data annotation attribute, it validates only the CustomerID property. Although this behavior is what is necessary in most of the cases, at times your outcome of a validation may depend on multiple properties. One can deal with such situations using IValidatableObject interface but the downside is that such a validation may not fit seamlessly with data annotation attributes.
In this article you will learn how to create a custom data validation attribute that performs validation based on multiple properties of the class. Specifically you will learn the following two approaches:
- Create a custom data validation attribute to decorate a single property.
- Create a custom data validation attribute to decorate the model class.
Which of these two approaches to use depends on your needs. The former approach is good if your class has, say, 10 properties and your validation requires two or three of them. The later approach is good if your validation depends on the object as a whole.
Custom data validation attribute for a property
Before you start developing such a data validation attributes, have a look at the following screen shot:
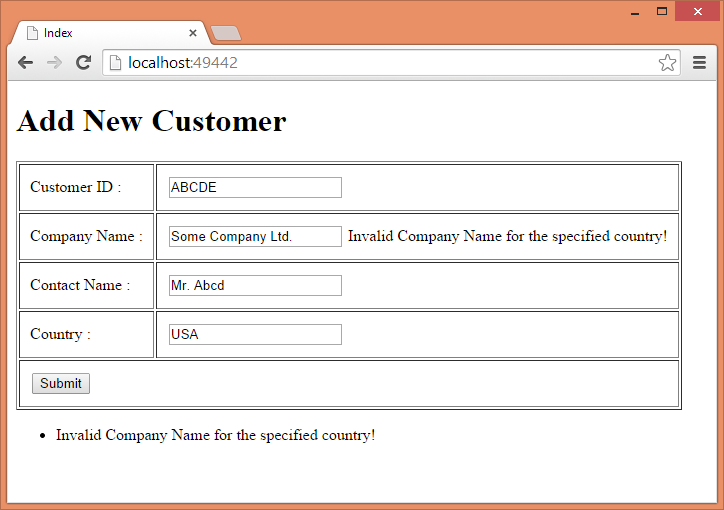
The above figure shows a Customer entry page that accepts CustomerID, CompanyName, ContactName and Country from the user. It performs validation on the CompanyName such that CompanyName ends with a specific phrase depending on a specific Country. For example, if the Country is USA, CompanyName should end with LLC or for an Indian company it should end with Ltd. and so on. If this multi-field validation fails an error message as shown in the figure is thrown back to the user.
To develop this data validation attribute create a new ASP.NET MVC application. Add ADO.NET Entity Data Model for Customers table of the Northwind database and also add HomeController.
Next, add a class named CompanyNameAttribute as shown below:
 public class CompanyNameAttribute:ValidationAttribute
{
  protected override ValidationResult IsValid(object value,
                ValidationContext validationContext)
  {
    ...
  }
}
As you can see, CompanyNameAttribute class inherits from System.ComponentModel.DataAnnotations.ValidationAttribute base class. It then overrides IsValid() method. The IsValid() method takes two parameters - value and validationContext. The value parameter supplies the value of the property to which this attribute is attached (CompanyName in our case). The validationContext parameter can be used to grab the object instance under consideration. We can then inspect its other properties (as you will see later). The IsValid() method returns ValidationResult object indicating the validation error (if any).
Now add the following code inside the IsValid() method:
bool flag = false;
object instance = validationContext.ObjectInstance;
Type type = instance.GetType();
PropertyInfo property = type.GetProperty("Country");
object propertyValue = property.GetValue(instance);
The above code declares a Boolean variable - flag - that is set to true if the validation succeeds, else it is set to false. Then ObjectInstance property of validationContext is used to grab the underlying instance of Customer class. Remember that our custom attribute will be applied to the CompanyName property of the Customer class. The GetType() method is used to get t he type information of the object instance. Make sure to import System.Reflection for this code to compile correctly. Then GetProperty() method of Type object is called specifying Country as the property name. This way a PropertyInfo object for Country property will be returned. Finally, GetValue() method is used to retrieve the actual value of the Country property.
So far we haven't performed any validation. Next, add the following code:
if (propertyValue == null)
{
    flag = false;
}
else
{
    switch (propertyValue.ToString())
    {
        case "USA":
            if (value.ToString().EndsWith("LLC"))
            {
                flag = true;
            }
            break;
        case "India":
            if (value.ToString().EndsWith("Ltd"))
            {
                flag = true;
            }
            break;
        default:
            flag = true;
            break;
    }
}
The above code is quite straightforward and simply performs our custom validation mentioned earlier. Depending on the switch conditions the flag variable is set. If Country property is not set altogether then flag is set to false.
Finally, add the concluding piece of code as shown below:
if(!flag)
{
    ValidationResult result = new ValidationResult
                    ("Invalid Company Name for the specified country!");
    return result;
}
else
{
    return null;
}
The above code block checks the flag variable. If it is false, a ValidationResult is created with a custom error message and is returned from the IsValid() method. If flag is true, null is returned.
This completes the custom CompanyNameAttribute. Now, it's time to use this attribute. Add a metadata class to the project as shown below:
public class CustomerMetadata
{
    [CompanyName]
    [StringLength(20)]
    public string CompanyName { get; set; }
}
The above code creates a CustomerMetadata class and defines CompanyName property in it. The CompanyName property is decorated with two data validation attributes - our [CompanyName] attribute and inbuilt [StringLength] attribute.
Then add Customer partial class that links the CustomerMetdata class with the Customer model class.
[MetadataType(typeof(CustomerMetadata))]
public partial class Customer
{

}
As you can see, [MetadataType] attribute associates the CustomerMetadata class with the Customer model class.
Now, add Index view to the project and place the following markup in it:
@model MultiFieldCustomDataAnnotationDemo.Models.Customer

@{
    Layout = null;
}

<!DOCTYPE html>

<html>
<head>
    <meta name="viewport" content="width=device-width" />
    <title>Index</title>
</head>
<body>
    @using(Html.BeginForm("Index","Home",FormMethod.Post))
    {
        <h1>Add New Customer</h1>
        <table border="1" cellpadding="10">
            <tr>
                <td>Customer ID :</td>
                <td>@Html.TextBoxFor(m => m.CustomerID)</td>
            </tr>
            <tr>
                <td>Company Name :</td>
                <td>
                    @Html.TextBoxFor(m => m.CompanyName)
                    @Html.ValidationMessageFor(m => m.CompanyName)
                </td>
            </tr>
            <tr>
                <td>Contact Name :</td>
                <td>@Html.TextBoxFor(m => m.ContactName)</td>
            </tr>
            <tr>
                <td>Country :</td>
                <td>@Html.TextBoxFor(m => m.Country)</td>
            </tr>
            <tr>
                <td colspan="2">
                    <input type="submit" value="Submit" />
                </td>
            </tr>
        </table>
    }

    @Html.ValidationSummary()
</body>
</html>
The view markup is straightforward and uses ValidationMessageFor() and ValidationSummary() helpers to display validation errors.
Run the application and test our validation by entering some invalid CompanyName and Country combinations.
Custom data validation attribute for the whole model class
In the preceding approach you developed [CompanyName] attribute and decorated the CompanyName model property. In this approach you will create [ValidateCustomer] attribute and decorate the Customer class with it. In this case a sample run looks like this:
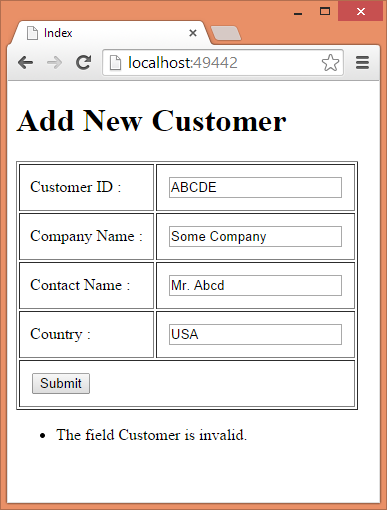
Did you notice the difference? In the precious case ValidationMessageFor() as well as ValidationSummary() emitted the error message. In this case only ValidationSummary() displays the error because we are validating the Customer object as whole rather than its individual properties.
In this case the custom data validation attribute looks like this:
public class ValidateCustomerAttribute : ValidationAttribute
{
    public override bool IsValid(object value)
    {
        bool flag = false;
        Customer obj = (Customer)value;
        switch (obj.Country)
        {
            case "USA":
                if (obj.CompanyName.EndsWith("LLC"))
                {
                    flag = true;
                }
                break;
            case "India":
                if (obj.CompanyName.EndsWith("Ltd"))
                {
                    flag = true;
                }
                break;
            default:
                flag = true;
                break;
        }

        return flag;
    }
}
The ValidateCustomerAttribute class inherits from ValidationAttribute class as before. This time, however, it overrides another version of IsValid() method. This version of IsValid() accepts object value and returns a Boolean value indicating success or failure of the validation. Inside, we perform the same validation as earlier and return flag variable. Notice that since [ValidateCustomer] will be applied to Customer class, the whole Customer object under consideration is passed to the IsValid() method as value parameter. Thus all the properties of Customer class can be accessed inside IsValid() method.
To use [ValidateCustomer] attribute add it on the metadata class as follows:
[ValidateCustomer]
public class CustomerMetadata
{
    ...
}
As you can see [ValidateCustomer] is applied on top of the CustomerMetadata class (and hence Customer model class) rather than CompanyName (or any other) property. Just like any other data validation attribute you can customize the error message by setting the ErrorMessage property of the base class.
[ValidateCustomer(ErrorMessage =
"Invalid Customer data. Please check all the fields.")]
public class CustomerMetadata
{
  ....
}
That's it! You can now run the application and try entering some invalid values. If all is well you should see our custom error message displayed in the ValidationSummary().

