top button
Flag Notify
    Connect to us
      Site Registration

Site Registration

Consuming ASMX And WCF Services Using JQuery

0 votes
304 views

In the previous part I demonstrated how jQuery animations can add some jazz to your web forms. Now let's see one of the most important feature of jQuery that you will probably use in all data driven websites - accessing server data. In the previous articles you used jQuery methods such as $.get() to make a GET request to the server. More powerful feature, however, is to make AJAX calls to ASP.NET Web Services, Page Methods and WCF services. The $.ajax() method of jQuery allows you to access these services. In fact $.get() method you used earlier internally makes use of $.ajax() method but restricts itself only to GET requests. The $.ajax() method provides more control on how the services are called.

The general signature of $.ajax() method is as follows :

$.ajax({
  type: get_or_post,
  url: url_goes_here,
  data: service_parameters_goes_here,
  contentType: "application/json; charset=utf-8",
  dataType: json_or_xml,
  processData: true_or_false;
  success: function(results){...},
  error: function(err) {...}
})

Though many of the parameters mentioned above (and there are still more!) are optional knowing about them is a good idea so that you can have total control on the AJAX calls being made. A brief description of each of the parameters mentioned above is as follows:

  • The type parameter indicates the type of request i.e. GET or POST
  • The URL parameter is the URL to the remote service method to be called. A typical URL will be MyService.asmx/MyMethod for Web Services and MyService.svc/MyMethod for WCF services.
  • The data parameter allows you pass parameters required by the remote method. Typically data will be a JSON serialized object.
  • contentType indicates the type of content being sent on the wire. Most of the times it will be "application/json".
  • dataType indicates whether data will be in JSON format or XML format.
  • processData indicates whether to add data specified in data parameter to request querystring. For POST requests you will set it to false.
  • success is a function that will be invoked after successful completion of the remote call.
  • error is a function that will be invoked in case there is any error while calling the remote service.

Example Services

As an example to illustrate how $.ajax() method can be used we will develop two services and a couple of page methods. All of them essentially do a trivial job - converting temperatures from Celsius to Fahrenheit and vice a versa. Our web form will look like this:

image

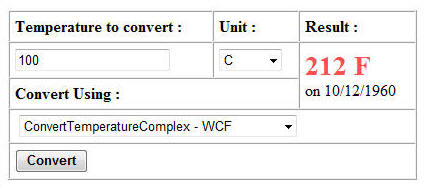
The web form allows us to enter temperature value and its unit. Then we can select whether to call ASMX or WCF service or Page Methods. Clicking on Convert converts the temperature value to other unit and displays under Result column.

Creating ASMX Service

Create a new website and add a new Web Service (.asmx) to it. Then create the following methods in the webservice.

[WebMethod]
public decimal ConvertTemperatureSimple(decimal t, string unit)
{
    if (unit == "C")
    {
        t = (t * 1.8m) + 32;
    }
    else
    {
        t = (t - 32) / 1.8m;
    }
    return t;
}

[WebMethod]
public TemperatureData ConvertTemperatureComplex(TemperatureData t)
{
    if (t.Unit == "C")
    {
        t.Value = (t.Value * 1.8m) + 32;
        t.Unit = "F";
    }
    else
    {
        t.Value = (t.Value - 32) / 1.8m;
        t.Unit = "C";
    }
    return t;
}

The ConvertTemperatureSimple() method has parameters and return values as simple primitive data types. It accepts temperature value to convert and its current unit. Internally depending on whether the unit is "C" or "F" it converts the temperature to another unit. The calculated temperature is then returned.

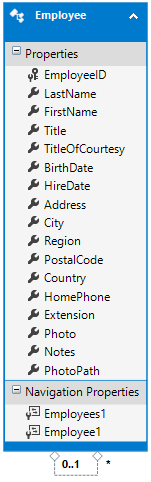
The ConvertTemperatureComplex() method makes use of complex data types i.e. TemperatureData class. Internal working of ConvertTemperatureComplex() method is similar to the previous method. The TemperatureData class is shown below:

public class TemperatureData
{
    public TemperatureData() { }
    public TemperatureData(decimal value, string unit, DateTime takenon)
    {
        this.Value = value;
        this.Unit = unit;
        this.TakenOn = takenon;
    }
    public decimal Value { get; set; }
    public string Unit { get; set; }
    public DateTime TakenOn { get; set; }
}

The TemperatureData class essentially stores temperature value, unit and date on which the temperature is recorded (though we don't use this property for any meaningful purpose in this example).

Creating WCF Service

We will also add a WCF service to our website that is equivalent in terms of functionality to the web service we just developed. The following code shows WCF service methods.

[ServiceContract]
public interface IService
{
    [OperationContract]
    [WebInvoke(Method = "POST", 
     RequestFormat = WebMessageFormat.Json, 
     ResponseFormat = WebMessageFormat.Json, 
     BodyStyle = WebMessageBodyStyle.Wrapped)]
    decimal ConvertTemperatureSimple(decimal t,string unit);

    [OperationContract]
    [WebInvoke(Method = "POST", 
     RequestFormat = WebMessageFormat.Json, 
     ResponseFormat = WebMessageFormat.Json)]
    TemperatureData ConvertTemperatureComplex(TemperatureData t);

} 

[DataContract]
public class TemperatureData
{
    public TemperatureData() { }
    public TemperatureData(decimal value, string unit,DateTime takenon)
    {
        this.Value = value;
        this.Unit=unit;
        this.TakenOn = takenon;
    }
    [DataMember]
    public decimal Value { get; set; }
    [DataMember]
    public string Unit { get; set; }
    [DataMember]
    public DateTime TakenOn { get; set; }
}
 

public class Service : IService
{
    public decimal ConvertTemperatureSimple(decimal t, string unit)
    {
        if (unit == "C")
        {
            t = (t * 1.8m) + 32;
        }
        else
        {
            t = (t - 32)/1.8m;
        }
        return t;
    }

    public TemperatureData ConvertTemperatureComplex(TemperatureData t)
    {
        if (t.Unit == "C")
        {
            t.Value = (t.Value * 1.8m) + 32;
            t.Unit = "F";
        }
        else
        {
            t.Value = (t.Value - 32) / 1.8m;
            t.Unit = "C";
        }
        return t;
    }
}

I won't go into the technical details of creating a WCF service here. You will find many articles on this website that teach you how do that. Notice the lines marked in bold letters. That's an important piece of code for us. The [WebInvoke] attribute from System.ServiceModel.Web namespace marks a service method as REST callable. REST (REpresentational State Transfer) is a programming model for getting information from a web accessible URL (typically to a web page or service). In jargon free terms REST means retrieving data from a web accessible resource (e.g. a web page) using HTTP GET or POST methods.

The WebInvoke attribute has several properties as described below:

  • Method : Indicates HTTP verb GET or POST that can invoke this method.
  • RequestFormat and ResponseFormat : Indicate the format of request and response respectively. Possible values are JSON and XML.
  • BodyStyle : Indicates whether to wrap data within system defined XML elements or not. Possible options are Bare, Wrapped, WrappedRequest and WrappedResponse. For methods with only one parameter the default of Bare works fine. However, if your service method is taking more than one parameters then you should make it Wrapped.

Creating Page Methods

Creating Page Methods is very similar to creating Web Service methods. The only difference is that they reside in the code behind file of the web form and are static. Have a look below:

[WebMethod]
public static decimal ConvertTemperatureSimple(decimal t, string unit)
{
...
}

[WebMethod]
public static TemperatureData ConvertTemperatureComplex(TemperatureData t)
{
...
}

Calling Service Methods

The jQuery code that calls the service methods is inside the click event handler of Convert button. The event handler is wired in the ready event as shown below:

$(document).ready(function() {
  $("#btnConvert").click(OnConvert);
});

The OnConvert function that acts as the click event handler of Convert button contains switch-case statement that checks the value selected in dropdown Select2.

function OnConvert(event) {
    var url = "";
    var data="";
    var successHandler=null;
    var temp = $("#TextBox1").val();
    var unit=$("#Select1").val();
    switch ($("#Select2").val()) {
        case "ASMX1":
            url = "WebService.asmx/ConvertTemperatureSimple";
            data = '{"t":"' + temp + '","unit":"' + unit + '"}';
            successHandler=function(results) {
                $("#lblResult").text(results.d);
                $("#lblTakenOn").text("");
            }
            break;
        case "ASMX2":
            url = "WebService.asmx/ConvertTemperatureComplex";
            data = '{t:{"Value":"' + temp + '","Unit":"' + unit + 
'","TakenOn":"12/10/2010"}}';
            successHandler = function(results) {
                $("#lblResult").text(results.d.Value + " " + results.d.Unit);
                $("#lblTakenOn").text("on " + ToJSDate(results.d.TakenOn));
            }
            break;
        case "WCF1":
            url = "Service.svc/ConvertTemperatureSimple";
            data = '{"t":"' + temp + '","unit":"' + unit + '"}';
            successHandler=function(results) {
                $("#lblResult").text(results.ConvertTemperatureSimpleResult);
                $("#lblTakenOn").text("");
            }
            break;
        case "WCF2":
            url = "Service.svc/ConvertTemperatureComplex";
            data = '{"Value":"' + temp + '","Unit":"' + unit + '","TakenOn":"' + 
ToWCFDate("12/10/1960") + '"}';
            successHandler=function(results) {
                $("#lblResult").text(results.Value + " " + results.Unit);
                $("#lblTakenOn").text("on " + ToJSDate(results.TakenOn));
            }
            break;
        case "PM1":
            url = "Default.aspx/ConvertTemperatureSimple";
            data = '{"t":"' + temp + '","unit":"' + unit + '"}';
            successHandler = function(results) {
                $("#lblResult").text(results.d);
                $("#lblTakenOn").text("");
            }
            break;
        case "PM2":
            url = "Default.aspx/ConvertTemperatureComplex";
            data = '{t:{"Value":"' + temp + '","Unit":"' + unit + 
'","TakenOn":"12/10/2010"}}';
            successHandler = function(results) {
                $("#lblResult").text(results.d.Value + " " + results.d.Unit);
                $("#lblTakenOn").text("on " + ToJSDate(results.d.TakenOn));
            }
            break;
    }
    $.ajax({
        type: "POST",
        url: url,
        data: data,
        contentType: "application/json; charset=utf-8",
        dataType: "json",
        success: successHandler,
        error: function(err) {
            alert(err.status + " - " + err.statusText);
        }
    })
}

Each "case" essentially forms the REST endpoint to be invoked. As described earlier the general format of URL is

<service_asmx_or_svc_file_name>/<method_name>

The method parameters need to be in JSON format. JSON format is basically a key-value format wherein keys and values are enclosed in double quotes and are separated by :. Multiple key-value pairs are separated by a comma (,). The entire set of key-value pairs is enclosed within { and }. For primitive data types key name must be same as the method parameter name and for object types key name must match the property name. Notice the differences between the JSON strings for ASMX and WCF.

The success handler receives the return value of the service method as a parameter (result). For Web Services the return value is made available as a member of implicit object d. For WCF services you can access the return value directly.

JSON format takes care of serializing data types such as string, integers and boolean. However, there is no way to represent Date data type in JSON. That means dates are treated as plain strings. To avoid any confusion ASMX and WCF services serialize dates in a special format. The format is as follows:

\/Date(no_of_mlilliseconds_since_1_Jan_1970)\/

To take care of this format we will create two helper methods ToWCFDate() and ToJSDate().

function ToJSDate(value) {
    var pattern = /Date\(([^)]+)\)/;
    var results = pattern.exec(value);
    var dt = new Date(parseFloat(results[1]));
    return (dt.getMonth() + 1) + "/" + dt.getDate() + "/" + dt.getFullYear();
}

function ToWCFDate(value) {
    var dtArr = value.split("/");
    var dt = new Date(dtArr[2], --dtArr[0], dtArr[1]);
    var date = '\/Date(' + dt.getTime() + '+0000)\/';
    return date;
}

The ToJSDate() function accepts date in the special format as mentioned above and then converts it into mm/dd/yyyy format. It does so by first matching a regular expression and then converting the millisecond value back into a JavaScript date. Similarly ToWCFDate() function converts specified date from mm/dd/yyyy format to WCF service specific format using getTime() function. The getTime() function returns number of milliseconds since 1 January 1970 and that specific date instance. The time zone information is also appended (+0000 or whatever time zone you want say +0530 for IST)

That's it! Run the web form and try converting a few temperature values using ASMX and WCF service methods.

posted Nov 15, 2016 by Shivaranjini

  Promote This Article
Facebook Share Button Twitter Share Button LinkedIn Share Button


Related Articles

Handling client side DOM events such as click and keypress is a common task in the jQuery code. The DOM events are always bound to some or the other HTML element. However, there can be situations where you may need to flag some application specific behavior or event. For example, you might be having an Ajax code that periodically checks the server for availability of some data. As soon as the data is made available by the server you may need to notify to your client side code about its availability so that your code can take an appropriate action. Obviously, there is no DOM event that can be used in this case. Luckily, jQuery allows you to define your own events that can be raised from within your code. This article shows how jQuery's on() and trigger() methods can be used for the task just mentioned.

Let's try to use custom events in a sample scenario. Suppose you have an Ajax driven function GetData() that polls the server to check whether data is available or not. Once the data is available you want to update several DOM elements from the page based on the data as well as perform some application specific processing. One way to deal with this situation is to write all the logic in the success handler of $.ajax() method. The following code shows how this can be done:

function GetData()
{
    $.ajax({
        url: "/home/getdata",
        type: "GET",
        contentType: "application/json",
        dataType: "json",
        success: function (data) {
         //...
         //your code here
         //...
        }
    });
}

As you can see, the GetData() client side function calls /Home/GetData action method of Home controller. The success callback function receives the server data and then performs all the required processing. Although this approach works, it has a drawback. All the DOM elements that need to utilize the data must be known to the success handler. The success handler should also know the exact logic to be executed for each DOM element. For example, once the data is receives TextBox1 may want to display that value, Table1 may want to append a row with that data filled in, Div1 may want to display some message to the end user based on that data and so on. Placing all this logic inside the success handler makes it bulky and rigid. What if DOM elements interested in the data received are not known at development time? What if some DOM elements want to utilize or skip the data based on some programmatic condition? Such operations are tedious to code in the above approach.

A better approach is to implement some sort of subscription model for the DOM elements and then once the data is received notify the subscribers about the data arrival. This way the success handler simply contains code to notify the subscribers. Each subscriber deals with the data as per its own requirement. The success handler need not know about the exact DOM elements to update at all. This is where custom events can come handy. Once the data is received from the server the success handler will trigger some custom event to notify the subscribers. The subscribers, in turn, will wire an event handler to that event and utilize the data as per their requirement inside the wired handler.

Let's see how this can be implemented. Consider a simple ASP.NET MVC view:

<form>
    <input type="text" id="text1" />
    <div id="div1"></div>
    <input type="text" id="text2" />
    <br /><br />
    <table id="table1" border="1" cellpadding="5"></table>
</form>

The view contains four elements - text1, text2, div1 and table1. Except text2 all the elements are interested to get notification when the data is received from the server.

Here is the jQuery code that defines the subscriptions:

var subscribers = [];
var pollTime = 4000;

$(document).ready(function () {

    //add subscriber definition
    subscribers.push({
        ElementId: "text1",
        Handler: function (evt, data) {
            $(evt.target).val(data);
        }
    });

    subscribers.push({
        ElementId: "div1",
        Handler: function (evt, data) {
            $(evt.target).html("<h2>" + data + "</h2>");
        }
    });

    subscribers.push({
        ElementId: "table1",
        Handler: function (evt, data) {
            $(evt.target).append("<tr><td>" + data + "</td></tr>");
        }
    });

    //attach event handlers to the subscriber elements
    for (var i = 0; i < subscribers.length; i++) {
        $("#" + subscribers[i].ElementId).
        on("datareceived",subscribers[i].Handler);
    }

    //start Ajax polling
    window.setTimeout(GetData, pollTime);
});

The code begins by declaring two variables - subscribers and pollTime. The subscribers is an array that holds JavaScript objects. Each JavaScript object stored in the subscribers array has two properties namely ElementId and Handler. The ElementId property indicates the ID of the DOM element interested to subscribe to the custom event. The Handler property points to an anonymous function that acts as the event handler. In the above example text1, div1 and table1 are the DOM elements interested in the custom event. Note that all the handlers receive data parameter that supplies the data received from the server. The textbox uses this data to fill itself. The <div> uses this data to display it statically inside <h2></h2> tag. And the table appends that data as a table row.

Now comes the important part. A for loop iterates through the subscribers array. For every array element on() method of jQuery is called to bind datareceived event to the handler. The datareceived is a custom event and you can use any name instead of datareceived. This is how jQuery allows you to handler custom events.

Then setTimeout() method starts the polling operation by specifying GetData() function and pollTime value.

The modified GetData() function looks like this:

function GetData()
{
    $.ajax({
        url: "/home/getdata",
        type: "GET",
        contentType: "application/json",
        dataType: "json",
        success: function (data) {
            for (var i = 0; i < subscribers.length; i++) {
                $("#" + subscribers[i].ElementId)
                .trigger("datareceived", data);
            }
            window.setTimeout(GetData, pollTime);
        }
    });
}

Notice the code marked in bold letters. The success function receives data from the server. A for loop iterates through the subscribers array and for every subscriber trigger() method is called. The trigger() method is used to raise the custom event - datareceived. The data received from the server is passed as the second parameter of the trigger() method.

As you can see, the success callback is quite simple and straightforward now. All it needs is the list of subscribers and it will notify all of them by raising the datareceived event.

The GetData() server side function used in the url parameter above looks like this:

public JsonResult GetData()
{
    return Json(DateTime.Now.ToString("hh:mm:ss tt"),
    JsonRequestBehavior.AllowGet);
}

The GetData() action method simply returns current time in hh:mm:ss format.

If you run the application you should see the datareceived event being handled as expected.

image

Notice that since text1, div1 and table1 subscribe to the datareceived event, only those elements are updated. The text2 element doesn't subscribe to the datareceived event and hence it is empty.

READ MORE

Most of the times the JavaScript event handlers attached with an element fire every time the event under consideration is raised. For example, if you wire a click event handler to the click event of a button then clicking that button will invoke the event handler function every time. At times, however, this behavior is undesirable.

Suppose that you have a hyperlink or a button and clicking on that element causes an Ajax request to be sent to the server. The Ajax request returns some data that is loaded in some other element. Once the data is retrieved there is no need for the click event handler to fire. If you keep firing the click event handler you would be unnecessary making Ajax requests to the server.

One way to avoid these unwanted Ajax requests is to maintain a flag that tells you whether data for an element has already been retrieved or not. However, this may slightly complicate the JavaScript code. As an alternative you can unsubscribe the click event handler when it gets executed the first time. That means you need to create event handlers that fire only one time. Luckily, jQuery provides an inbuilt way to accomplish this task - one() method.

To understand how the one() method is used you will create an ASP.NET Web Form as shown below:

image

As you can see the above Web Form consists of a GridView control that lists EmployeeID, FirstName and LastName from the Employees table of Northwind database. The Get Notes column is a a HyperLinkField and doesn't have any server side functionality. Clicking on the Get Notes link executes some Ajax code that retrieves Notes for an employee. The Notes are appended to a Label control placed below the GridView. Once retrieved there is no need to retrieve Notes of the same employee again and hence the click event handler of the Get Notes link for that employee can be removed.

To develop this example, create an empty ASP.NET Web Forms application. Then add the ADO.NET Entity Framework Data Model for the Employees table. The following figure shows how the Employee entity class looks like:

image

Then add a Web Form to the project and place a GridView on it. Add two BoundField columns and one HyperLinkField column to the GridView and design it as shown in the beginning of  this article. Also, place a Label control below the GridView.

Now, set the SelectMethod property of the GridView to GridView1_GetData and add the GridView1_GetData() method in the code behind. This method does the job of fetching employee records from the database and is shown below:

public IQueryable GridView1_GetData()
{
    NorthwindEntities db=new NorthwindEntities();
    var query = from emp in db.Employees
                where emp.Country=="USA"
                orderby emp.EmployeeID
                select new { EmployeeID=emp.EmployeeID,
                             FirstName=emp.FirstName,
                             LastName=emp.LastName };
    return query;
}

The GridView1_GetData() returns all the Employee records where Country is USA. Only the EmployeeID, FirstName and LastName columns are returns because our example needs only these columns.

Now, add a [WebMethod] named GetNotes() as shown below:

[WebMethod]
public static string GetNotes(int employeeid)
{
  NorthwindEntities db = new NorthwindEntities();
  var query = from emp in db.Employees
              where emp.EmployeeID == employeeid
              select emp.Notes;
  return query.SingleOrDefault().ToString();
}

The GetNotes() web method is intended to be called from the client side script using Ajax. The GetNotes() method accepts an EmployeeID and returns the Notes for that employee.

Next, add a <script> reference to jQuery library and also add a <script> block in the head section of the Web Form. Key in the following jQuery code in the <script> block:

$(document).ready(function () {
  $("a").one("click", function (evt) {
    var empId = $(evt.target).closest("tr").children(":first-child").text();
    $.ajax({
      url: "WebForm1.aspx/getnotes",
      type: "POST",
      data: JSON.stringify({ employeeid: empId }),
      dataType: "json",
      contentType: "application/json",
      success: function (result) {
        $("#lblNotes").append(result.d + "<hr />");
      },
      error: function () { alert('error'); }
   });
  });
});

The above code uses one() method of jQuery to wire a one time event handler to all the hyperlink elements from the Web Form. In our case this will cause all Get Notes links to have the specified function as the one time click event handler. The first parameter of the one() method is the type of event that is to be handled (click in this case). The second parameter is the event handler function. The event handler function retrieves the EmployeeID from the first column of the row whose Get Notes link is clicked. Notice the use of closest(), children() methods and :first-child selector to accomplish this task.

Then an Ajax call is made to the GetNotes() web method using jQuery .$ajax(). The EmployeeID retrieved earlier is passed as the data parameter. The success function receives the return value of the web method. In this case the success function will receive the Notes for that employee. The Notes are then appended in the Label (lblNotes) using append() method.

To test the function of the Web Form, set a breakpoint at the GetNotes() web method and run the application. You will observe that when you click on the Get Notes link for an employee for the first time, the Ajax call is made and the Notes are retrieved from the database. This will be evident from the fact that your execution will halt at the breakpoint. Once Notes for an Employee are retrieved clicking on Get Notes doesn't cause the Ajax call and the web method won't be called again and again. That's what we wanted!

That's it! Keep coding.

READ MORE
...