By now you know how to alter existing elements and their attributes. jQuery also allows you insert, append, remove and replace elements from HTML DOM so that you can modify the document structure. For example, say you are calling some WCF service from client script and based on its return values need to generate HTML table on the fly. Since you won't know the number of rows and columns needed in the table you need to modify DOM structure and add table rows and cells as required. In this article I am going to demonstrate some of these jQuery features.
The following table lists jQuery methods that allow you to modify DOM structure.
| Method Name |
Description |
| wrap() |
Wraps every element of matched set inside a given element. |
| wrapAll() |
Wraps an element and all its child elements inside a given element. |
| wrapInner() |
Wraps inner contents of an element inside a given element. |
| append() |
Appends content at the end of target element.
e.g. $("#container").append("<div>Hello</div>") |
| appendTo() |
Appends content at the end of target element.
e.g. $("<div>Hello</div>").appendTo("#container") |
| prepend() |
Inserts content at the beginning of a target element.
e.g. $("#container").prepend("<div>Hello</div>") |
| prependTo() |
Inserts content at the beginning of a target element.
e.g. $("<div>Hello</div>").prependTo("#container") |
| after() |
Inserts content after a specific element.
e.g. $("#container").after("<div>Hello</div>") |
| insertAfter() |
Inserts content after a specific element.
e.g. $("<div>Hello</div>").insertAfter("#container") |
| before() |
Inserts content before a specific element.
e.g. $("#container").before("<div>Hello</div>") |
| insertBefore() |
Inserts content before a specific element.
e.g. $("<div>Hello</div>").insertBefore("#container") |
| empty() |
Removes all the child nodes of a specific element. The specified element still remains in the DOM but is made empty. |
| remove() |
Removes a specific element and all its child elements. |
| replaceWith() |
Replaces target element with a specific content.
e.g. $("span").replaceWith("<div>Hello</div>") |
| replaceAll() |
Replaces target element with a specific content.
e.g. $("<div>Hello</div>").replaceAll("span") |
| clone() |
Makes a deep copy of an element and its contents. |
| val() |
Returns value from a form element. |
| text() |
Returns text content of an element (all child elements included). |
| html() |
Returns HTML markup of an element. |
You might have guessed that pairs of methods viz. append - appendTo, prepend - prependTo, after - insertAfter, before - insertBefore, replaceWith - replaceAll all give you identical results. Only the positions of new element and old element is reversed. With prior methods the method is invoked on old element by passing new element as parameter whereas later methods are called on new elements by passing old element as a parameter.
In order to illustrate how some of these methods are used we are going to develop an RSS gadget. Assume that you want to allow users of your website to add configurable RSS feed boxes on the web form. Users should be able to define RSS feed URL of their choice as well as customize look and feel of the resultant RSS feed box. See the example below :
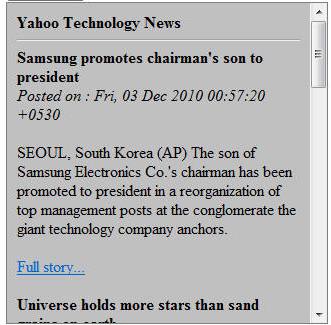
This RSS feed box for Yahoo Technology News feed has been generated via jQuery and allows following features to be customized.
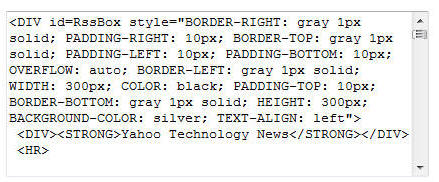
The following HTML (not a complete view) was generated on the fly using jQuery :
Ok. Now that you got an idea as to what our web form is supposed to do. Let's uncover the functionality.
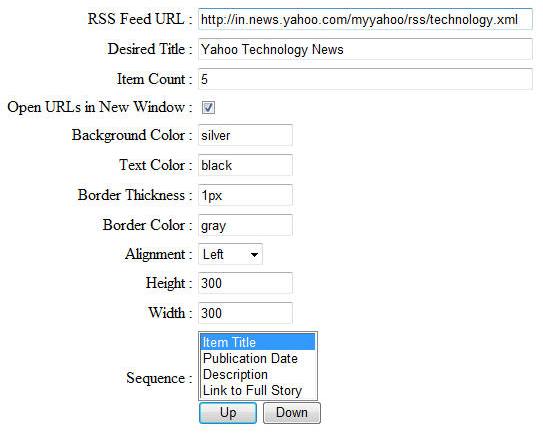
Creating the web form
The web form as shown in the above figure consists of several server controls that gather the following pieces of information from the user :
- RSS Feed URL : The URL of the RSS feed whose items you wish to display on the web form.
- Desired Title : A title to be used in the resultant RSS box.
- Item Count : No. of feed items to display.
- Target window for feed URLs : Whether to open feed item URLs in the same browser window or a new window.
- Background Color : Background color for the resultant RSS box.
- Text Color : Text color for title and feed items.
- Border thickness : Thickness of border for the entire box.
- Border color : Border color for the box.
- Alignment : Text alignment for the feed items.
- Height : Height of the resultant box.
- Width : Width of the resultant box.
- Sequence : Sequence of feed item elements. The Up/Down buttons can be used to change the sequence.
The top part of the web form contains all the server controls as mentioned above and below there is a DIV and TextArea controls as shown below :
<div id="RssBox"></div>
<textarea id="HtmlSource" rows="10" cols="50"></textarea>
Grabbing the remote RSS feed data
Your jQuery code is executed by your browser and as such is restricted by your browser's security settings. Browser's security settings will prohibit any cross domain calls that you make via your jQuery code. That means you can only request data originating from your own website. As you can guess this will prevent us from accessing RSS feeds because they will not be part of your website. To overcome this restriction, you need to create a helper on the server that will grab RSS feed data for you and then serve this data to jQuery code. The helper being part of your website can be easily called by the client jQuery code. Although there can be different strategies for creating this helper, I am going to show the simplest method. In this method you will use another web form that internally makes use of RSS syndication classes of .NET framework. You will call this web form from the client side jQuery code passing RSS feed URL as a querystring parameter. This querystring parameter will then be read on the server and RSS feed data is fetched. The fetched data is then "re-written" onto the response stream so that it reaches the client as desired. The following code demonstrates how this is done :
protected void Page_Load(object sender, EventArgs e)
{
    string url = Request.QueryString["feedUrl"];
    XmlReader reader = XmlReader.Create(url);
    Rss20FeedFormatter formatter = new Rss20FeedFormatter();
    formatter.ReadFrom(reader);
    reader.Close();
    Response.ContentEncoding = System.Text.Encoding.UTF8;
    Response.ContentType = "text/xml";
    XmlWriter rssWriter = XmlWriter.Create(Response.Output);
    formatter.WriteTo(rssWriter);
    rssWriter.Close();
    Response.End();
}
We first retrieve the querystring parameter named feedUrl. This parameter supplies the original RSS feed URL whose data is to be retrieved. An XmlReder instance is then constructed based on this remote RSS feed URL. The Rss20FeedFormatter class is then used to read RSS feed data from the XmlReader. The XmlWriter then writes these feed items into the Response stream.
Before writing this code ensure that you have imported the following namespaces :
System.Xml
System.ServiceModel.Syndication
Also make sure to save / rename the above web form as RssFetecher.aspx.
Ok. Now let's move on to the jQuery code.
Wiring event handlers
$(document).ready(OnLoad);

function OnLoad() {
    $("#btnGenerate").click(OnGenerate);
    $("#btnUp").click(OnUp);
    $("#btnDown").click(OnDown);
}
In the jQuery code we need to handle three event handlers - the click events of three buttons viz. Generate, Up and Down. This is done in the ready() method.
Retrieving RSS feed data
This is the important piece of functionality. jQuery allows you to make AJAX calls to server side resources. There are couple of options available here. I will discuss them in detail in later parts of this series. For now we will use get() method of jQuery object that makes GET requests to server side resources. The following code fragment illustrates how get() method is used :
function OnGenerate(event) {
	var SourceUrl="RssFetcher.aspx?feedUrl=" + $("#txtURL").val();
	$.get(SourceUrl, OnSuccess);
	event.preventDefault();
}
The OnGenerate event handler function grabs the RSS feed URL entered in the relevant textbox and constructs the querystring of RssFetcher.aspx. It then calls the get() method by passing the URL and a callback function to be executed upon successful execution of the request. Note that .get() actually means jQuery.get().
Processing the RSS feed data
function OnSuccess(feedData) {
    $("#RssBox").empty();
    $("#RssBox").append("<div><strong>" +
                   $("#txtTitle").val() + "</strong></div>")
                .append("<hr />")
                .css("width", $("#txtWidth").val())
                .css("height", $("#txtHeight").val())
                .css("overflow", "auto")
                .css("text-align",$("#ddlAlign").val())
                .css("background-color", $("#txtBgColor").val())
                .css("color", $("#txtTxtColor").val())
                .css("border-style", "solid")
                .css("border-width", $("#txtBorderWidth").val())
                .css("border-color", $("#txtBorderColor").val())
                .css("padding","10px");
    $(feedData).find("item").each(ProcessFeedItem);

    if ($("#txtItemCount").val() > 0) {
        $("#RssBox > div:first-child ~ div").slice($("#txtItemCount").val()).remove();
    }
}
If the call to get() is successful OnSuccess method will be called. The OnSuccess method will receive the feed data as a parameter. Inside the OnSuccess method we first empty the DIV (recollect that the DIV that displays the feed items has ID RssBox) using empty() method. The empty() method empties all the DOM elements from the matched elements. We need to empty the DIV because there might be previous data in it. We then append a new DIV element to RssBox. This is done using append() method. The append() method accepts the DOM elements to be appended. The newly added DIV displays the title of the RSS box as specified in the textbox.
We then proceed by adding several CSS attributes the RssBox. This is done using css() method. You should be familiar with css() method as we used it many times earlier. Notice how all the textbox values are being added as CSS attributes. Also notice that we are setting overflow style property to auto so that a scrollbar is automatically displayed in case feed items exceed the height of the box.
Now comes the important line of code. The find() method allows you search the descendant elements. The feed data as received by OnSuccess() method is nothing but an XML document with the following structure (look at the markup in bold letters) :
<?xml version="1.0" encoding="utf-8"?>
<rss version="2.0">
<channel>
 <title></title>
 <link></link>
 <description></description>
 <copyright></copyright>
 <generator></generator>
 <item>
 <title></title>
 <link></link>
 <description></description>
 <pubDate></pubDate>
 </item>
 ...
We find every occurrence of <item> element and call each() method of jQuery to process it. How each item is processed is explained in the next section.
The feed may contain say 20 items but you may want to display just few of them (as indicated in the Item Count textbox). To strip off unwanted items from the RssBox DIV we use the slice() and remove() methods. Notice how we have used next siblings selector (you learnt it in the previous part of this series). The slice() method takes the start index from where the items are to be sliced and returns the sliced subset. The actual job of removing the sliced elements is done by the remove() method.
Processing feed items
In the preceding section we called each() method on the <item> elements. Now, let's see what needs to be done in the ProcessFeedItem() method.
function ProcessFeedItem(index) {
    var item = $(this);
    var title = item.find("title").text();
    var link = item.find("link").text();
    var description = item.find("description").text();
    var pubDate = item.find("pubDate").text();

    var newDiv = $("<div></div>");

    for(var i=1;i<=$("#lstSequence option").length;i++)
    {
        switch ($("#lstSequence option:nth-child(" + i + ")").val()) {
            case "title":
                $("<strong>" + title +
                     "</strong><br />").appendTo(newDiv);
                break;
            case "date":
                $("<em>Posted on : " +
                     pubDate + "</em><br />").appendTo(newDiv);
                break;
            case "desc":
                $("<p>" + description + "</p>").appendTo(newDiv);
                break;
            case "link":
                $("<a href='" + link + "' target='" +
                   ($("#chkTarget").is(":checked") ? '_blank' : '_self') + "'>
                   Full story...</a><br /><br />")
                   .appendTo(newDiv);
                break;
        }
    }

    $("#RssBox").append(newDiv);
    $("#HtmlSource").text($('<div>').append($("#RssBox").eq(0).clone()).html());
}
The this reference inside the each() method points to an individual element whose index is passed to the processing method. We store this reference in a local variable for easier use. We then call find() method to find out title, description, link and pubDate elements. The text() method returns the text value of these elements. We then construct a new DIV element that acts as a container for a feed item. The for loop then iterates through the ListBox and based on the desired sequence of elements adds DOM elements to the newDiv. Notice the use of appendTo() method here instead of append. Also notice the use of selectors and functions (such as nth-child, :checked and is()) we learned in the previous parts. This way a feed item is added to the main DIV RssBox. The general structure of the newDiv will be as follows :
<div>
<strong>Title here</strong>
<br />
<em>Pub Date here</em>
<br />
<p>Description here</p>
<a>Link here</a>
<br />
<br />
</div>
Once all the feed items are added to the RssBox we display the resultant HTML source of the modified DOM in the textarea. This is done using html() method. Notice the use of eq() method that accepts an index of element and returns that specific element from the matched set. The clone() method creates a deep copy of the matched elements.
Moving the ListBox items
function OnUp(event) {
    $('#lstSequence option:selected').each(function() {
        $(this).insertBefore($(this).prev());
    });
    event.preventDefault();
}

function OnDown(event) {
    $('#lstSequence option:selected').each(function() {
        $(this).insertAfter($(this).next());
    });
    event.preventDefault();
}
In our example the ListBox that allows you to decide the sequence of elements as displayed in the RSS box needs to move its <option> elements up and down on the click of Up and Down buttons. This is done using insertBefore() and insertAfter() methods. In both the cases first we need to find out the <option> selected (:selected selector) and then call insertBefore() method if we are moving it up or insertAfter() if we are moving it down. The prev() and next() methods return the elements that are previous to and next to the current element.
That's it! Run the web form supply some valid RSS feed URL and see how jQuery renders the RSS feed box for you as per your specifications.
In the next part of this series I will cover the event handling mechanism of jQuery. So stay tuned!

