While uploading large files you may need to display the progress of the file upload operation to the end user. This can be done using HTML5 and jQuery UI's Progressbar widget. While HTML5 also has <progress> element that can be used to render a progress bar, jQuery UI's Progressbar widget offers more configuration and theming options. In this post you will use XMLHttpRequest (Level 2) object to upload files to the server. The XMLHttpRequest object now supports file upload related events such as progress that can be used to track file upload progress.
The following figure shows a sample Web Form that shows how the progress bar looks like:
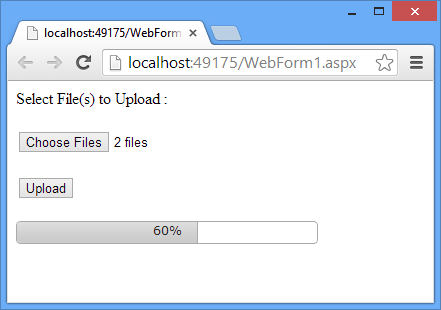
The Web Form has a FileUpload server control that allows you to select one or more files. Clicking on the Upload button uploads the files on the server. To upload the files on the server you use XMLHttpRequest object instead of traditional postback. The files are uploaded in the background and the progress of the upload operation is displayed in the Progressbar widget. The progress bar also has a label that indicates the progress in percentages.
The Web Form consists of the following markup:
<form id="form1" runat="server">
        <asp:Label ID="Label1" runat="server" Text="Select File(s) to Upload :"></asp:Label>
        <br />
        <br />
        <asp:FileUpload ID="FileUpload1" runat="server" AllowMultiple="true" />
        <br />
        <br />
        <asp:Button ID="Button1" runat="server" Text="Upload" />
        <br />
        <br />
        <div id="progressbar" class="progressbar">
            <div id="progresslabel" class="progressbarlabel"></div>
        </div>
    </form>
As you can see the form primarily consists of a FileUpload server control, a Button and couple of <div> elements at the bottom. The outer <div> represents the Progressbar whereas the inner <div> represents the label of the progress bar.
Then add the following CSS classes for the outer <div> and the inner <div> respectively.
 .progressbar {
  width:300px;
  height:21px;
}
.progressbarlabel {
  width:300px;
  height:21px;
  position:absolute;
  text-align:center;
  font-size:small;
}
Now add the <script> sections to the head section as shown below:
 <script src="Scripts/jquery-2.0.0.js"></script>
<script src="Scripts/jquery-ui.js"></script>
As you can see the first <script> tag points to the jQuery library and the second <script> tag points to the jQuery UI library. Also add a reference to the CSS file needed by jQuery UI:
<link href="jquery-ui.css" rel="stylesheet" />
Then add a new <script> block in the head section and write the following jQuery code in it:
 $(document).ready(function () {
  $("#Button1").click(function (evt) {
    var xhr = new XMLHttpRequest();
    var data = new FormData();
    var files = $("#FileUpload1").get(0).files;
    for (var i = 0; i < files.length; i++) {
      data.append(files[i].name, files[i]);
    }
    xhr.upload.addEventListener("progress", function (evt) {
    if (evt.lengthComputable) {
      var progress = Math.round(evt.loaded * 100 / evt.total);
      $("#progressbar").progressbar("value", progress);
    }
    }, false);
    xhr.open("POST", "UploadHandler.ashx");
    xhr.send(data);

    $("#progressbar").progressbar({
      max: 100,
      change: function (evt, ui) {
        $("#progresslabel").text($("#progressbar").progressbar("value") + "%");
      },
      complete: function (evt, ui) {
        $("#progresslabel").text("File upload successful!");
      }
    });
    evt.preventDefault();
  });
});
The above code consists of click event handler of Button1. Inside, the code creates an instance of XMLHttpRequest object (xhr) and a FormData object (data). It then obtains a list of files selected in the FileUpload control using files property of the DOM element. A for loop iterates through the files collection and with each iteration the file is added to the FormData object using its append() method. The first parameter of append() is the name of the file and the second parameter is the file itself.
Then progress event handler is wired to the upload object of the XMLHttpRequest object. This event is raised periodically during the file upload operation. The progress event handler uses event object properties such as lengthComputable, loaded and total to calculate the progress in percentages. The jQuery UI Progressbar is updated with this progress value. This is done by setting the value option of the progressbar widget to the progress value just calculated.
Then the open() method of XMLHttpRequest is called and the URL to an ASP.NET generic handler (UploadHandler.ashx) is specified. Then send() method is called to actually make the request and send the files to the server. The FormData object is passed as a parameter to the send() method.
Finally, the Progressbar widget is initialized on the progressbar <div> element. The configuration options namely max, change and complete are passed to the progressbar widget. The max option indicates the maximum value that can be displayed in the progress bar. the change options wires an event handler to the change event of the progressbar widget. The change event is raised whenever the value of the progressbar widget changes. The change event handler sets the text of the progressbarlabel <div> element to the value of the progressbar. The complete options wires an event handler for the complete event. The complete event is raised when the value reaches the max value of the progressbar widget. The complete event handler sets the text of the progressbarlabel <div> to "File upload successfully!".
Although not used in this example, you can also handle the load event of the XMLHttpRequest object to notify the user of the completion of the request.
Now add a generic handler (UploadHandler.ashx) to the project and add the following code to it:
public void ProcessRequest(HttpContext context)
{
  HttpFileCollection files = context.Request.Files;
  foreach (string key in files)
  {
    HttpPostedFile file = files[key];
    string fileName = file.FileName;
    fileName = context.Server.MapPath("~/uploads/" + fileName);
    file.SaveAs(fileName);
  }
  context.Response.ContentType = "text/plain";
  context.Response.Write("File(s) uploaded successfully!");
}
The generic handler receives the uploaded files in the Request.Files collection. Each file in the collection is an instance of HttpPostedFile class. A foreach loop iterates through the files collection and saves each PostedFile using the SaveAs() method. The files are saved in Uploads folder under the root folder of the web application. Once all the files are uploaded the generic handler sends a success message to the client.
That's it! Run the Web Form, select a few large files and click on the Upload button to see the progressbar widget in action.