top button
Flag Notify
    Connect to us
      Site Registration

Site Registration

Creating Wizard In ASP.NET MVC (Part 3 - JQuery)

+5 votes
550 views

In Part 1 and Part 2 of this article series you developed a wizard in an ASP.NET MVC application using full page postback and Ajax helper respectively. In this final part of this series you will develop a client side wizard using jQuery. The navigation between various wizard steps (Next, Previous) happens without any postback (neither full nor partial). The only step that causes form submission to the server is clicking on the Finish wizard button.

The jQuery version of the wizard uses only one view - Index - that contains all the three steps as three <div> elements. Using jQuery code you show only one <div> at a time giving a wizard appearance to the view.

The HomeController class now contains two overloads of Index() action method as shown below:

public class HomeController : Controller
{
  public ActionResult Index()
  {
    return View();
  }

  [HttpPost]
  public ActionResult Index(Customer obj)
  {
    if (ModelState.IsValid)
    {
      NorthwindEntities db = new NorthwindEntities();
      db.Customers.Add(obj);
      db.SaveChanges();
      return View("Success");
    }
    return View();
  }
}

As you can see the second Index() method is marked with [HttpPost] attribute and accepts Customer parameter. Inside it checks whether there are any model state errors or not. In case of any errors Index view is returned otherwise data is added to the database and the Success view is returned.

Currently, there are no model validations on Customer class.  To add then using data annotations you can create a metadata class as shown below:

public class CustomerMetadata
{
  [Required]
  public string CustomerID { get; set; }
  [Required]
  public string CompanyName { get; set; }
  [Required]
  public string Address { get; set; }
  [Required]
  public string City { get; set; }
  [Required]
  public string Country { get; set; }
  [Required]
  public string PostalCode { get; set; }
  [Required]
  public string ContactName { get; set; }
  [Required]
  public string Phone { get; set; }
  [Required]
  public string Fax { get; set; }
}

[MetadataType(typeof(CustomerMetadata))]
public partial class Customer
{
}

As you can see the CustomerMetadata class defines all the properties that are accepted through the wizard. All the properties are marked with [Required] attribute. The CustomerMetadata class is linked with the Customer model class by creating a partial class and then decorating it with [MetadataType] attribute.

Now, add the Index view to the project. The Index view that contains all these <div> elements looks like this:

@model WizardInMVC.Models.Customer

@{
Layout = null;
}

<!DOCTYPE html>

<html>
<head>
<meta name="viewport" content="width=device-width" />
<title>Index</title>
</head>
<body>
@using (Html.BeginForm("Index", "Home", FormMethod.Post))
{
<div id="divBasic">
<h1>Step 1 : Basic Details</h1>
@Html.LabelFor(m=>m.CustomerID)<br />
@Html.TextBoxFor(m=>m.CustomerID)
@Html.ValidationMessageFor(m=>m.CustomerID)<br />
@Html.LabelFor(m=>m.CompanyName)<br />
@Html.TextBoxFor(m=>m.CompanyName)
@Html.ValidationMessageFor(m=>m.CompanyName)
<br />
<input type="button" name="nextBtn" value='Next' />
</div>
<div id="divAddress">
<h1>Step 2 : Address Details</h1>
@Html.LabelFor(m=>m.Address)<br />
@Html.TextBoxFor(m=>m.Address)
@Html.ValidationMessageFor(m=>m.Address)
<br />
@Html.LabelFor(m=>m.City)<br />
@Html.TextBoxFor(m=>m.City)
@Html.ValidationMessageFor(m=>m.City)
<br />
@Html.LabelFor(m=>m.Country)<br />
@Html.TextBoxFor(m=>m.Country)
@Html.ValidationMessageFor(m=>m.Country)
<br />
@Html.LabelFor(m=>m.PostalCode)<br />
@Html.TextBoxFor(m=>m.PostalCode)
@Html.ValidationMessageFor(m=>m.PostalCode)
<br />
<input type="button" name="prevBtn" value='Previous' />
<input type="button" name="nextBtn" value='Next' />
</div>
<div id="divContact">
<h1>Step 3 : Contact Details</h1>
@Html.LabelFor(m=>m.ContactName)<br />
@Html.TextBoxFor(m=>m.ContactName)
@Html.ValidationMessageFor(m=>m.ContactName)
<br />
@Html.LabelFor(m=>m.Phone)<br />
@Html.TextBoxFor(m=>m.Phone)
@Html.ValidationMessageFor(m=>m.Phone)
<br />
@Html.LabelFor(m=>m.Fax)<br />
@Html.TextBoxFor(m=>m.Fax)
@Html.ValidationMessageFor(m=>m.Fax)
<br />
<input type="button" name="prevBtn" value='Previous' />
<input type="submit" name="nextBtn" value='Finish' />
</div>
}
</body>
</html>

As you can see there are three <div> elements namely divBasic, divAddress and divContact. They contain various form fields for the respective wizard step. The markup shown above is essentially the summation of the markups in individual views from the Part 1 and Part 2 examples. This markup is quite straightforward. There is a minor change though - the Previous and Next buttons are of type button rather than submit. This is because these buttons no longer cause form submission. To turn the above markup into a wizard you need to write some jQuery code as shown below:

$(document).ready(function () {
  $("div").hide();
  $("div:first").show();
  $(":button").click(function () {
    var parentDiv = $(this).parent();
    $("div").hide();
    if($(this).val()=="Previous")
    {
      var prevDiv = parentDiv.prev();
      prevDiv.show();
    }
    if ($(this).val() == "Next") {
      var nextDiv = parentDiv.next();
      nextDiv.show();
    }
  });
});

As you can see the above jQuery code first hides all the <div> elements from the view. This is done using the element selector and hide() method. Then the first <div> element is made visible using :first selector and show() method. This way initially when the page loads only the first wizard step will be visible.

The code then wires event handlers for the click event of the Previous and Next buttons. This is done by selecting these buttons using :button selector and then using click() method. Notice that inside the click event handler nowhere we hardcode the IDs of various <div> elements. This way adding or removing a wizard step doesn't need any change in the jQuery code. Inside the click event handler, the code retrieves a reference to the parent <div> element of the button being clicked. This is done using parent() method called on this. The code then hides all the <div> elements. It then checks the button that was clicked - Previous or Next. If Previous button is clicked a reference to the previous <div> element is retrieved using prev() method called on parentDiv variable. Similarly if Next button is clicked, a reference to the next <div> element is retrieved using next() method called on parentDiv. Accordingly, either previous <div> or next <div> is displayed using show() method.

That's it! Test the wizard by running the application and then navigating between wizard steps.

posted Oct 18, 2016 by Shivaranjini

  Promote This Article
Facebook Share Button Twitter Share Button LinkedIn Share Button


Related Articles

In Part 1 of this article series you developed a wizard in an ASP.NET MVC application. Although the wizard developed in Part 1 works as expected it has one shortcoming. It causes full page postback whenever you click on Previous or Next button. This behavior may not pose much problem if a wizard has only a few steps. However, if a wizard has many steps and each step accepts many entries then full page postback can deteriorate the user experience. To overcome this shortcoming you can add Ajax to the wizard so that only the form is posted to the server. In this part of the series you will convert the application developed in Part 1 to use Ajax. In the next part you will further enhance the wizard using jQuery so that data is posted to the server only on the final step.

To convert the wizard application developed previously to use Ajax you will use Ajax helper of ASP.NET MVC. To use Ajax helper you need to make certain changes to the application. These changes are listed below:

  • All the four views namely BasicDetails, AddressDetails, ContactDetails and Success will now be partial views.
  • All the action methods will now return the corresponding partial views.
  • The wizard will be launched by Index view and initially BasicDetails partial view will be displayed.

You might wonder as to why we are making these changes. These changes are required since we wish to use Ajax helper. The Ajax helper allows you to submit a form using an Ajax request and the returned response is displayed in a DOM element. For example, you may create a form that makes a post request to an action method and displays a success message returned by the action method in a <div> element. In our specific case when one wizard step is submitted to the server using an Ajax request the server responds by sending the next or previous wizard step. Thus a form submits to the server and renders another form in the browser. This requires that the wizard steps return only the HTML needed to display that step and not the page level items such as <script> and <link>. The page level items just mentioned will go inside Index view that launches the wizard.

Ok. Let's begin our development. Add an Index view to the project and key-in the following markup into it:

@{
Layout = null;
}

<!DOCTYPE html>

<html>
<head>
<meta name="viewport" content="width=device-width" />
<script src="~/Scripts/jquery-1.10.2.js"></script>
<script src="~/Scripts/jquery.unobtrusive-ajax.js">
</script>
<title>Index</title>
</head>
<body>
<div id="divContainer">
  @Html.Partial("BasicDetails")
</div>
</body>
</html>

Notice the above markup carefully. The <head> section of the page contains <script> references to jquery-1.10.1.js and jquery.unobtrusive-ajax.js. These files are necessary for the proper working of Ajax helper. Also notice that the body section contains a <div> with ID of divContainer. This <div> plays an important role in the functioning of the wizard because it houses various wizard steps. As you can see from the code initially it hosts BasicDetails partial view.

Now add a Partial View and name it as BasicDetails. The BasicDetails partial view contains the following markup:

@model WizardInMVC.Models.BasicDetails


@{
AjaxOptions options = new AjaxOptions();
options.HttpMethod = "POST";
options.InsertionMode = InsertionMode.Replace;
options.UpdateTargetId = "divContainer";
}

@using (Ajax.BeginForm("BasicDetails","Home",options))
{
<h1>Step 1 : Basic Details</h1>
@Html.LabelFor(m=>m.CustomerID)<br />
@Html.TextBoxFor(m=>m.CustomerID)
@Html.ValidationMessageFor(m=>m.CustomerID)<br />
@Html.LabelFor(m=>m.CompanyName)<br />
@Html.TextBoxFor(m=>m.CompanyName)
@Html.ValidationMessageFor(m=>m.CompanyName)
<br />
<input type="submit" name="nextBtn" value='Next' />
}

The BasicDetails partial view has BasicDetails class as its data model. It creates an instance of AjaxOptions class. The AjaxOptions class is used to supply various configuration settings while using the Ajax helper. In this case we set HttpMethod, InsertionMode and UpdateTargetId properties. The HttpMethod property indicates the form submission method and it is set to POST in this case. The InsertionMode and UpdateTargetId properties are very important for us. The UpdateTargetId property indicates an ID of a DOM element that will be updated with the response returned from the server. In our example UpdateTargetId is divContainer, the <div> element you added inside the Index view. The InsertionMode property governs how the server response should be added to the UpdateTargetId. The InsertionMode has three possible values - InsertAfter, InsertBefore and Replace. In our example we wish to replace the whole content of divContainer with the response (i.e. a form making a wizard step) and we set it to Replece.

Then a <form> is rendered using Ajax.BeginForm() helper method. The BeginForm() method accepts three parameters viz. action method name, controller name and AjaxOptions object. Inside it contains the same markup as the earlier example (see Part 1 for more details).

On the same lines you need to add AddressDetails, ContactDetails and Success partial views. The complete markup of these partial views is given below:

AddressDetails

@model WizardInMVC.Models.AddressDetails

@{
AjaxOptions options = new AjaxOptions();
options.HttpMethod = "POST";
options.InsertionMode = InsertionMode.Replace;
options.UpdateTargetId = "divContainer";
}

@using (Ajax.BeginForm("AddressDetails","Home",options))
{
<h1>Step 2 : Address Details</h1>
@Html.LabelFor(m=>m.Address)<br />
@Html.TextBoxFor(m=>m.Address)
@Html.ValidationMessageFor(m=>m.Address)
<br />
@Html.LabelFor(m=>m.City)<br />
@Html.TextBoxFor(m=>m.City)
@Html.ValidationMessageFor(m=>m.City)
<br />
@Html.LabelFor(m=>m.Country)<br />
@Html.TextBoxFor(m=>m.Country)
@Html.ValidationMessageFor(m=>m.Country)
<br />
@Html.LabelFor(m=>m.PostalCode)<br />
@Html.TextBoxFor(m=>m.PostalCode)
@Html.ValidationMessageFor(m=>m.PostalCode)
<br />
<input type="submit" name="prevBtn" value='Previous' />
<input type="submit" name="nextBtn" value='Next' />
}

ContactDetails

@model WizardInMVC.Models.ContactDetails

@{
AjaxOptions options = new AjaxOptions();
options.HttpMethod = "POST";
options.InsertionMode = InsertionMode.Replace;
options.UpdateTargetId = "divContainer";
}

@using (Ajax.BeginForm("ContactDetails","Home",options))
{
<h1>Step 3 : Contact Details</h1>
@Html.LabelFor(m=>m.ContactName)<br />
@Html.TextBoxFor(m=>m.ContactName)
@Html.ValidationMessageFor(m=>m.ContactName)
<br />
@Html.LabelFor(m=>m.Phone)<br />
@Html.TextBoxFor(m=>m.Phone)
@Html.ValidationMessageFor(m=>m.Phone)
<br />
@Html.LabelFor(m=>m.Fax)<br />
@Html.TextBoxFor(m=>m.Fax)
@Html.ValidationMessageFor(m=>m.Fax)
<br />
<input type="submit" name="prevBtn" value='Previous' />
<input type="submit" name="nextBtn" value='Finish' />
}

Success

<h3>Customer Data Saved Successfully!</h3>
@Html.ActionLink("Add Another Customer","Index","Home")

Notice that all the partial views that use Ajax helper declare their own AjaxOptions object and pass it to BeginForm() method.

Once you create all the partial views modify the action methods to return partial view instead of view. The following code shows the modified BasicDetails() action method:

[HttpPost]
public ActionResult BasicDetails(BasicDetails data, 
string prevBtn, string nextBtn)
{
  if (nextBtn != null)
  {
    if (ModelState.IsValid)
    {
      Customer obj = GetCustomer();
      obj.CustomerID = data.CustomerID;
      obj.CompanyName = data.CompanyName;
      return PartialView("AddressDetails");
    }
  }
  return PartialView();
}

As you can see there is no change in the logic of the action method. The only difference is that instead of View() method it uses PartialView() method. Also change AddressDetails() and ContactDetails() action method to return partial views instead of views. If you run the wizard you will find that even after navigating to different wizard steps the URL in the browser's address bar remains unchanged indicating that Ajax requests are being made to the server rather than full page postback.

image

As you can see even if you are on Step 2 the address bar still points to /home/index.

That's it! In the next part you will learn to develop a wizard that replies more on client side technologies and posts data to the server only at the last step.

READ MORE

At times you want to accept user input in your web applications by presenting them with a wizard driven user interface. A wizard driven user interface allows you to logically divide and group pieces of information so that user can fill them up easily in step-by-step manner. While creating a wizard is easy in ASP.NET Web Forms applications, you need to implement it yourself in ASP.NET MVC applications. There are more than one approaches to creating a wizard in ASP.NET MVC and this article shows one of them. In Part 1 of this article you will develop a wizard that stores its data in ASP.NET Session and the wizard works on traditional form submission.

To develop a wizard in ASP.NET MVC you will use the following approach:

  • Each wizard step will have an action method in the controller and a view.
  • The data accepted in each wizard step is stored in a view model class designed for that step.
  • All the action methods for wizard steps will accept three parameters - step's view model object and two string parameters indicating the Next / Previous status.
  • The action methods mentioned above grab the data from view model object and store it in Session till the final step.
  • The action methods return a view for the next step if Next button is clicked. If Previous button is clicked they return a view for the previous step and they return the same view if there are any model validation errors.
  • Model validations are checked only when Next button is clicked.

Now that you have some idea about the approach we will be taking for developing a wizard, let's create a sample application that illustrates how this approach can be implemented. Begin by creating a new ASP.NET MVC application based on Empty template. Then right click on the Models folder and add an ADO.NET Entity Data Model for the Customers table of Northwind database. The following figure shows the Customer model class in the designer.

image

As you can see the Customer class has several properties. For the sake of creating the wizard let's group them in three steps as follows:

  • Basic Details : Customer ID, CompanyName
  • Address Details : Address, City, Country, PostalCode
  • Contact Details : ContactName, Phone, Fax

Note that a few properties have been omitted from the wizard just to keep things tidy.

You need to create a view model class for each of the wizard steps outlined above. So, you need to add BasicDetails, AddressDetails and ContactDetails classes to the Models folder. These are simple POCOs as shown below:

public class BasicDetails
{
  [Required]
  public string CustomerID { get; set; }
  [Required]
  [StringLength(30)]
  public string CompanyName { get; set; }
}
public class AddressDetails
{
  [Required]
  public string Address { get; set; }
  [Required]
  public string City { get; set; }
  [Required]
  public string Country { get; set; }
  [Required]
  public string PostalCode { get; set; }
}
public class ContactDetails
{
  [Required]
  public string ContactName { get; set; }
  [Required]
  public string Phone { get; set; }
  [Required]
  public string Fax { get; set; }
}

As you can see the three classes namely BasicDetails, AddressDetails and ContactDetails contain only those properties that are relevant to the corresponding wizard step. Additionally, they use data annotations for basic validations. You can add more data annotations as per your requirement. For this example, the above attributes are sufficient.

Now, add HomeController to the Controllers folder. The HomeController contains five methods in all - Index(), GetCustomer(), RemoveCustomer(), BasicDetails(), AddressDetails() and ContactDetails(). The Index() action method and GetCustomers() / RemoveCustomer() helper methods are shown below:

public ActionResult Index()
{
  return View("BasicDetails");
}

private Customer GetCustomer()
{
  if (Session["customer"] == null)
  {
    Session["customer"] = new Customer();
  }
  return (Customer)Session["customer"];
}

private void RemoveCustomer()
{
  Session.Remove("customer");
}

The Index() action method simply returns a view that represents the first step of the wizard - BasicDetails. The GetCustomer() helper method does the job of retrieving a Customer object from Session and return it to the caller. The GetCustomer() method first checks whether a Customer object is stored in the Session or not. If Customer object exists that object is returned, otherwise a new Customer object is created and stored in the Session with a key customer. The RemoveCustomer() method simply removes the customer key and associated Customer object from the Session.

Each wizard step has an action method. Since this example has three wizard steps you need to add three action methods. The BasicDetails() action method is shown below:

[HttpPost]
public ActionResult BasicDetails(BasicDetails data, 
string prevBtn, string nextBtn)
{
  if (nextBtn != null)
  {
    if (ModelState.IsValid)
    {
      Customer obj = GetCustomer();
      obj.CustomerID = data.CustomerID;
      obj.CompanyName = data.CompanyName;
      return View("AddressDetails");
    }
  }
  return View();
}

The BasicDetails() action method accepts three parameters - BasicDetails object, prevBtn and nextBtn. The BasicDetails view posts the form to BasicDetails action method and hence it is marked with [HttpPost] attribute. The three parameters of BasicDetails() action method are passed in by the default model binding process of ASP.NET MVC. The BasicDetails object contains the values of CustomerID and CompanyName as entered on the BasicDetails view. Inside the BasicDetails() action method you need to know which of the two buttons (Next / Previous) was clicked by the user. That's why the two string parameters prevBtn and nextBtn are used. If prevBtn or nextBtn is not null it indicates it indicates that the button was clicked. The BasicDetails view doesn't have Previous button since it is the first step of the wizard. The BasicDetails() still accepts prevBtn parameter for the sake of consistency with other wizard step methods.

Inside, the code checks the ModelState.IsValid property to determine whether the the model contains valid data. If IsValid returns true GetCustomer() is called to retrieve the Customer object from the Session. The CustomerID and CompanyName properties of the Customer object are set with the corresponding properties of BasicDetails object and AddressDetails view is returned. If there are any model validation errors the BasicDetails view will be returned.

The AddressDetails() method works on the similar lines as that of BasicDetails() and is shown below:

[HttpPost]
public ActionResult AddressDetails(AddressDetails data, 
string prevBtn, string nextBtn)
{
  Customer obj = GetCustomer();
  if (prevBtn!=null)
  {
    BasicDetails bd = new BasicDetails();
    bd.CustomerID = obj.CustomerID;
    bd.CompanyName = obj.CompanyName;
    return View("BasicDetails",bd);
  }
  if (nextBtn != null)
  {
    if (ModelState.IsValid)
    {
      obj.Address = data.Address;
      obj.City = data.City;
      obj.Country = data.Country;
      obj.PostalCode = data.PostalCode;
      return View("ContactDetails");
    }
  }
  return View();
}

The AddressDetails view has Previous as well as Next button and posts to AddressDetails() action method. The AddressDetails() method accepts AddressDetails object and prevBtn and nextBtn parameters. If the Previous button was clicked, the code prepares an instance of BasicDetails object and populates its CustomerID and CompanyName properties from the Customer object from Session. The code then returns BasicDetails view with BasicDetails object as its model. This way user is taken to the previous step of the wizard.

Then the code checks whether Next button was clicked. If so, IsValid property of ModelState is checked as before. If there are no model validation errors data from AddressDetails object is stored in the Customer object from the Session. The code then return ContactDetails view.

The ContactDetails() action method does the job of saving the newly added Customer to the database and is shown below:

[HttpPost]
public ActionResult ContactDetails(ContactDetails data, 
string prevBtn, string nextBtn)
{
  Customer obj = GetCustomer();
  if (prevBtn != null)
  {
    AddressDetails ad = new AddressDetails();
    ad.Address = obj.Address;
    ad.City = obj.City;
    ad.Country = obj.Country;
    ad.PostalCode = obj.PostalCode;
    return View("AddressDetails", ad);
  }
  if (nextBtn != null)
  {
    if (ModelState.IsValid)
    {
      obj.ContactName = data.ContactName;
      obj.Phone = data.Phone;
      obj.Fax = data.Fax;
      NorthwindEntities db = new NorthwindEntities();
      db.Customers.Add(obj);
      db.SaveChanges();
      RemoveCustomer();
      return View("Success");
    }
  }
  return View();
}

The ContactDetails view posts to the ContactDetails() action method. The ContactDetails() action method accepts ContactDetails object and prevBtn and nextBtn parameters. As before, it checks whether the Previous button was clicked. If so, a new instance of AddressDetails class is created and is filled with the data from Customer object from the Session. The code then returns AddressView by passing AddressDetails object as its model.

If user clicks on Next button, model is checked for any validation errors using IsValid property. If there are no validation errors properties of Customer object stored in the Session are assigned values of the corresponding ContactDetails object properties. Then a Entity Framework context is instantiated and the Customer object is added to the Customers DbSet. Calling SaveChanges() saves the data to the database. RemoveCustomer() is then called so as to remove the Session object. Finally, Success view is returned from the method.

Next, add four views - BasicDetails, AddressDetails, ContactDetails and Success. The markup of BasicDetails view is shown below:

@model WizardInMVC.Models.BasicDetails

@{
Layout = null;
}

<!DOCTYPE html>

<html>
<head>
<meta name="viewport" content="width=device-width" />
<title>BasicDetails</title>
</head>
<body>
@using (Html.BeginForm("BasicDetails", "Home", FormMethod.Post))
{
<h1>Step 1 : Basic Details</h1>
@Html.LabelFor(m=>m.CustomerID)<br />
@Html.TextBoxFor(m=>m.CustomerID)
@Html.ValidationMessageFor(m=>m.CustomerID)<br />
@Html.LabelFor(m=>m.CompanyName)<br />
@Html.TextBoxFor(m=>m.CompanyName)
@Html.ValidationMessageFor(m=>m.CompanyName)
<br />
<input type="submit" name="nextBtn" value='Next' />
}
</body>
</html>

As you can see BasicDetails view has its model set to BasicDetails class. The view renders a form using BeginForm() Html helper that posts to BasicDetails() action method of HomeController. Form fields for CustomerID and CompanyName are rendered using LabelFor() and TextBoxFor() helpers. The validation errors are emitted using ValidationMessageFor() helper. Note that the name of the Next button must match the corresponding parameter name of the BasicDetails() action method (nextBtn in this case). The following figure shows the BasicDetails view in action:

image

The AddressDetails view is similar to BasicDetails but has Previous button also. The markup of AddressDetails view is shown below:

@model WizardInMVC.Models.AddressDetails

@{
Layout = null;
}

<!DOCTYPE html>

<html>
<head>
<meta name="viewport" content="width=device-width" />
<title>AddressDetails</title>
</head>
<body>
@using (Html.BeginForm("AddressDetails", "Home", FormMethod.Post))
{
<h1>Step 2 : Address Details</h1>
@Html.LabelFor(m=>m.Address)<br />
@Html.TextBoxFor(m=>m.Address)
@Html.ValidationMessageFor(m=>m.Address)
<br />
@Html.LabelFor(m=>m.City)<br />
@Html.TextBoxFor(m=>m.City)
@Html.ValidationMessageFor(m=>m.City)
<br />
@Html.LabelFor(m=>m.Country)<br />
@Html.TextBoxFor(m=>m.Country)
@Html.ValidationMessageFor(m=>m.Country)
<br />
@Html.LabelFor(m=>m.PostalCode)<br />
@Html.TextBoxFor(m=>m.PostalCode)
@Html.ValidationMessageFor(m=>m.PostalCode)
<br />
<input type="submit" name="prevBtn" value='Previous' />
<input type="submit" name="nextBtn" value='Next' />
}
</body>
</html>

AddressDetails view renders fields for Address, City, Country and PostalCode model properties. It also has prevBtn and nextBtn buttons that represent the Previous and Next button respectively. The AddressDetails view posts the form to AddressDetails() action method of HomeController. The following figure shows how AddressDetails view looks like along with validation errors.

image

The final wizard step - ContactDetails - consists of form fields for ContactName, Phone and Fax. It has two buttons Previous and Finish. The markup of ContactDetails view is shown below:

@model WizardInMVC.Models.ContactDetails

@{
Layout = null;
}

<!DOCTYPE html>

<html>
<head>
<meta name="viewport" content="width=device-width" />
<title>ContactDetails</title>
</head>
<body>
@using (Html.BeginForm("ContactDetails", "Home", FormMethod.Post))
{
<h1>Step 3 : Contact Details</h1>
@Html.LabelFor(m=>m.ContactName)<br />
@Html.TextBoxFor(m=>m.ContactName)
@Html.ValidationMessageFor(m=>m.ContactName)
<br />
@Html.LabelFor(m=>m.Phone)<br />
@Html.TextBoxFor(m=>m.Phone)
@Html.ValidationMessageFor(m=>m.Phone)
<br />
@Html.LabelFor(m=>m.Fax)<br />
@Html.TextBoxFor(m=>m.Fax)
@Html.ValidationMessageFor(m=>m.Fax)
<br />
<input type="submit" name="prevBtn" value='Previous' />
<input type="submit" name="nextBtn" value='Finish' />
}
</body>
</html>

As you can see the ContactDetails view posts to ContactDetails() action method of HomeController. Notice that this time nextBtn has a value of Finish since it is the last step of the wizard. The following figure shows ContactDetails in action:

image

Finally, you need to add the Success view that displays a success method and has a link to run the wizard again. The markup of success view is shown below:

@{
Layout = null;
}

<!DOCTYPE html>

<html>
<head>
<meta name="viewport" content="width=device-width" />
<title>Success</title>
</head>
<body>
<h3>Customer Data Saved Successfully!</h3>
@Html.ActionLink("Add Another Customer","Index","Home")
</body>
</html>

As you can see the ActionLink() helper renders an action link that points to the Index action method of HomeController. The following figure shows how the Success view looks like:

image

That's it! You can now run the wizard and test whether it works as expected. In the second part of this article you will learn to create a wizard using Ajax techniques.

READ MORE

Sometimes you need to display DropDownLists in your ASP.NET MVC views such that values in one DropDownList are dependent on the value selected in another DropDownList. The most common example of such a functionality is countries and states DropDownLists where based on a selected country you need to populate the states DropDownList. This article shows how such a cascading DropDownLists can be developed using ASP.NET MVC and jQuery.

Have a look at the following figure that shows two DropDownLists:

image

As you can see the country DropDownList contains a list of countries along with the first entry of "Please select". Upon selecting a country the states DropDownList displays the states belonging to the selected country. When the page is loaded the country DropDownList has "Please select" entry selected and states DropDownList is disabled. Upon selecting a country the states DropDownList is enabled so that state selection can be made. Clicking on the Submit button submits the form to an action method for further processing.

Begin by creating a new ASP.NET MVC4 project based on empty project template. Add Scripts folder to the project and place jQuery library into it. Then add HomeController to the Controllers folder. In a real world scenario you will get countries and states from a database. Here, for the sake of simplicity, we will use some hardcoded country and state values.

Now add the following action method to the HomeController:

public ActionResult Index()
{
  List<string> items = new List<string>();
  items.Add("Please select");
  items.Add("USA");
  items.Add("UK");
  items.Add("India");
  SelectList countries = new SelectList(items);
  ViewData["countries"] = countries;
  return View();
}

The above code shows Index() action method. Inside the Index() method a generic List of strings is created to hold country names and a few countries are added to it. The DropDownList HTML helper of ASP.NET MVC requires its data in the form of SelectList object. Hence a SelectList is created based on the countries List. The SelectList object is passed to the view using countries ViewData variable.

Next, add another action method to the HomeController as shown below:

public JsonResult GetStates(string country)
{
  List<string> states = new List<string>();
  switch (country)
  {
    case "USA":
      states.Add("California");
      states.Add("Florida");
      states.Add("Ohio");
      break;
    case "UK":
      //add UK states here
      break;
    case "India":
      //add India states hete
      break;
  }
  return Json(states);
}

As you can see the GetStates() action method accepts a string parameter named country and returns JsonResult. The GetStates() returns JsonResult because this method will be called using jQuery and states information is to be returned as JSON data. The GetStates() method contains a simple switch statement that adds a few states to states List based on the country value. Finally, the states generic List is returned to the caller using Json() method. The Json() method converts any .NET object into its JSON equivalent.

Now, add Index view to the Views folder and key-in the following markup to it:

<% using(Html.BeginForm("ProcessForm","Home",FormMethod.Post)){ %>
<div>Select Country :</div>
<%= Html.DropDownList("country", ViewData["countries"] as SelectList)%>
<br /><br />
<div>Select States :</div>
<select id="state"></select>
<br /><br />
<input type="submit" value="Submit" />
<%} %>

The Index view consists of a <form> that houses two DropDownLists. The country DropDownList is rendered using DropDownList HTML helper. The first parameter of the DropDownList() helper is the name of the DropDownList and the second parameter is the SelectList object containing DropDownList values. The second DropDownList is added as raw <select> element whose ID is state. Although the <form> is submitted to ProcessForm action this method is not described below as it's not directly related to the functioning of the DropDownLists.

Now, add a <script> reference to jQuery library and also add a <script> block in the head section of the view. Then write the following jQuery code in the <script> block:

$(document).ready(function () {
  $("#state").prop("disabled", true);
  $("#country").change(function () {
    if ($("#country").val() != "Please select") {
       var options = {};
       options.url = "/home/getstates";
       options.type = "POST";
       options.data = JSON.stringify({ country: $("#country").val() });
       options.dataType = "json";
       options.contentType = "application/json";
       options.success = function (states) {
       $("#state").empty();
       for (var i = 0; i < states.length; i++) {
         $("#state").append("<option>" + states[i] + "</option>");
       }
       $("#state").prop("disabled", false);
    };
    options.error = function () { alert("Error retrieving states!"); };
    $.ajax(options);
  }
  else {
    $("#state").empty();
    $("#state").prop("disabled", true);
  }
 });
});

The above code shows the ready() handler. Inside the ready() handler, you first disable the state DropDownList using prop() method. The prop() method sets the disabled DOM property to true and thus disables the state DropDownList. Then the change() method is used to wire change event handler of the country DropDownList. The change event handler will be called whenever selection in the country DropDownList changes. The change handler function first checks value selected in the country DropDownList. If it is other than "Please select", the code creates an options object. The options object holds various settings for the Ajax request to made to the server for retrieving the state values. The url property points to the GetStates() action method. The type property is set to POST indicating that a POST method will be used while making Ajax request. The data property contains JSON representation of the country selected in the country DropDownList. Note that the name of this property has to match with the name of the GetStates() method parameter. The dataType and contentType are set to json and application/json respectively. These properties indicate the data type of the response and request respectively.

The success handler function is called when the Ajax call to GetStates() is successful. The success handler function receives the states returned from the GetStates() method as an array of JSON objects. Inside the success handler you iterate through the states array and add <option> elements to the state DropDownList using append() method. Before appending the newly fetched states the state DropDownList is emptied. Once t he states are populated the disabled property of the states DropDownList is set to true using prop() method.

The error handler function simply displays an error message in an alert dialog.

Finally, an Ajax call is made using $.ajax() method of jQuery and the options object is passed as its parameter.

That's it! Run the application and test whether states are populated as expected.

READ MORE

Some time back during one of my training programs I was asked this question by a beginner in ASP.NET MVC - "Can we have TempBag wrapper for TempData just as we have ViewBag for ViewData?"

Whether such a wrapper is needed or not is a different question but if you wish you can create one using dynamic objects of C# language. Here I am going to show a quick way to wrap TempData into our own TempBag and then using it in the controller and view.

The main class that does the trick is this:

public class MyTempBag : DynamicObject
{
    TempDataDictionary tempData = null;

    public MyTempBag(TempDataDictionary tempdata)
    {
        this.tempData = tempdata;
    }

    public override bool TryGetMember(GetMemberBinder binder, out object result)
    {
        try
        {
            if (tempData.Keys.Where(k => k == binder.Name).Count() > 0)
            {
                result = tempData[binder.Name];
                return true;
            }
            else
            {
                result = "Invalid TempBag Property";
                return false;
            }
        }
        catch
        {
            result = "Invalid TempBag Property";
            return false;
        }
    }

    public override bool TrySetMember(SetMemberBinder binder, object value)
    {
        try
        {
            tempData[binder.Name] = value;
            return true;
        }
        catch
        {
            return false;
        }
    }
}

The System.Dynamic namespaces provides DynamicObject class that can be used to create your own custom dynamic object. In order to create your own dynamic object using DynamicObject class you need to inherit it from DynamicObject and override three methods, viz. TryGetMember, TrySetMember and TryInvokeMember. The first two methods allow you to get and set dynamic properties whereas the last method allows you to invoke method calls on the dynamic object. In our specific case we don't need to implement TryInvokeMember because all we need is an ability to set and get properties.

The MyTempBag inherits from DynamicObject base class and accepts TempDataDictionary as its constructor parameter. The TrySetMember() method sets a TempData property value by using tempData variable. On the same lines, TryGetMember() method retrieves a TempData property value using the tempData variable.

Once you create MyTempBag class you can use it in the controller as follows:

public class HomeController : Controller
{
    dynamic TempBag = null;

    public HomeController()
    {
        TempBag = new MyTempBag(TempData);
    }

    public ActionResult Index()
    {
        TempBag.Message = "This is a test message";
        return View();
    }
}

The above code declares a dynamic variable - TempBag - inside the HomeController class. In the constructor of the HomeController this variable is set to a new instance of MyTempBag. Notice that TempData property of the controller is passed to the constructor of MyTempBag class. Once created the TempBag can be used as shown in the Index() action method.

In order to read the TempBag property inside a view you would write:

@{
    Layout = null;
    dynamic TempBag = new MyTempBag(TempData);
}

...
<html>
...
<body>
    <h3>@TempBag.Message</h3>
</body>
</html>

The view also creates an instance of MyTempBag and then reads the TempData property using TempBag object.

READ MORE

If you used ASP.NET MVC before, you are probably aware that Visual Studio provides ASP.NET MVC Web Application project template to create MVC based applications. There is no option to create MVC Web Sites. In this article I am going to explain how I solved this issue in one of my application.

Recently I migrated one of my ASP.NET 2.0 web sites to MVC 2.0. Though small the web site was having some 20 odd classes in App_Code folder and of course several web forms. While migrating the web site I did some "non-standard" things including:

  • I developed the MVC version as a "web site" and not as a "web application". No Bin folder. No class libraries. No compiled assemblies.
  • I deviated from the default folder structure for Models, Controllers and Views.
  • At some places I needed to communicate between Web Forms and MVC Controllers. The Web Forms posted their data to a Controller and controller then took over.

When Microsoft released ASP.NET 1.0 there was no concept of project-less web sites. Based on developer feedback they included it as a part of ASP.NET 2.0. At the same time special folders such as App_Code were introduced to keep classes needed by the web site. Without going into any comparison or debate between project based and project-less development the fact remains that many web sites developed using ASP.NET 2.0 and 3.5 follow project-less structure. The sample web site I decided to migrate was no exception. Since the web site already had a well defined folder structure and classes I decided to follow "minimum changes" approach to this migration. That is why I decided to stick with "web site" and not "web application". However, if you are developing a brand new web site then more appropriate approach would be to follow the recommended project type (MVC Web Application).

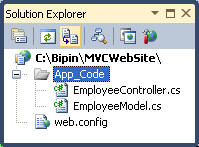
Since I already had many classes in App_Code folder, I decided to put my controllers and models in App_Code folder instead of the default Controllers and Models folder. The existing web site was having web forms arranged in several folders. This arrangement was on the basis of functionality. For example, all blog post related web forms in one folder, all discussion forum related web forms in another folder etc. I was reluctant to change my folder structure just because the default MVC folder structure is something different. So I decided to deviate from the default folder structure. Note, however, that for a new MVC web application (or unless there is some strong reason) it makes sense to follow the default folder structure.

I decided to migrate the sample web site in phases. That means for some time there is going to be a mix of web forms and MVC based models-views-controllers in a single web site. At places I wanted to accept user input on a web form and wanted to pass it to a controller. I know this may sound ugly but you know, real world requirements are always strange than a controlled environment :-)

Now, let's see with a step-by-step example how all of the above can be achieved. Remember, however, that you should carefully evaluate these deviations on case to case basis.

For the rest of the article, I assume that you are already familiar with MVC design pattern and ASP.NET MVC in general.

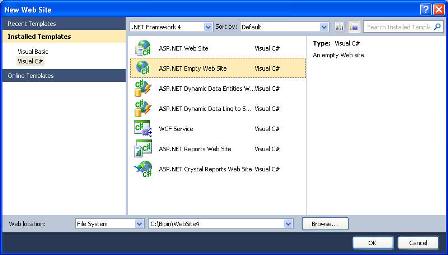
Creating an empty web site

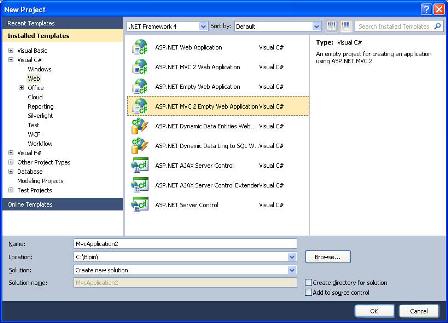
First, create a new ASP.NET Empty Web Site using Visual Studio 2010.

image

Modify the web.config file to have a <compilation> section as follows (you can download the complete code of this article. See "Associated Links" section) :

<compilation debug="false" targetFramework="4.0">
<assemblies>
 <add assembly="System.Web.Abstractions, ... />
 <add assembly="System.Web.Routing, ... />
 <add assembly="System.Web.Mvc, ... />
</assemblies>
</compilation>

This is how ASP.NET will understand about MVC specific namespaces and classes. Also, add <pages> section as shown below:

<pages>
    <namespaces>
        <add namespace="System.Web.Mvc"/>
        <add namespace="System.Web.Mvc.Ajax"/>
        <add namespace="System.Web.Mvc.Html"/>
        <add namespace="System.Web.Routing"/>
    </namespaces>
</pages>

Rather than importing MVC specific namespaces in each and every view we can include them using <pages> section.

Creating model and controller

Next, add App_Code folder and add two classes viz. EmployeeModel and EmployeeController to it.

image

EmployeeModel class is our MVC data model that represents an Employee of a hypothetical employee management system. Code the EmployeeModel class as shown below:

public class EmployeeModel
{
    public EmployeeModel() { }
    public EmployeeModel(int id, string name)
    {
        this.ID = id;
        this.Name = name;
    }
    public int ID { get; set; }
    public string Name { get; set; }
}

The EmployeeModel class simply defines two public properties viz. ID and Name.

The EmployeeController class acts as an MVC controller and has one action - List. The complete code of List action is shown below:

public class EmployeeController: Controller
{
    public ActionResult List()
    {
        List<EmployeeModel> items = new List<EmployeeModel>();
        items.Add(new EmployeeModel(100, "Tom"));
        items.Add(new EmployeeModel(200, "Jerry"));
        ViewData["employeelist"] = items;
        return View("~/EmployeeView.aspx");
    }
}

The controller class EmployeeController simply creates a generic List with a few EmployeeModel objects, stores it in ViewData so that it can be accessed inside a view and then renders the view. Note that since we are not following the default folder structure for views, we must specify the complete path of the view (~/EmployeeView.aspx). We will revisit this issue again a bit later.

Creating a view

Now, add a new single file web form in the root folder and name it as EmployeeView.aspx. Replace the contents of the newly added web form with the following markup:

<%@ Page Language="C#" Inherits="System.Web.Mvc.ViewPage" %>
<html xmlns="http://www.w3.org/1999/xhtml" >
<head>
    <title>Employee View</title>
</head>
<body>
    <table>
        <tr>
        <th>ID</th>
        <th>Name</th>
        </tr>
        <%
        List<EmployeeModel> items = 
        (List<EmployeeModel>)ViewData["employeelist"];
        %>
        <% foreach (var item in items) { %>
        <tr>
        <td><%= item.ID %></td>
        <td><%= item.Name %></td>
        </tr>
        <% } %>
    </table>
</body>
</html>

Notice that the EmployeeView page inherits from System.Web.Mvc.ViewPage base class. Inside we retrieve previously stored employeelist object and display a list of employees in a table.

Defining routes

Next, add a Global Application Class (Global.asax) to the web site and handle Application_Start event as follows:

<%@ Application Language="C#" %>

<script runat="server">
    void Application_Start(object sender, EventArgs e) 
    {
        RouteTable.Routes.IgnoreRoute("{resource}.axd/{*pathInfo}");
        RouteTable.Routes.MapRoute(
         "Default", 
         "{controller}/{action}/{id}",
         new {
          controller = "EmployeeController", 
          action = "List", 
          id = UrlParameter.Optional 
             }
        );
    }
</script>

Notice how we are registering default route in the Application_Start event handler. This way ASP.NET will understand your requests correctly and pass them to appropriate controllers.

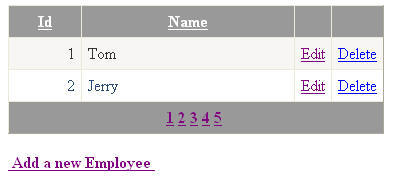
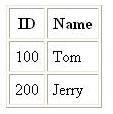
That's it! Now run the web site and give a hit to employee/list. A sample URL will be:

http://localhost:1234/MVCWebSite/employee/list

and you get to see a table with employees listed (see below).

image

Creating strongly typed views

So far so good. Now, let's try to use a strongly typed view. A strongly typed view inherits from System.Web.Mvc.ViewPage<IEnumerable<model_class>> instead of just System.Web.Mvc.ViewPage. Modify @page directive of the EmployeeView.aspx to reflect this change. Build the web site and you will get the following error:

Could not load type 'System.Web.Mvc.ViewPage<IEnumerable<EmployeeModel>>'.

To correct this error modify <pages> section from web.config as shown below (see download for full listing):

<pages pageParserFilterType="System.Web.Mvc.ViewTypeParserFilter, ..."
        pageBaseType="System.Web.Mvc.ViewPage, System.Web.Mvc, ..."
        userControlBaseType="System.Web.Mvc.ViewUserControl, ...">

Here, we specify the default base class for web pages using pageBaseType. Similarly default base class for view user controls (though we are not using any in this example) is specified using userControlBaseType. The pageParserFilterType attribute specifies a parser filter class that is called by the page compilation process before the parsing step to accommodate changes made to the source code at run time.

Now the web site will build without any compilation errors. The next step is to modify the controller and view. Create one more action in the EmployeeController as shown below:

public ActionResult ListStronglyTyped()
{
 List<EmployeeModel> items = new List<EmployeeModel>();
 items.Add(new EmployeeModel(100, "Tom"));
 items.Add(new EmployeeModel(200, "Jerry"));
 return View("~/EmployeeView.aspx",items);
}

Here, we pass the model (items) to the view as a second parameter instead of passing it via ViewData. Finally, modify EmployeeView to use strongly typed model as shown below:

<%@ Page Language="C#" 
Inherits="System.Web.Mvc.ViewPage<IEnumerable<EmployeeModel>>" %>
<html xmlns="http://www.w3.org/1999/xhtml" >
<head>
    <title>Employee View</title>
</head>
<body>
    <table border="1" cellpadding="5">
        <tr>
        <th>ID</th>
        <th>Name</th>
        </tr>
        <% foreach (var item in Model) { %>
        <tr>
        <td><%= item.ID %></td>
        <td><%= item.Name %></td>
        </tr>
        <% } %>
    </table>
</body>
</html>

Notice the code marked in bold letters. The page now inherits from a ViewPage based on a strongly typed model. The model is then accessed in the foreach loop.

Using default folder structure for views

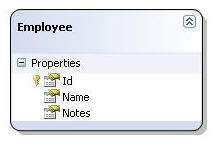
As I mentioned earlier, we need to use full path to the view file since we are deviating from the default folder structure. If you wish you can make use of the default folder structure just for view files (and keep controllers and models inside App_Code as before). See the following folder structure:

image

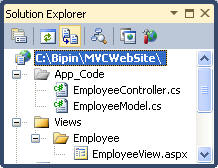
The EmployeeView now resides under Views\Employees folder. This is the default folder structure for views in MVC Web Application project. You can now add another controller named EmployeeView as follows:

public ActionResult EmployeeView()
{
 List<EmployeeModel> items = new List<EmployeeModel>();
 items.Add(new EmployeeModel(100, "Tom"));
 items.Add(new EmployeeModel(200, "Jerry"));
 return View(items);
}

As you can see we no longer specify ~ path for the view. Note, however, that for this to work your controller name and view name must be the same in addition to following the default folder structure.

Posting a Web Form to a controller action

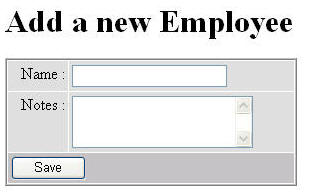
Though rare you may require to post a web form to a controller. This can be done using PostBackUrl property of Button web control. You will design web form as you normally do and then set PostBackUrl property of the form's submit button to a controller action.

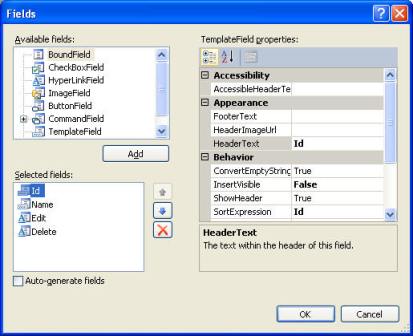
Design a web form as shown below and name it as PostToController.aspx. Change ID of the textboxes to name1 and name2 respectively.

image

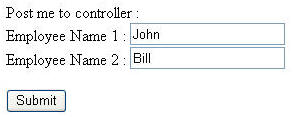
Set the PostBackUrl property of the Submit button to employee/listpost and then add the listpost controller action as shown below:

[AcceptVerbs(HttpVerbs.Post)]
public ActionResult ListPost(FormCollection collection)
{
 List<EmployeeModel> items = new List<EmployeeModel>();
 items.Add(new EmployeeModel(100, collection["name1"]));
 items.Add(new EmployeeModel(200, collection["name2"]));
 return View("~/EmployeeView.aspx", items);
}

Notice how we access textbox values using the FormCollection parameter. The EmployeeView then displays the employee listing as before.

Creating a Visual Studio Template

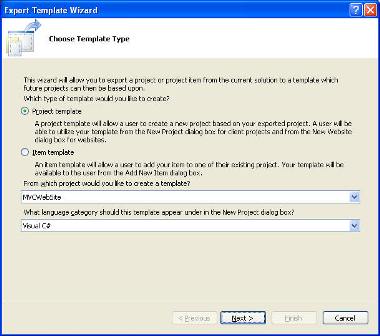
If you find yourself using MVC web sites again and again then it would be better to create project template for them. You can do so by selecting File > Export Template and follow the wizard to create a Visual Studio Project template.

image

Once created you can create new web sites based on this template.

image

The complete code download of what we discussed in this article is available in the "Associated Links" section. Open the web site in VS2010 and run the Default.aspx. It has links to all the controller actions we discussed above. Just select the required link and see the example in action.

That's it! Keep coding!!

READ MORE

ASP.NET MVC makes use of MVC design pattern and the result is far different at code level. ASP.NET MVC divides the entire processing logic into three distinct parts namely model, view and controller. In the process views (that represent UI under MVC architecture) needed to sacrifice three important features of web forms viz. Postbacks, ViewState and rich event model. Let's quickly see why this sacrifice is necessary. Remember that in the following sections when I say "web form" I mean the original web form model and when I say "MVC web page" I mean MVC based web forms, though technically they belong to the same inheritance chain.

  • In a web form controls such as Button and LinkButton always submit a form (POST request) to itself. That means under default scheme post backs originating from a web form are handled in the same web form. This contradicts the MVC pattern where a view always talks with a controller and not to itself.
  • First thing to note is that server controls were never designed keeping MVC architecture in mind. They were always intended to be used with "forms based" programming mode. The clever tricks played by web form framework and server controls such as ViewState and events though quite useful in "forms based" model they are of a very little use in MVC architecture. Since a view never submits data to itself (rather it sends it to a controller) ViewState has no role to play in MVC architecture.
  • Web form events can be either "GET" events or "POST" events. Because of the points mentioned above "POST" events of server controls (such as Click event of a Button, SelectedIndexChanged event of GridView and so on) are of little use in MVC.

Considering the above points MVC doesn't offer any direct equivalent of server controls. Under MVC scheme views make use of raw HTML, non-visual helper classes (HTML helpers) and of course third party controls.

Purely for the sake of rough analogy web forms and MVC web pages can be compared like this - The data objects such as DataSets, entities, generic lists etc. go as model under MVC, the markup that renders some UI (typically .aspx files and .ascx files) goes in views and the code that usually goes in event handlers go in controllers.

If you are thinking that the discussion so far is contradicting with the title of the article wait. Though server controls are not a recommended choice under ASP.NET MVC there are situations where you may need to use server controls. Some of these situations include:

  • You are working with server controls for over eight long years. You don't want to dump them immediately just because you wish to use ASP.NET MVC.
  • You are migrating existing ASP.NET web forms based website onto ASP.NET MVC. You simply want to re-use your efforts as much as possible.
  • Your client has asked you to develop a prototype using ASP.NET MVC. You want to do it quickly. Your team is not yet fully acclimatized with ASP.NET MVC.
  • You want to familiarize yourself with MVC concepts first rather than focusing too much on raw HTML and HTML helpers. Over a period of time you plan to master those pieces.
  • You are still evaluating third party MVC controls / helpers. Unless you are convinced that a vendor is meeting your expectations you want to continue using existing controls.

Merely using server controls on an MVC web pages doesn't break MVC architecture in any way. Improper use of the server controls, however, can break the architecture and make your views difficult to understand. When you wish to use server controls in ASP.NET MVC you should keep in mind the following points:

  • Server controls should always post data to a controller. You can use PostbackUrl property of Button and LinkButton controls to achieve this.
  • Server controls and the web forms should never use ViewState. The view will get its data from ViewData collection and send its data to a controller via POST request.
  • MVC web pages can make use of "GET" events (Page_Load for example) if required but they should never make use of "POST" events (SelectedIndexChanged event of GridView for example).

Example Scenario

To illustrate how we can use ASP.NET server controls in ASP.NET MVC web pages we will develop a sample application. In this application we will make use of GridView and DetailsView control. The application adds, edits, deletes and selects records from Employees table. Later we will also add sorting and paging capabilities to our grid.

Just to give you an idea of what we will be building see the following screen shots:

image

Figure 1

We present a list of existing employees to the user. Clicking on "Add a new Employees" link takes you to another page where a new employee record can be added.

image

Figure 2

Clicking on Edit will take the user to a data entry page where the selected employee record can be edited.

image

Figure 3

Notice that edit and add pages make use of DetailsView control and the listing page makes use of GridView control.

Create an MVC Web Application

Begin by creating a new MVC Web Application in Visual Studio. Select ASP.NET MVC 2 Empty Web Application template as shown below:

image

Creating a Model

Add a new SQL Server database to the App_Data folder and create a table named Employees. The Employees table contains three columns viz. Id, Name and Notes. Id is an identity column. Add a few sample records in the Employee table for testing purpose.

image

Then add a new LINQ to SQL Classes (.dbml) file to Models folder. Drag and drop Employees table onto its design surface from the Server Explorer. Doing so will create a LINQ to SQL class (Employee) for Employees table. This class will form the model for our MVC pages.

image

Creating a Controller

Now add a new class named EmployeeController in the Controllers folder. The EmployeeController class will have the following action methods:

  • Index : Fetches all the records from Employees table and renders Index view.
  • ShowInsertView : Shows insert view with a DetailsView control in insert mode.
  • Insert : Picks up data submitted by insert view and insert it into the Employees table.
  • ShowUpdateView : Shows update view with a DetailsView control in edit mode.
  • Update : Picks up data submitted by update view and saves it into the Employees table.
  • Delete : Deletes a record from Employees table.

These action methods are discussed next.

public ActionResult Index()
{
    DataClasses1DataContext db = new DataClasses1DataContext();
    IQueryable<Employee> emplist = from rows in db.Employees
                                   select rows;
    ViewData["emplist"] = emplist;
    return View();
}

The Index() action method creates an instance of data context class and then executes a LINQ query to fetch all the rows from Employees table. The returned rows are stored in a ViewData collection so that they can be accessed in the view. Index view is then rendered.

public ActionResult ShowInsertView()
{
    return View();
}

[HttpPost]
public ActionResult Insert(FormCollection collection)
{
    DataClasses1DataContext db = new DataClasses1DataContext();
    Employee item = new Employee();
    item.Name = collection["DetailsView1$txtName"];
    item.Notes = collection["DetailsView1$txtNotes"];
    db.Employees.InsertOnSubmit(item);
    db.SubmitChanges();
    return RedirectToAction("Index");
}

The ShowInsertView() action method simply renders ShowInsertView view. Since we are inserting a new record no data needs to be passed to the view.

Notice the Insert() action method carefully. It is marked with [HttpPost] attribute indicating that only POST requests can invoke this action method. The Insert() method receives the form data as a FormCollection parameter. FormCollection parameter is essentially a key-value collection. See how we retrieve the values entered in the DetailsView control of the view. The DetailsView control will have two textboxes with IDs txtName and txtNotes respectively. As you are probably aware, SP.NET automatically prefixes the IDs of the constituent controls with the parent control ID. So txtName becomes DetailsView1$txtName when the view data is posted. A new Employee object is constructed and inserted in the Employees table. The index view is again rendered so that the user goes back to the employee listing.

public ActionResult ShowUpdateView(int id)
{
    DataClasses1DataContext db=new DataClasses1DataContext();
    var temp = from item in db.Employees
                where item.Id == id
                select item;
    ViewData["emplist"] = temp.ToList();
    return View();
}

[HttpPost]
public ActionResult Update(int id,FormCollection collection)
{
    DataClasses1DataContext db = new DataClasses1DataContext();
    var temp = from item in db.Employees
                where item.Id == id
                select item;
    temp.First().Name=collection["DetailsView1$txtName"];
    temp.First().Notes = collection["DetailsView1$txtNotes"];
    db.SubmitChanges();
    return RedirectToAction("Index");
}

The ShowUpdateView() action method fetches an Employee record whose ID matches with the supplied ID. The ShowUpdateView() method receives an ID from employee listing page (see the first figure). The Employee collection is stored in a ViewData variable and ShowUpdateView view is rendered. Even though the LINQ query is returning a single object we still need to pass it as a generic List beause DetailsView control expects a list or array for the sake of data binding.

The Update() action method is similar to Insert() method we discussed earlier. The only difference is that it modifies an existing record instead of adding a new one. The Id of the employee to be updated is supplied as Id parameter from the view (see the first figure). After the update operation the user is again taken to the employee listing.

public ActionResult Delete(int id)
{
    DataClasses1DataContext db = new DataClasses1DataContext();
    var temp = from item in db.Employees
                where item.Id == id
                select item;
    db.Employees.DeleteOnSubmit(temp.First());
    db.SubmitChanges();
    return RedirectToAction("Index");
}

The Delete() action method simply deletes a specified employee from the Employees table and takes the user back to the employee listing. Notice that unlike Insert() and Update() action methods Delete() method is not marked with [HttpPost] attribute because we are not posting anything to it. The Id parameter will be supplied from the Index view as a part of GET request.

Creating Views

In all we need to create three views viz. Index, ShowInsertView and ShowUpdateView. These views can be seen in the figures shown above.

To create the Index view, add a new View in the Views folder. Drag and drop a GridView control on the view design surface. Add two TemplateField columns and two HyperLink columns to the GridView and configure them as follows:

image

The Id and Name template fields are bound with Id and Name columns of the Employees table. The markup after binding the Id template field is shown below.

<asp:TemplateField HeaderText="Id" InsertVisible="False" 
     SortExpression="Id">
    <ItemTemplate>
        <asp:Label ID="Label1" runat="server" 
        Text='<%# Bind("Id") %>'></asp:Label>
    </ItemTemplate>
</asp:TemplateField>

The Edit and Delete HyperLink columns essentially display a hyperlink that points to the ShowUpdateView and Delete action methods respectively.

<asp:HyperLinkField DataNavigateUrlFields="Id" 
    DataNavigateUrlFormatString="~/Employee/ShowUpdateView/{0}" 
    Text="Edit" >
</asp:HyperLinkField>
<asp:HyperLinkField DataNavigateUrlFields="Id" 
    DataNavigateUrlFormatString="~/Employee/Delete/{0}" 
    Text="Delete" >
</asp:HyperLinkField>

Notice how the DataNavigateUrlField and DataNavigateUrlFormatString properties are used. At run time in place of {0} the employee Id for that row will be substituted. Recollect that the ShowUpdateView() and Delete() actions methods accept employee Id as a parameter.

Now place a HyperLink control below the GridView we just configured. Set its Text and NavigateUrl properties to "Add a new Employee" and ~/Employee/ShowInsertView respectively.

Final task is to bind the GridView with the data we pass through ViewData variable. We do this in the Page_Load event as shown below:

protected void Page_Load(object sender, EventArgs e)
{
    GridView1.DataSource = ViewData["emplist"];
    GridView1.DataBind();
}

This complete the Index view. We will revisit Index view when we implement sorting and paging features to the GridView in Part 2 of this article.

Now add another view in the Views folder and name it as ShowInsertView.aspx. Drag and drop a DetailsView control on it and set its DefaultMode property to Insert. This way when the view is rendered the DetailsView will be ready to accept a new entry. The DetailsView will have two template fields for Name and Notes columns respectively (though we won't bind them with anything as such). Since employee ID is identity column we need not include it in the DetailsView. Design the InsertItemTemplate of both the template fields to include textboxes. Then add a Button control to the footer template of the DetailsView and set its Text and PostbackUrl properties to Save and ~/Employee/Insert respectively. This way clicking the Save button will post the form to Insert() action method we coded earlier. Your DetailsView should resemble Figure 2. The markup of DetailsView is given below:

<asp:DetailsView ID="DetailsView1" runat="server" DefaultMode="Insert">
 <Fields>
     <asp:TemplateField HeaderText="Name :">
         <InsertItemTemplate>
           <asp:TextBox ID="txtName" runat="server" 
             Text='<%# Bind("Name") %>' />
         </InsertItemTemplate>
     </asp:TemplateField>
     <asp:TemplateField HeaderText="Notes :">
        <InsertItemTemplate>
           <asp:TextBox ID="txtNotes" runat="server" 
             Text='<%# Bind("Notes") %>' Rows="3" 
             TextMode="MultiLine"></asp:TextBox>
        </InsertItemTemplate>
    </asp:TemplateField>
    </Fields>
    <FooterTemplate>
     <asp:Button ID="Button1" runat="server" 
       PostBackUrl="~/Employee/Insert" 
       Text="Save" Width="75px" />
    </FooterTemplate>
</asp:DetailsView>

Similarly, add a view named ShowUpdateView.aspx and design its DetailsView as shown in Figure 3. This time the DefaultMode property of the DetailsView should be set to Edit. The DetailsView EditItemTemplate has three template fields viz. Id, Name and Notes. The Id column is not editable. The markup of the DetailsView is given below:

<asp:DetailsView ID="DetailsView1" runat="server" DefaultMode="Edit">
    <Fields>
        <asp:TemplateField HeaderText="Id :">
            <EditItemTemplate>
                <asp:Label ID="Label1" runat="server" 
                 Text='<%# Bind("Id") %>'></asp:Label>
            </EditItemTemplate>
        </asp:TemplateField>
        <asp:TemplateField HeaderText="Name :">
            <EditItemTemplate>
                <asp:TextBox ID="txtName" runat="server" 
                  Text='<%# Bind("Name") %>'></asp:TextBox>
            </EditItemTemplate>
        </asp:TemplateField>
        <asp:TemplateField HeaderText="Notes :">
            <EditItemTemplate>
                <asp:TextBox ID="txtNotes" runat="server" 
                  Text='<%# Bind("Notes") %>' Rows="3" 
                  TextMode="MultiLine"></asp:TextBox>
            </EditItemTemplate>
        </asp:TemplateField>
    </Fields>
    <FooterTemplate>
        <asp:Button ID="Button1" runat="server" 
            PostBackUrl='<%# Eval("Id","~/Employee/Update/{0}") %>' 
            Text="Save" Width="75px" />
    </FooterTemplate>
</asp:DetailsView>

Notice the PostbackUrl property of  the Save button carefully. It is set to ~/Employee/Update/{0}. The Update() action needs employee Id as a parameter. The employee Id is passed via Id property of the model. The DetailsView is finally bound with the model in the Page_Load event as shown below:

protected void Page_Load(object sender, EventArgs e)
{
    object emplist = ViewData["emplist"];
    DetailsView1.DataSource = emplist;
    DetailsView1.DataBind();
}

Recollect that we are saving employee object to be edited in a ViewData variable in the ShowUpdateView() action method. The same object is bound with the DetailsView.

That's it! Run the web application and navigate to Index view (your URL should be something like http://localhost:XXXX/Employee/index where XXXX is the port number assigned by development web server). Try adding new employee entries as well as edit existing records.

Disabling ViewState completely

Though our application is functioning as expected, it has one flaw. The individual views still maintain ViewState of server controls (GridView, DetailsView etc.). In MVC applications the ViewState is of little use and if not disabled unnecessarily makes the view heavier. One quick way to rectify the problem is to set EnableViewState property of the page to false. This way the ViewState will be reduced to a small value.

<input type="hidden" name="__VIEWSTATE" id="__VIEWSTATE" 
value="Ly91biiCAQJThIvtDDyFLvl0HWiJ1O/Egm9fLkQEf72LVCkYT/EI
C88uk3xc+Ku3pXDLM6jhDLA7sY6nOh5Hj1Fg93VSiGZHl5/T5O4U69A=" />

Though we have disabled the ViewState using EnableViewState property the control state is still maintained and cannot be disabled as such. If you wish to get rid of this small chunk of ViewState also then add the following overridden methods in the view page server side code.

protected override void SavePageStateToPersistenceMedium(object state)
{
}

protected override object LoadPageStateFromPersistenceMedium()
{
 return null;
}

The SavePageStateToPersistenceMedium() is intended t save ViewState and ControlState information of the page. We override it with an empty implementation so that no ViewState or ControlState is saved. The LoadPageStateFromPersistenceMedium() simply returns null. This way the ViewState hidden field becomes:

<input type="hidden" name="__VIEWSTATE" 
id="__VIEWSTATE" 
value="" />
READ MORE
...