top button
Flag Notify
    Connect to us
      Site Registration

Site Registration

How to Working With a ScrollViewer Control in a WPF Application?

+3 votes
489 views

The ScrollViewer is an object that represents a scrollable area that contains other visible controls, it could be found within the System.Windows.Controls.  At the contrast of a ScrollBar object, the ScrollViewer is a WPF new feature. So let's discover its principal characteristics through this article.

Imagine that you host an image in your application in such way that its dimensions are bigger than the window. You can make use of a ScrollViewer to enable see the entire image without having the obligation to change the dimension of the given window. Try to host a big image within a given window. Say that the image height and width are both 1000 pixels.

<Window x:Class="myWpfApplication.Window1"

    xmlns="http://schemas.microsoft.com/winfx/2006/xaml/presentation"

    xmlns:x="http://schemas.microsoft.com/winfx/2006/xaml"

    xmlns:wf="clr-namespace:System.Windows.Forms.Integration;assembly=WindowsFormsIntegration"

    Title="Window1" Height="300" Width="300" xmlns:my="clr-namespace:System.Windows.Forms.Integration;assembly=WindowsFormsIntegration"

      Loaded="Window_Loaded" >

            <Image Source="C:\myWpfApplication\myWpfApplication\image.BMP" Width="1000"Height="1000"></Image>


The result will be:

ScrollViewer1.gif
 
Figure 1

And even you expand the window. You couldn't get the entire image at the screen level. To prevent this problem you may use the ScrollViewer object as follow:

Replace the above XAML code by this one.


<Window x:Class="myWpfApplication.Window1"

    xmlns="http://schemas.microsoft.com/winfx/2006/xaml/presentation"

    xmlns:x="http://schemas.microsoft.com/winfx/2006/xaml"

    xmlns:wf="clr-namespace:System.Windows.Forms.Integration;assembly=WindowsFormsIntegration"

    Title="Window1" Height="300" Width="300" xmlns:my="clr-namespace:System.Windows.Forms.Integration;assembly=WindowsFormsIntegration"

      Loaded="Window_Loaded" >

    <Grid>

    <ScrollViewer VerticalScrollBarVisibility="Visible"

                   HorizontalScrollBarVisibility="Visible">

        <Image Source="C:\myWpfApplication\myWpfApplication\image.BMP" Width="1000"Height="1000"></Image>

    </ScrollViewer></Grid>

</Window>


And the result will be

ScrollViewer2.gif
 
Figure  2

Then it is possible to scroll the image.

posted Jan 5, 2016 by Jdk

  Promote This Article
Facebook Share Button Twitter Share Button LinkedIn Share Button


Related Articles

Introduction:

  1. Open Visual Studio 2008 and create a new project, a WPF application and name it myWpfApplication


    Figure1
     
  2. The new WPF form called Window1 appears in addition to the XAML code editor


    Figure 2
     
  3. Expand the project node in the solution explorer and right click the references menu item, then click add reference context menu item.


    Figure 3
     
  4. Select the .Net tab then add WindowsFormsIntegration assembly reference to the solution. 


    Figure 4
     
  5. Then add another reference, it will be  our well known Windows forms assembly


    Figure 5
     
  6. Now, as the references are added, switch to the C# code by right clicking the Window1 and clicking the view code context menu item

    Do add the two namespaces 

    using System.Windows.Forms;
    using System.Windows.Forms.Integration;
     
  7. Expand the toolbox and go to the bottom, you find there an element witch called WindowsFormHost
     
  8. Drag and drop it into the WPF window or simply add this couple of lines of XAML code into the XAML editor
     

    <my:WindowsFormsHost Margin="18,20,38,73" Name="windowsFormsHost1">


    </my:WindowsFormsHost>
     
  9. Take a look on the XAML code, it will look like this
     

    <Window x:Class="myWpfApplication.Window1"

        xmlns="http://schemas.microsoft.com/winfx/2006/xaml/presentation"

        xmlns:x="http://schemas.microsoft.com/winfx/2006/xaml"

        xmlns:wf="clr-namespace:System.Windows.Forms.Integration;assembly=WindowsFormsIntegration"

        Title="Window1" Height="300" Width="300" xmlns:my="clr-namespace:System.Windows.Forms.Integration;assembly=WindowsFormsIntegration"

             Loaded="Window_Loaded">

        <Grid>

            <WindowsFormsHost Height="100" Margin="39,27,39,0" Name="windowsFormsHost1"   VerticalAlignment="Top" >


            </WindowsFormsHost>


        </Grid>

    </Window>
     
  10. Within the WindowsFormHost tag, add those lines:
     

    <WindowsFormsHost Height="100" Margin="39,27,39,0" Name="windowsFormsHost1"VerticalAlignment="Top" >

      <wf:ElementHost BackColor="Beige">

        <Button Background="Bisque" Margin="39,27,39,27" Click="Button_Click">Click me  please!</Button>

      </wf:ElementHost>

    </WindowsFormsHost>
     
  11. Now, switch to the code behind zone, you find there the button click event handler  related stub, then implement it as follows
     

    private void Button_Click(object sender, RoutedEventArgs e)

    {

      System.Windows.Forms.MessageBox.Show("My parent is the hosted window form","Message");

    }
     
  12. Do run the application and observe

    wpf6.gif

    Figure 6
READ MORE

In a previous article, we discovered how to define and configure a Grid control using XAML. In this second article, I'll demonstrate how to do the same task using the code behind, I mean using C#.

Walkthrough:

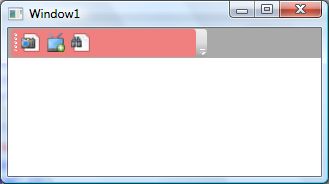
1. To do so, create a new WPF project

Figure1

2. Right click on the window and select view code, then replace the existing code by this one

public partial class Window1 : Window

    {

        public Window1() {

            InitializeComponent();

            InitializeGrid();

        }

        private void InitializeGrid() {

            Grid oGrid = new Grid();

            oGrid.Width = 200;

            oGrid.Height = 200;

            oGrid.Background = System.Windows.Media.Brushes.Bisque;

            //Set the rows

            RowDefinition Row0 = new RowDefinition();

            RowDefinition Row1 = new RowDefinition();

            RowDefinition Row2 = new RowDefinition();

            //Set the columns

            ColumnDefinition Col0 = new ColumnDefinition();

            ColumnDefinition Col1 = new ColumnDefinition();

            ColumnDefinition Col2 = new ColumnDefinition();          

            //Add the columns and rows to the Grid control

            oGrid.ColumnDefinitions.Add(Col0);

            oGrid.ColumnDefinitions.Add(Col1);

            oGrid.ColumnDefinitions.Add(Col2);

            oGrid.RowDefinitions.Add(Row0);

            oGrid.RowDefinitions.Add(Row1);

            oGrid.RowDefinitions.Add(Row2);

            //Show the grid lines

            oGrid.ShowGridLines = true;

            this.Content = oGrid;

        }
    }


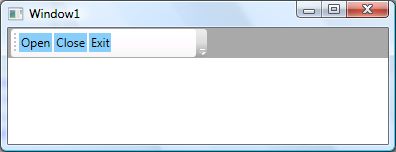
3. Run the project and observe, a window like this will appear, as you see the grid is visible now


The Star definition

it means that the related size could be expressed as weighted proportion of available space, for example, if a size of a given first row is double of a second given row size, then the first one will receive two units of the entire grid size, meanwhile, the second one will have one unit as size. Rows and columns sizes are expressed by this symbol * that represents a unit of size. To do so using C# code, use this code snippet. It should be copied and pasted within the scope of InitializeGrid().

private void InitializeGrid(){

            Grid oGrid = new Grid();

            oGrid.Width = 200;

            oGrid.Height = 200;

            oGrid.Background = System.Windows.Media.Brushes.Bisque;

            //Set the rows

            RowDefinition Row0 = new RowDefinition();

            RowDefinition Row1 = new RowDefinition();

            RowDefinition Row2 = new RowDefinition();

            //Set the columns

            /* This code add the star option to resize the

            First row as double of the rest of columns*/

            ColumnDefinition Col0 = new ColumnDefinition();

            Col0.Width = new GridLength(2, GridUnitType.Star);


            ColumnDefinition Col1 = new ColumnDefinition();

            ColumnDefinition Col2 = new ColumnDefinition();          

            //Add the columns and rows to the Grid control

            oGrid.ColumnDefinitions.Add(Col0);

            oGrid.ColumnDefinitions.Add(Col1);

            oGrid.ColumnDefinitions.Add(Col2);

            oGrid.RowDefinitions.Add(Row0);

            oGrid.RowDefinitions.Add(Row1);

            oGrid.RowDefinitions.Add(Row2);

            //Show the grid lines

            oGrid.ShowGridLines = true;

            this.Content = oGrid;

        }

Run the project and the result will be


The Pixel definition

It means that the size is defined in terms of pixels such as in the ASP applications. This bellow C# code illustrates how to define a dimension of a given column or row based on pixels.

private void InitializeGrid() {

            Grid oGrid = new Grid();

            oGrid.Width = 200;

            oGrid.Height = 200;

            oGrid.Background = System.Windows.Media.Brushes.Bisque;

            //Set the rows

            RowDefinition Row0 = new RowDefinition();

            RowDefinition Row1 = new RowDefinition();

            RowDefinition Row2 = new RowDefinition();

            //Set the columns

            /* This code add the pixel option to resize the

            First row as double of the rest of columns*/

            ColumnDefinition Col0 = new ColumnDefinition();

            Col0.Width = new GridLength(50, GridUnitType.Pixel);    

            ColumnDefinition Col1 = new ColumnDefinition();

            ColumnDefinition Col2 = new ColumnDefinition();          

            //Add the columns and rows to the Grid control

            oGrid.ColumnDefinitions.Add(Col0);

            oGrid.ColumnDefinitions.Add(Col1);

            oGrid.ColumnDefinitions.Add(Col2);

            oGrid.RowDefinitions.Add(Row0);

            oGrid.RowDefinitions.Add(Row1);

            oGrid.RowDefinitions.Add(Row2);

            //Show the grid lines

            oGrid.ShowGridLines = true;

            this.Content = oGrid;

        }

READ MORE

In this article, I will try to make a representation of the Grid object witch is directly derived from the Panel abstract class and we can say that is a flexible area that contains rows and columns, it plays a role of container in a given WPF window. The grid could be found in the PresentationFramework assembly. The grid control could be used to create a complex layout that gives to the application an attractive and ergonomic look. So let's discover how to configure it using XAML in this part and in second part I will illustrate how to perform the same task using the code behind, I mean C#.

At first look, when a new WPF application is defined, we have the impression that there is not controls but the window one, even if the "<Grid></Grid>" tags are presents, and the first question that one can ask is where are the grid lines if it is a grid really? 


Figure 1

I tell you ok try this code:

<Grid ShowGridLines="True">

        <Grid.RowDefinitions>

            <RowDefinition></RowDefinition>

            <RowDefinition></RowDefinition>

            <RowDefinition></RowDefinition>

        </Grid.RowDefinitions>

        <Grid.ColumnDefinitions>

            <ColumnDefinition></ColumnDefinition>

            <ColumnDefinition></ColumnDefinition>

            <ColumnDefinition></ColumnDefinition>

        </Grid.ColumnDefinitions>       

    </Grid>

I use the <Grid.RowDefinitions> to define a collection of rows and a<Grid.ColumnDefinitions> to define columns collection. In the other hand I use<RowDefinition> to define a row element within the grid control and <ColumnDefinition> to define a column element, and then I set ShowGridLines property to true, it is very important in order to render columns and rows visible. The result will be as follows:

Figure 2

The columns and rows definition mode could be, namely star, Auto or Pixel.

The Star definition

It means that the related size could be expressed as weighted proportion of available space, for example if a size of a given first row is double of a second given row size, then the first one will receive two units of the entire grid size, meanwhile, the second one will have one unit as size. Rows and columns sizes are expressed by this symbol * that represents a unit of size. The XAML code sample illustrates how to define a size based on star definition.

<Grid ShowGridLines="True" >

        <Grid.RowDefinitions>

            <RowDefinition></RowDefinition>

            <RowDefinition></RowDefinition>

            <RowDefinition></RowDefinition>

        </Grid.RowDefinitions>

        <Grid.ColumnDefinitions>

            <ColumnDefinition Width="2*"></ColumnDefinition>

            <ColumnDefinition></ColumnDefinition>

            <ColumnDefinition></ColumnDefinition>

        </Grid.ColumnDefinitions>       

    </Grid>

The result of the above code is:

Figure 3

The above code sets the first column width as double of the reset of the columns.

The Pixel definition

It means that the size is defined in terms of pixels such as in the ASP applications. This bellow code illustrate how to define a dimension of a given column or row based on pixels

<Grid ShowGridLines="True" >

        <Grid.RowDefinitions>

            <RowDefinition></RowDefinition>

            <RowDefinition></RowDefinition>

            <RowDefinition></RowDefinition>

        </Grid.RowDefinitions>

        <Grid.ColumnDefinitions>

            <ColumnDefinition Width="100px"></ColumnDefinition>

            <ColumnDefinition></ColumnDefinition>

            <ColumnDefinition></ColumnDefinition>

        </Grid.ColumnDefinitions>       

    </Grid>

And this is a presentation of what could be if such alternative is used

Figure 4

The Auto definition

It means that the size is proportional to the content object size. Once the column or the row width or height is set to auto and there is no object contained with it. It disappears from the grid but it doesn't mean that it is deleted. If you add controls within, it takes exactly the control dimension. For example, if we make a rectification of the previous code

<Grid ShowGridLines="True" >

        <Grid.RowDefinitions>

            <RowDefinition></RowDefinition>

            <RowDefinition></RowDefinition>

            <RowDefinition></RowDefinition>

        </Grid.RowDefinitions>

        <Grid.ColumnDefinitions>

            <ColumnDefinition Width="Auto"></ColumnDefinition>

            <ColumnDefinition></ColumnDefinition>

            <ColumnDefinition></ColumnDefinition>

        </Grid.ColumnDefinitions>       

    </Grid>

The grid appearance will be

Figure 5

Cut  Width="Auto"  then drag and drop a button into the grid and make sure that it is contained within the row 0 , column 0 grid cellule and this is the XAML button code.

<Button Grid.Column="0" Grid.Row="0" Width="100" Name="button1">Button</Button>

Now, paste Width="Auto" exactly in its previous place and you will observe this. As you see the button is clipped rather that scrolled.

Figure 6


READ MORE

Introduction 

The RichTextBox control allows you to view and edit text, paragraph, images, tables and other rich text format contents. 

The RichTextBox tag represents a RichTextBox control in XAML. 

<RichTextBox></RichTextBox>  

The Width and Height properties represent the width and the height of a RichTextBox. The Name property represents the name of the control, that is a unique identifier of a control. The Margin property tells the location of a RichTextBox on the parent control. The HorizontalAlignment andVerticalAlignment properties are used to set horizontal and vertical alignments. 

The following code snippet sets the name, height and width of a RichTextBox control. The code also sets the horizontal alignment to left and the vertical alignment to top. 

<RichTextBox Margin="10,10,0,13" Name="RichTextBox1" HorizontalAlignment="Left"   

                 VerticalAlignment="Top" Width="500" Height="300" />  

Displaying and Edit Text 

RichTextBox control hosts a collection of RichTextBoxItem. The following code snippet adds items to a RichTextBox control.


<RichTextBox Margin="10,10,0,13" Name="RichTextBox1" HorizontalAlignment="Left"   
             VerticalAlignment="Top" Width="500" Height="300">  
    <FlowDocument>  
        <Paragraph>  
            I am a flow document. Would you like to edit me?  
            <Bold>Go ahead.</Bold>                  
        </Paragraph>  
        
        <Paragraph Foreground="Blue">            
            I am blue I am blue I am blue.    
        </Paragraph>  
    </FlowDocument>          
</RichTextBox> 

The preceding code generates Figure 1 where you can begin editing text right away.

RichTextBox with editable text

Creating and Using RichTectBox Dynamically 

In the previous section, we saw how to create and use a RichTextBox in XAML. WPF provides the RichTextBox class that represents a RichTextBox control. In this section, we will see how to use this class to create and use a RichTextBox control dynamically. 

The code listed in Listing 1 creates a FlowDocument, adds a paragraph to the flow document and sets the Document property of the RichTextBox to FlowDocument.


private void CreateAndLoadRichTextBox()  
{  
    // Create a FlowDocument  
    FlowDocument mcFlowDoc = new FlowDocument();  
  
    // Create a paragraph with text  
    Paragraph para = new Paragraph();  
    para.Inlines.Add(new Run("I am a flow document. Would you like to edit me? "));  
    para.Inlines.Add(new Bold(new Run("Go ahead.")));  
  
    // Add the paragraph to blocks of paragraph  
    mcFlowDoc.Blocks.Add(para);  
  
    // Create RichTextBox, set its hegith and width  
    RichTextBox mcRTB = new RichTextBox();  
    mcRTB.Width = 560;  
    mcRTB.Height = 280;  
  
    // Set contents  
    mcRTB.Document = mcFlowDoc;  
  
    // Add RichTextbox to the container  
    ContainerPanel.Children.Add(mcRTB);       
}  

Listing 1

The output of Listing 1 generates Figure 2.

Listing 1 doc

Enable Spelling Check 

RichTextBox control comes with spell check functionality out-of-the-box. By setting theSpellCheck.IsEnabled property to true enables spell checking in a RichTextBox

SpellCheck.IsEnabled="True"  

You can set this in code as follows:

mcRTB.SpellCheck.IsEnabled = true;  

Now if you type some text, the wrong word would be underlined with the Red color. See in Figure 3.

RichTextBox with Spell Check Enabled


Loading a Document in RichTextBox
We can use the RichTextBox.Items.Remove or RichTextBox.Items.RemoveAt methods to delete an item from the collection of items in the RichTextBox. The RemoveAt method takes the index of the item in the collection. 
Now, we modify our application and add a new button called Delete Item. The XAML code for this button looks as in the following:  

private void LoadTextDocument(string fileName)  
{  
    TextRange range;  
    System.IO.FileStream fStream;  
    if (System.IO.File.Exists(fileName))  
    {  
        range = new TextRange(RichTextBox1.Document.ContentStart, RichTextBox1.Document.ContentEnd);  
        fStream = new System.IO.FileStream(fileName, System.IO.FileMode.OpenOrCreate);  
        range.Load(fStream, System.Windows.DataFormats.Text );  
        fStream.Close();  
    }  
}

READ MORE

The XAML Tooltip element represents a window tooltip. A ToolTip is a pop-up window that displays some information in a small window. This article shows how to use a ToolTip control in WPF.

Creating a ToolTip

The ToolTip element represents a ToolTip control in XAML

<ToolTip/>  

The IsOpen property indicates whether or not a ToolTip is visible. The HorizontalOffset and VerticalOffsetproperties represent the horizontal and vertical distance between the target control and the pop-up window. The Content property represents the contents of the ToolTip. 

The code snippet in Listing 1 creates a ToolTip control and sets the horizontal offset, vertical offset and content of a ToolTip control. 


<ToolTip Content="Hello! I am a ToolTip."   
HorizontalOffset="10" VerticalOffset="20"/> 

                                                            Listing 1

The output looks as in Figure 1. 

                                              Creating a ToolTip
                                       

ToolTip Service

To display a tooltip for a control, the ToolTipService class must be used. The SetToolTip and GetToolTipstatic methods are used to set and get the tooltip of a control. 

The following code snippet creates a ToolTipService.ToolTip for a control.


<ToolTipService.ToolTip >   
    <ToolTip Content="Hello! I am a ToolTip."   
    HorizontalOffset="10" VerticalOffset="20"/>  
</ToolTipService.ToolTip>   


 <Button Content="Mouse over me" Width="150" Height="30"  
        Canvas.Top="10" Canvas.Left="10">  
    <ToolTipService.ToolTip >   
        <ToolTip Content="Hello! I am a ToolTip."   
        HorizontalOffset="10" VerticalOffset="20"/>  
    </ToolTipService.ToolTip>  
</Button>                                            


Then if you run the application and hover the mouse over the button control, the output looks as in Figure 2.

                                    ToolTip Service
                                                       

Creating a Fancy Tooltip

The ToolTip content can be any control and multiple controls. The code snippet in Listing 4 creates aToolTip with an image and text in it. 

          <!-- Create a button -->  
<Button Content="Mouse over me" Width="150" Height="30"   
        Canvas.Top="50" Canvas.Left="20">  
    <!-- Create a tooltip by using the ToolTipService -->  
    <ToolTipService.ToolTip >  
        <ToolTip HorizontalOffset="0" VerticalOffset="0">  
            <!-- Add a StackPanel to the tooltip content -->  
            <StackPanel Width="250" Height="150">  
                <!-- Add an image -->  
                <StackPanel.Background>  
                    <ImageBrush ImageSource="Garden.jpg"  
                                Opacity="0.4"/>  
                </StackPanel.Background>  
                <!-- Add a text block -->  
                <TextBlock >  
                    <Run Text="This is a tooltip with an image and text"  
                        FontFamily="Georgia" FontSize="14" Foreground="Blue"/>  
                </TextBlock>  
            </StackPanel>  
        </ToolTip>  
    </ToolTipService.ToolTip>  
</Button>                                       


The new tooltip looks as :

                  Creating a Fancy Tooltip


READ MORE

The XAML Toolbar element represents a window toolbar. A ToolBar control is a group of controls that are typically related in functionality. A typical ToolBar is a toolbar in Microsoft Word and Visual Studio where you see File Open, Save and Print buttons. 

This article discusses basic components of ToolBar controls in WPF and how to use them in your applications. 

Creating a Toolbar

The ToolBar element in XAML represents a WPF ToolBar control. 

<ToolBar />  
The code snippet in Listing 1 creates a ToolBar control and sets its width and height properties. You may place any control on a ToolBar but typically buttons are used. A ToolBar sits on a ToolBarTray. The code snippet in Listing 1 adds three buttons to the ToolBar and places a ToolBar on a ToolBarTray.
<ToolBarTray Background="DarkGray" Height="30" VerticalAlignment="Top">  
  
<ToolBar Name="MyToolbar" Width="200" Height="30" >  
    <Button Background="LightSkyBlue" Content="Open" />  
    <Button Background="LightSkyBlue" Content="Close" />  
    <Button Background="LightSkyBlue" Content="Exit" />  
</ToolBar>  
  
</ToolBarTray>  
                                                      Listing 1


The output looks as in Figure 1. 

         window
                                                      Figure 1

Adding ToolBar Button Click Event Handlers

The best part of WPF is that these buttons are WPF Button controls so you have a choice to use them on any other button. You may format them the way you like. You may add a click event handler to them and so on. 

The code snippet in Listing 2 adds click event handlers to all three ToolBar buttons. 
<ToolBar Name="MyToolbar" Width="200" Height="30"  >  
    <Button Background="LightSkyBlue" Content="Open" Name="OpenButton" Click="OpenButton_Click"  />  
    <Button Background="LightSkyBlue" Content="Close" Name="CloseButton" Click="CloseButton_Click"  />  
    <Button Background="LightSkyBlue" Content="Exit" Name="ExitButton" Click="ExitButton_Click"   />  
 </ToolBar>  
                                                      Listing 2

On these button click event handlers, you would want to write the code you want to execute when these buttons are clicked. For example, I show a message when these buttons are clicked. The code for these button click event handlers is as in Listing 3.
private void OpenButton_Click(object sender, RoutedEventArgs e)  
{  
    MessageBox.Show("Open button is clicked.");  
}  
  
private void CloseButton_Click(object sender, RoutedEventArgs e)  
{  
    MessageBox.Show("Close button is clicked.");  
}  
  
private void ExitButton_Click(object sender, RoutedEventArgs e)  
{  
    MessageBox.Show("Exit button is clicked.");  
}  
                                                      Listing 3

If you click on the Open button, you will see Figure 2 as output. 

                                    button
                                                      Figure 2

Adding Images to ToolBar Buttons 

Usually ToolBars look nicer than just displaying text. In most cases, they have icons. Displaying an Icon image on a button is simply placing an Image control as the content of a Button. The code snippet in Listing 4 changes the Button contents from text to images. 
<ToolBarTray Background="DarkGray" Height="30" VerticalAlignment="Top">  
    <ToolBar Name="MyToolbar" Width="200" Height="30" Background="LightCoral" >  
        <Button Name="OpenButton" Click="OpenButton_Click">  
            <Image Source="Images\camera.png" />  
         </Button>  
        <Button Name="CloseButton" Click="CloseButton_Click">  
            <Image Source="Images\ctv.png" />  
        </Button>  
        <Button Name="ExitButton" Click="ExitButton_Click" >  
            <Image Source="Images\find.png" />  
        </Button>  
    </ToolBar>  
</ToolBarTray>  
                                                      Listing 4

The new ToolBar looks as in Figure 3.

                    ToolBar
                                                      Figure 3

Adding Separators to a ToolBar

You may use a Separator control to give your ToolBar buttons a more prominent look. The code snippet in Listing 4 adds a few extra buttons and a few separators to a ToolBar.
<ToolBarTray Background="DarkGray" Height="30" VerticalAlignment="Top">  
    <ToolBar Name="MyToolbar" Width="180" Height="30" Background="LightCoral" >  
        <Separator />  
        <Button Name="OpenButton" Click="OpenButton_Click">  
            <Image Source="Images\camera.png" />  
         </Button>  
        <Button Name="CloseButton" Click="CloseButton_Click">  
            <Image Source="Images\ctv.png" />  
        </Button>  
        <Button Name="ExitButton" Click="ExitButton_Click" >  
            <Image Source="Images\find.png" />  
        </Button>  
        <Separator Background="Yellow" />  
        <Button >  
            <Image Source="Images\award.png" />  
        </Button>  
        <Button >  
            <Image Source="Images\cuser.png" />  
        </Button>  
        <Button >  
            <Image Source="Images\next.png" />  
        </Button>  
        <Button >  
            <Image Source="Images\code.png" />  
        </Button>  
        <Separator />  
    </ToolBar>  
</ToolBarTray>  
                                                      Listing 5

The ToolBar with separators looks as in Figure 4. Also, if you notice there is a drop array that is available when buttons do not fit in a ToolBar. If you click on that, you will see the rest of the buttons.

   
         fit in a ToolBar
                                                      Figure 4

Summary

In this article, I discussed how to use a ToolBar control in WPF and C#.

READ MORE

Before Continue to read our first article How to use a TextBlock in WPF and windows phone application Part-1?

http://tech.queryhome.com/94985/how-use-textblock-xaml-wpf-and-windows-phone-application-part

The FontSource property allows loading custom fonts dynamically. The following code snippet sets theFontSource property. 

Uri fontUri = new Uri("SomeFont.ttf", UriKind.Relative);  

StreamResourceInfo MySRI = Application.GetResourceStream(fontUri);  

TextBlock1.FontSource = new FontSource(MySRI.Stream);  

Wrapping, Alignment and Padding 

The TextWrapping property sets the wrap of no wrap text. The following code snippet sets the wrapping text option. 

TextWrapping="Wrap"  

The TextAlignment property sets the text alignment in a TextBlock that is of type TextAlignmentenumeration. A text can be aligned left, center, or right. 

TextAlignment="Right"  

The Padding property sets the space between a boundary and the text that can be applied to all sides or a selected side of the boundary. The padding spacing is based on left, right, top and bottom. If you specify only a single value, the padding will be applied to all four sides and if you specify two values, it will be applied to LeftTop and BottomRight sides. 

Listing 5 shows all these properties in a complete sample.

<TextBlock Name="TextBlock1" Height="30" Width="200"   

    Text="Hello! I am a TextBlock." Foreground="Red"  

    Margin="10,10,0,0" VerticalAlignment="Top"   

    HorizontalAlignment="Left"  

    FontSize="14" FontFamily="Verdana" FontWeight="Bold"  

    TextWrapping="Wrap" TextAlignment="Center" Padding="2">  

</TextBlock>  

                                                      Listing 5

Inlines

The Inlines property represents the collection of inline text within a TextBlock control. A Run object represents an inline text and can be treated as its own text control and have its foreground and font related properties. 

Listing 6 sets the Inlines property of the TextBlock and sets various fonts and foreground colors. 

<TextBlock.Inlines>  

    <Run FontWeight="Bold" FontSize="14" Text="Hi! I am a TextBlock. " />   

    <Run FontStyle="Italic" Foreground="Red" Text="This is red text. " />  

    <Run FontStyle="Italic" FontSize="18" Text="Here is some linear gradient text. ">  

        <Run.Foreground>  

            <LinearGradientBrush>   

                <GradientStop Color="Green" Offset="0.0" />   

                <GradientStop Color="Purple" Offset="0.25" />   

                <GradientStop Color="Orange" Offset="0.5" />   

                <GradientStop Color="Blue" Offset="0.75" />   

              </LinearGradientBrush>   

        </Run.Foreground>  

    </Run>              

    <Run FontStyle="Italic" Foreground="Green" Text="How about adding some green? " />              

</TextBlock.Inlines>  

                                                      Listing 6

The new output looks as in Figure 5.

                    new output looks
                                                      Figure 5

TextDecorations

The TextDecorations property represents the text decorations that are applied to the content of aTextBlock. WPF supports only underlined text decoration. 

Listing 7 sets the TextDecorations to underline. 

<TextBlock Name="TextBlock1"        

    Margin="10,10,0,0" VerticalAlignment="Top"   

    HorizontalAlignment="Left"  

    FontSize="12" FontFamily="Verdana"   

    TextWrapping="Wrap" TextAlignment="Left" Padding="2"  

           TextDecorations="Underline">  

                                                      Listing 7

The new output looks as in Figure 6.

              new output looks like
                                                      Figure 6

Summary

In this article, I discussed how to create and format a TextBlock control in WPF and C#. Then we saw how to create a TextBlock control dynamically. Then we saw how to set various properties of a TextBlock such as fonts, Inlines and text decorations.

READ MORE
...