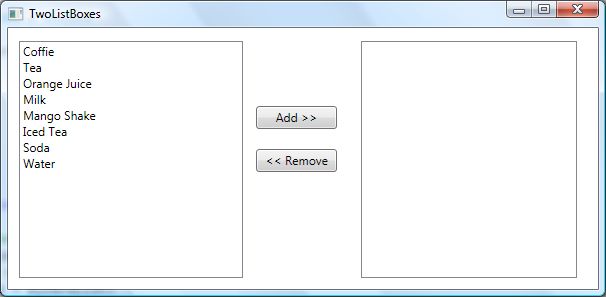
The following XAML code generates two ListBox control and two Button controls.
<ListBox Margin="11,13,355,11" Name="LeftListBox" />
<ListBox Margin="0,13,21,11" Name="RightListBox" HorizontalAlignment="Right" Width="216" />
<Button Name="AddButton" Height="23" Margin="248,78,261,0" VerticalAlignment="Top"
Click="AddButton_Click">Add >></Button>
<Button Name="RemoveButton" Margin="248,121,261,117"
Click="RemoveButton_Click"><< Remove</Button>
On the Window loaded event, we create and load data items to the ListBox by setting the ItemsSourceproperty to an ArrayList.
private void Window_Loaded(object sender, RoutedEventArgs e)
{
// Get data from somewhere and fill in my local ArrayList
myDataList = LoadListBoxData();
// Bind ArrayList with the ListBox
LeftListBox.ItemsSource = myDataList;
}
/// <summary>
/// Generate data. This method can bring data from a database or XML file
/// or from a Web service or generate data dynamically
/// </summary>
/// <returns></returns>
private ArrayList LoadListBoxData()
{
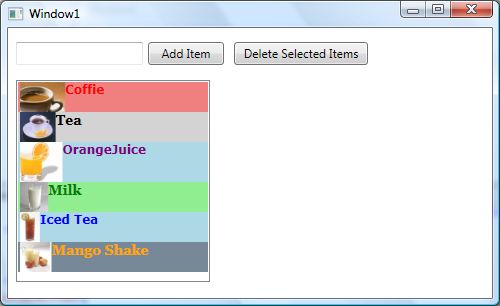
ArrayList itemsList = new ArrayList();
itemsList.Add("Coffie");
itemsList.Add("Tea");
itemsList.Add("Orange Juice");
itemsList.Add("Milk");
itemsList.Add("Mango Shake");
itemsList.Add("Iced Tea");
itemsList.Add("Soda");
itemsList.Add("Water");
return itemsList;
}
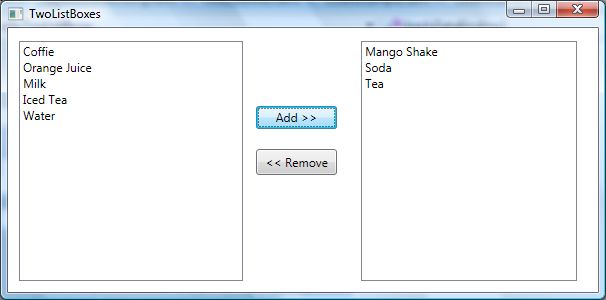
On the Add button click event handler, we get the value and index of the selected item in the left sideListBox and add that to the right side ListBox and remove that item from the ArrayList that is our data source. The ApplyBinding method simply removes the current binding of the ListBox and rebinds with the updated ArrayList.
private void AddButton_Click(object sender, RoutedEventArgs e)
{
// Find the right item and it's value and index
currentItemText = LeftListBox.SelectedValue.ToString();
currentItemIndex = LeftListBox.SelectedIndex;
RightListBox.Items.Add(currentItemText);
if (myDataList != null)
{
myDataList.RemoveAt(currentItemIndex);
}
// Refresh data binding
ApplyDataBinding();
}
/// <summary>
/// Refreshes data binding
/// </summary>
private void ApplyDataBinding()
{
LeftListBox.ItemsSource = null;
// Bind ArrayList with the ListBox
LeftListBox.ItemsSource = myDataList;
}
Similarly, on the Remove button click event handler, we get the selected item text and index from the right side ListBox and add that to the ArrayList and remove from the right side ListBox.
private void RemoveButton_Click(object sender, RoutedEventArgs e)
{
// Find the right item and it's value and index
currentItemText = RightListBox.SelectedValue.ToString();
currentItemIndex = RightListBox.SelectedIndex;
// Add RightListBox item to the ArrayList
myDataList.Add(currentItemText);
RightListBox.Items.RemoveAt(RightListBox.Items.IndexOf(RightListBox.SelectedItem));
// Refresh data binding
ApplyDataBinding();
}
Data Binding with a Database
We use the Northwind.mdf database that is provided with SQL Server. In our application, we will read data from the Customers table. The Customers table columns looks as in Figure 9.
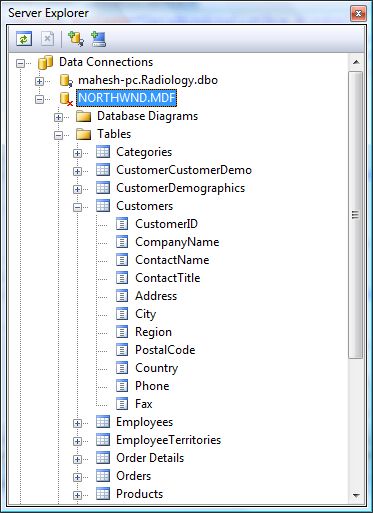
Figure 9
We will read ContactName, Address, City and Country columns in a WPF ListBox control. The finalListBox looks as in Figure 10.
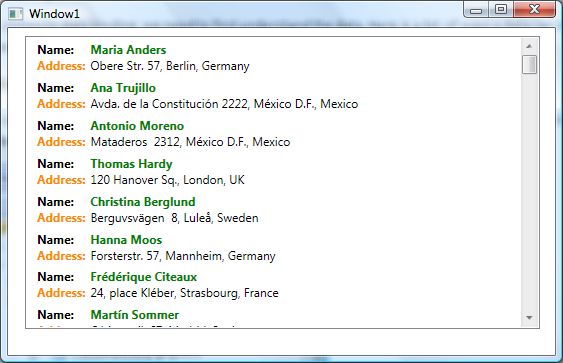
Figure 10
Now let's look at our XAML file. We create a resources DataTemplate type called listBoxTemplate. A data template is used to represent data in a formatted way. The data template has two dock panels where the first panel shows the name and the second panel shows address, city and country columns using TextBlock controls.
<Window.Resources>
<DataTemplate x:Key="listBoxTemplate">
<StackPanel Margin="3">
<DockPanel >
<TextBlock FontWeight="Bold" Text="Name:"
DockPanel.Dock="Left"
Margin="5,0,10,0"/>
<TextBlock Text=" " />
<TextBlock Text="{Binding ContactName}" Foreground="Green" FontWeight="Bold" />
</DockPanel>
<DockPanel >
<TextBlock FontWeight="Bold" Text="Address:" Foreground ="DarkOrange"
DockPanel.Dock="Left"
Margin="5,0,5,0"/>
<TextBlock Text="{Binding Address}" />
<TextBlock Text=", " />
<TextBlock Text="{Binding City}" />
<TextBlock Text=", " />
<TextBlock Text="{Binding Country}" />
</DockPanel>
</StackPanel>
</DataTemplate>
</Window.Resources>